LX3V-2TC
1 Mounting instruction
Before the installation must be ensure that the PLC host and BD associated equipment power off. Please install the BD module in the corresponding position of the PLC, and lock the four standard screws. If environmental dust is bigger, please cover BD right part by PLC’s cover. Please do not power operation.
Caution
This BD module only support the following firmware versions or later. Users can check the PLC firmware version in D8001.
- LX3VP:25103;
- LX3VE: 25201;
- LX3V-A2:25014;
- LX3V-A1: 22006;
- LX2V: 24005;
When mounting module to PLC, all the lights are blinking after power ON PLC, please purchase new PLC.
Please fixed BD module on the PLC, poor contact may lead to failure.
BD module and top cover of PLC’s tightening torque is 0.3 ~ 0.6 N.m.
Warning
Make sure to power off the PLC before mounting or removing the BD module and put the cover in right place.
2 Special feature
- LX3V-2TC-BD module equips with 2 channels analog output. This module will be mounted in the PLC, so there is no need to change the installation area of the PLC.
- The type to AD convert of LX3V-2TC-BD is a thermocouple input type (K/J), and the converted digital value of each channel is stored in special registers, but the mode of analog-to-digital conversion cannot be changed. The corresponding channel as following table shows.
| Extension port 1 (far away from PLC LED) | Extension port 2 (near PLC LED) | ||
| Address | Description | Address | Description |
| M8112 | The flag of thermocouple switch in CH1 OFF: K type ON: J type | M8116 | The flag of thermocouple switch in CH1 OFF: K type ON: J type |
| M8113 | The flag of thermocouple switch in CH2 OFF: K type ON: J type | M8117 | The flag of thermocouple switch in CH2 OFF: K type ON: J type |
| D8112 | CH1 temperature (unit: 0.1) | D8116 | CH1 temperature (unit: 0.1) |
| D8113 | CH2 temperature (unit: 0.1) | D8117 | CH2 temperature (unit: 0.1) |
3 Dimension
| Applied sensor: 2-wire thermocouple(K/J) | |
| L1+ | Positive pole of CH1’s sensor |
| L1- | Negative pole of CH1’s sensor |
| FG | None |
| L2+ | Positive pole of CH2’s sensor |
| L2- | Negative pole of CH2’s sensor |

LED lights indicating
- LED1: ON when power ON.
- LED2: flashes when communications.
- LED3 (TC 1): On indicates enable, OFF indicates disable, flicker indicates exceeding the measurement range.
- LED4 (TC 2): On indicates enable, OFF indicates disable, flicker indicates exceeding the measurement range.
If the BD module is plugged into the old firmware version when on the host, all LEDs will be flashing.
4 Specifications
- Please refer to the LX3V user manual for the general specification of LX3V-2TC-BD.
- LX3V-2TC-BD is powered supply by LX3V main unit.
Table 4‑1
| Item | Explanation | |||
| Analog circuitry | DC 24V ±10%, 70mA | |||
| Digital circuitry | DC 5V, 90mA (From the PLC internal power supply) | |||
| Temperature | Read data by buffers | |||
| Analog input signal | Thermocouple: K or J type (2 channels) | |||
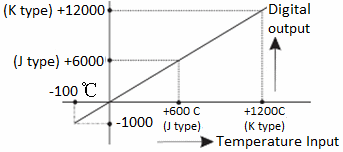
| Range of rated temperature | K | -100℃ - 1200℃ | J | -100℃ - 600℃ |
| Digital output | K | -1000 - 12000 | J | -1000 - 6000 |
| 12 bits total | ||||
| Accuracy | K | 0.4℃ | J | 0.3℃ |
| Overall accuracy | ±0.5% | |||
| Conversion rate | 700ms*2 | |||
| Conversion characteristics |
| |||
✎Note: Ground-type thermocouple (3-wire) is not supported in this BD module.
5 Wire
Warning
Make sure cut off the electricity before installation/disassembly, to prevent electric shock or product damages.
Caution
- Stay away from high-voltage cables to avoid interference or surge;
- Grounding is required, but please do not share the ground site with high-voltage cable;
- Do not weld any cable ends, and make ensure that the number of connecting cables, no more than a predetermined number;
- Do not connect a substandard cable;
- Fixed cable;
5.1 Suitable cable
Use AWG25-16 to connect the output equipment
The maximal screwing torque is from 0.5 to 0.6N.m
Table 5‑1
| Line type | Cross sectional area(mm2) | End-of-pipe treatment |
|
| AWG26 | 0.1288 | Stranded cable: stripped jacket, rub Conductor, then connect the cable. Single-core cable: stripped jacket, Then connect the cable. | |
| ...... | ...... | ||
| AWG16 | 1.309 |
5.2 Input mode

6 Examples
The value of each channel is storage in the registers (D8112, D8113) in the form of digital. For output, in each "END" instruction, M8114 and M8115 convert the digital value into an analog output.
6.1 Basic Program Examples
Caution:
- M8112 and M8113 are used to analog to digital conversion for CH1 and CH2;
- LX3V-2TC-BD only supports K type and J type thermocouple;
- Don’t try to change the value in D8112 and D8113, or D8116 and D8117 when finished the A/D conversion;
Set CH1 and CH2 as thermocouple input mode, and stored value in D0 and D2.
Set CH1 as K-type thermocouple input mode
Set CH2 as K-type thermocouple input mode
Write the digital value of CH1 into the register D0
Write the digital value of CH2 into the register D2

6.2 Examples of Applications
Since the LX3V-2TC-BD does not have offset and gain functions, if it needs for the values out of the standard specifications, additional programming orders will be needed to multiply or divide the converted value.
Caution
Since the use of additional programming orders, the converted precision and resolution of the analog value are different with the specifications.
The original range of the analog output does not change.
Thermocouple input mode
In Thermocouple input mode, LX3V-2TC-BD covert an analog value to a digital value in degrees Celsius. If in the program is Fahrenheit as a unit it needs to be converted to Celsius value.
Fahrenheit and Celsius conversion formula, Fahrenheit = Celsius * 9/5 + 32, the unit is 0.1 ℃.
D10=D8112*9
D12=D10/5
D0=D12+320
D0=D8112*9/5+320
