3.2 Basic information
Basic information
After adding a v-box or ig HMI, click the device list on the left to select v-box or ig HMI, and it will automatically jump to the device detail interface with seven subpages. The subpages include Real-time Data, Alarm, Historical data, Cloud SCADA, Pass-through, and C onfiguration.
Users can modify the information with valid data, and click the "save" button to finish the modification successfully. As shown in the following figure.
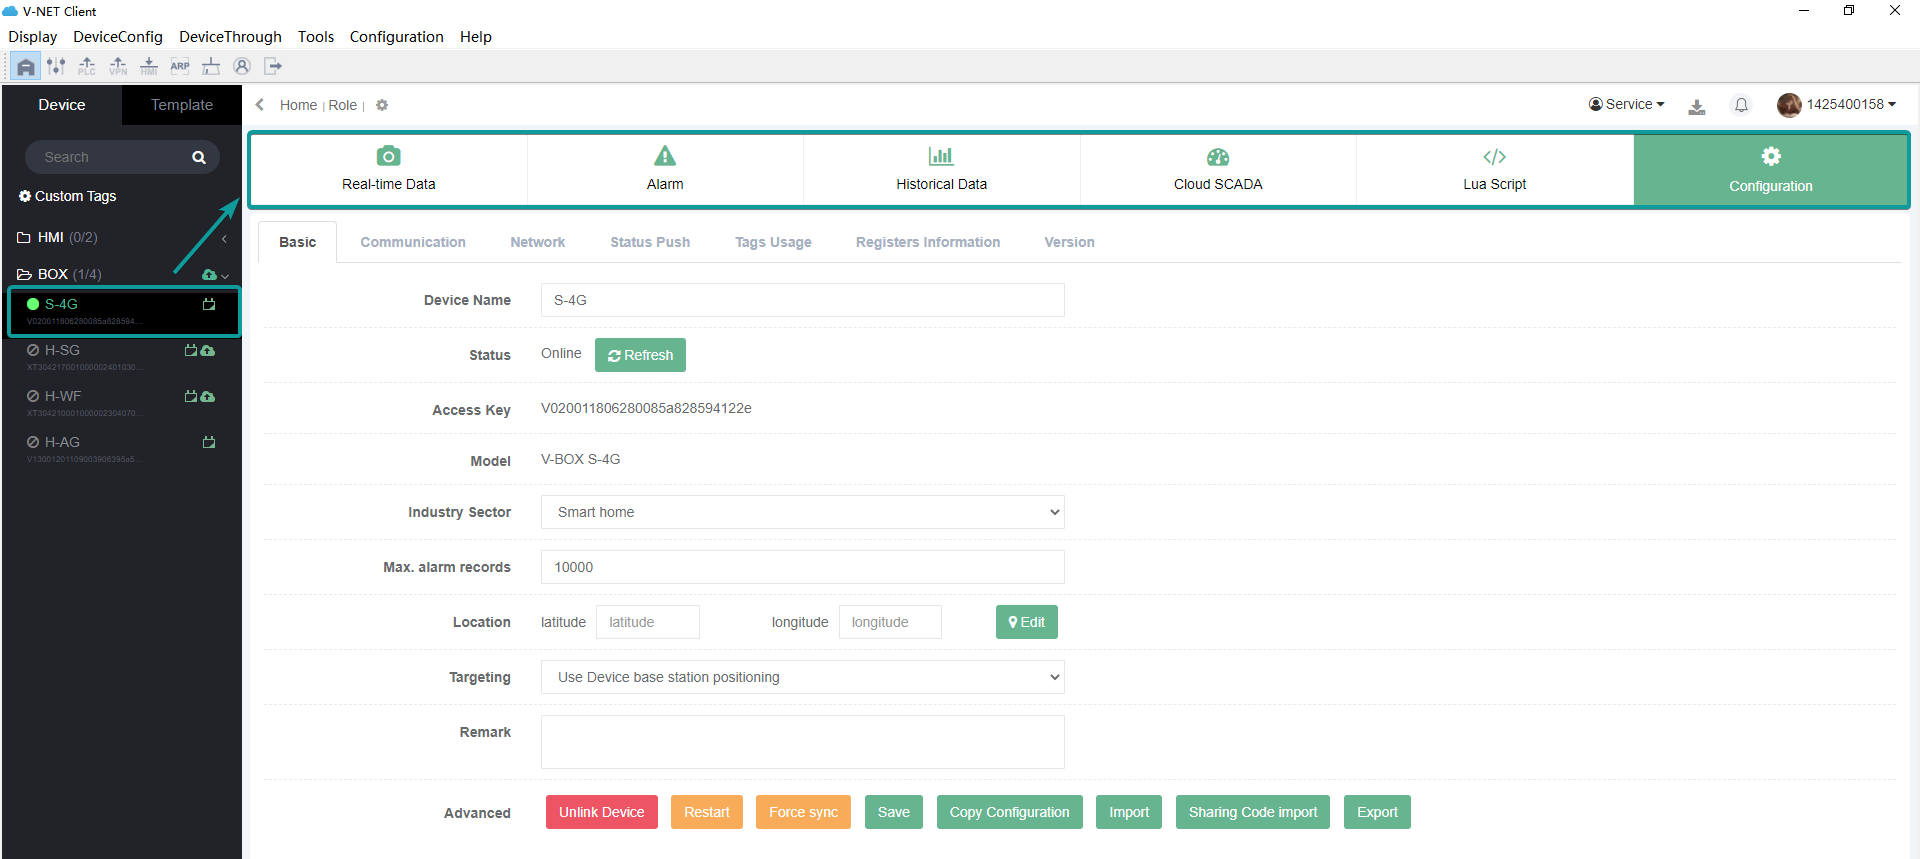
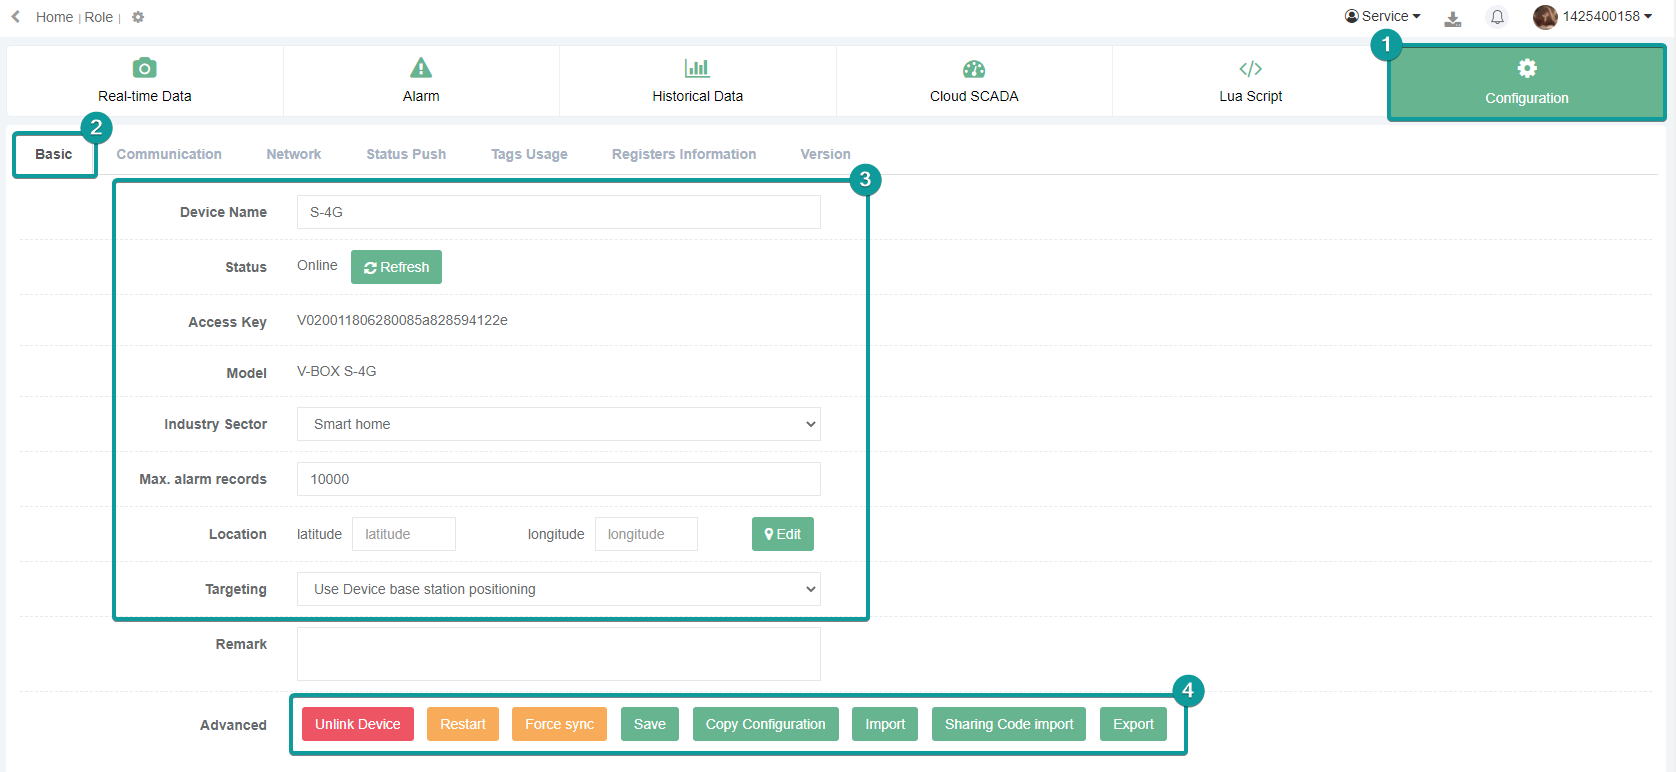
Configuration
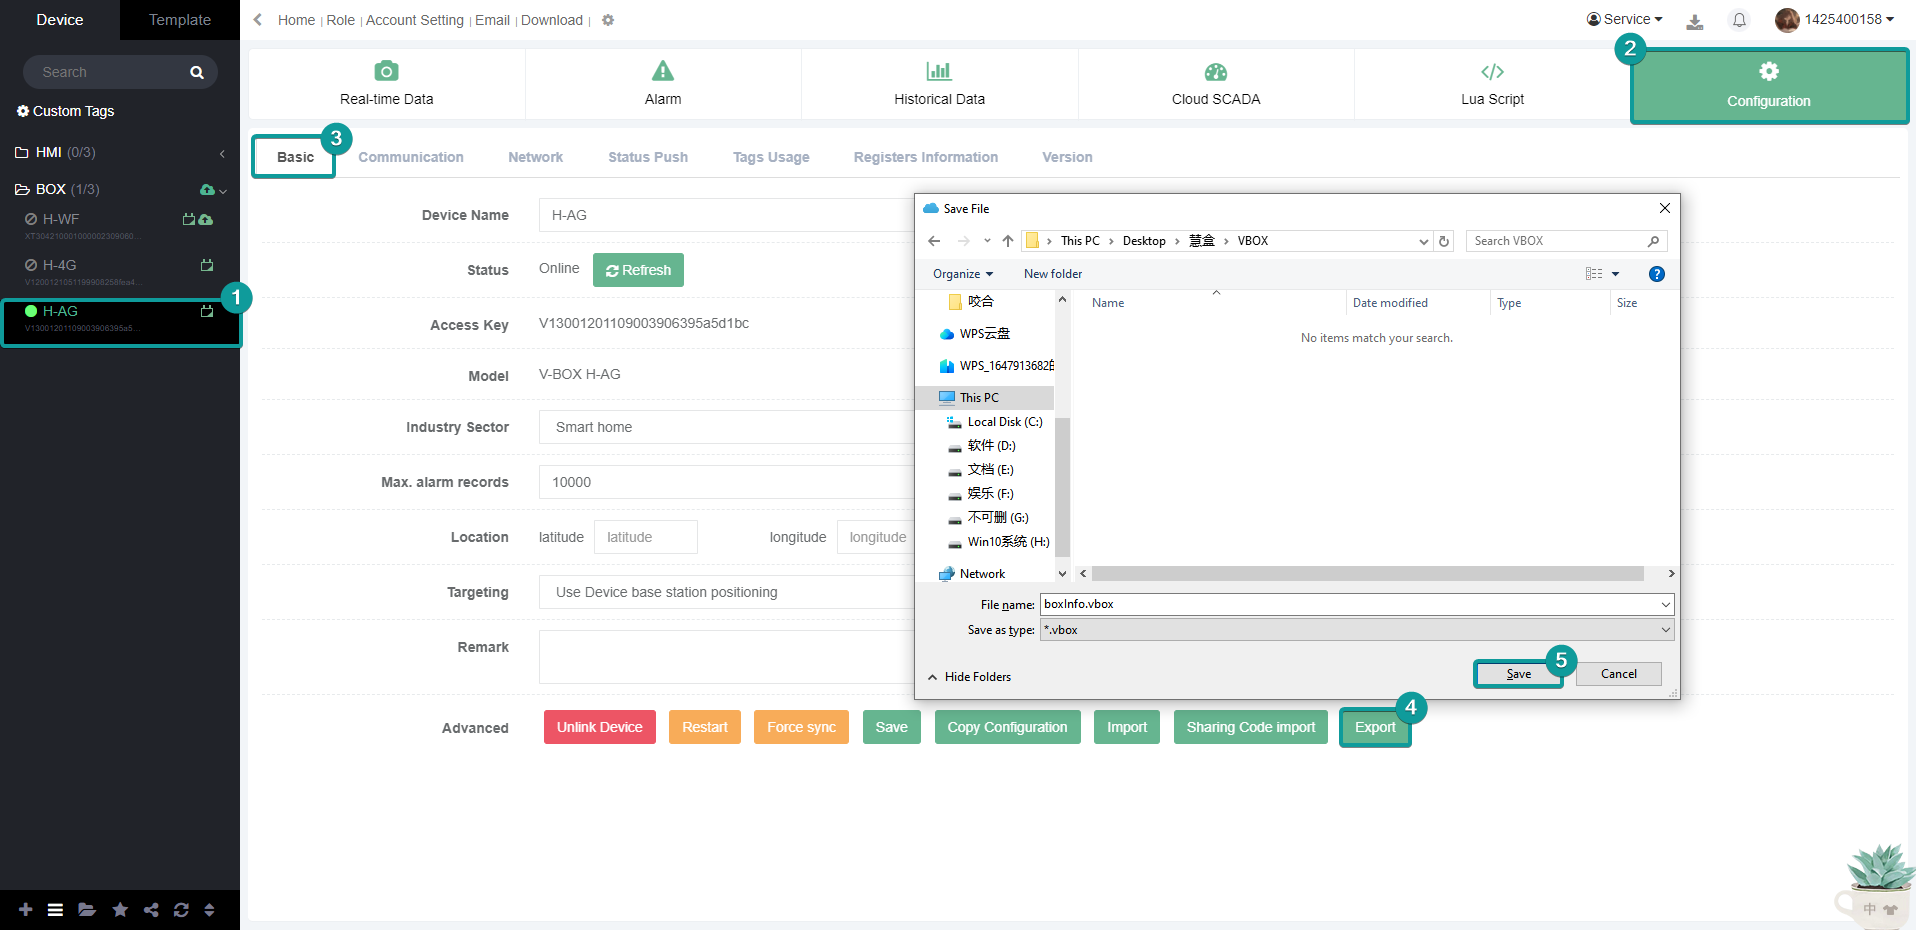
Select "Basic Information", you can see the name of VBOX, online status and some other functions. You can locate the VBOX on the map to know where the VBOX is located.
At the bottom of the basic information, you can Unlink VBOX, restart VBOX, force sync, import and export VBOX configuration. Forced sync is to sync the data directly from cloud service to PC. Import/Export VBOX Configuration, you can export and import the configuration data of existing VBOX to other VBOX, or import the configuration of other VBOX to the existing VBOX.
Unbind the device
The administrator can click "Unlink device" to unbind the v-box or ig screen on the "Basic Information" sub-page under the "Basic Configuration" page. If the configuration of the communication port and monitoring point corresponding to the device is not deleted after unbinding, then the next time the device is added, the data is still exist and automatically transferred to the device. As shown in the following figure.
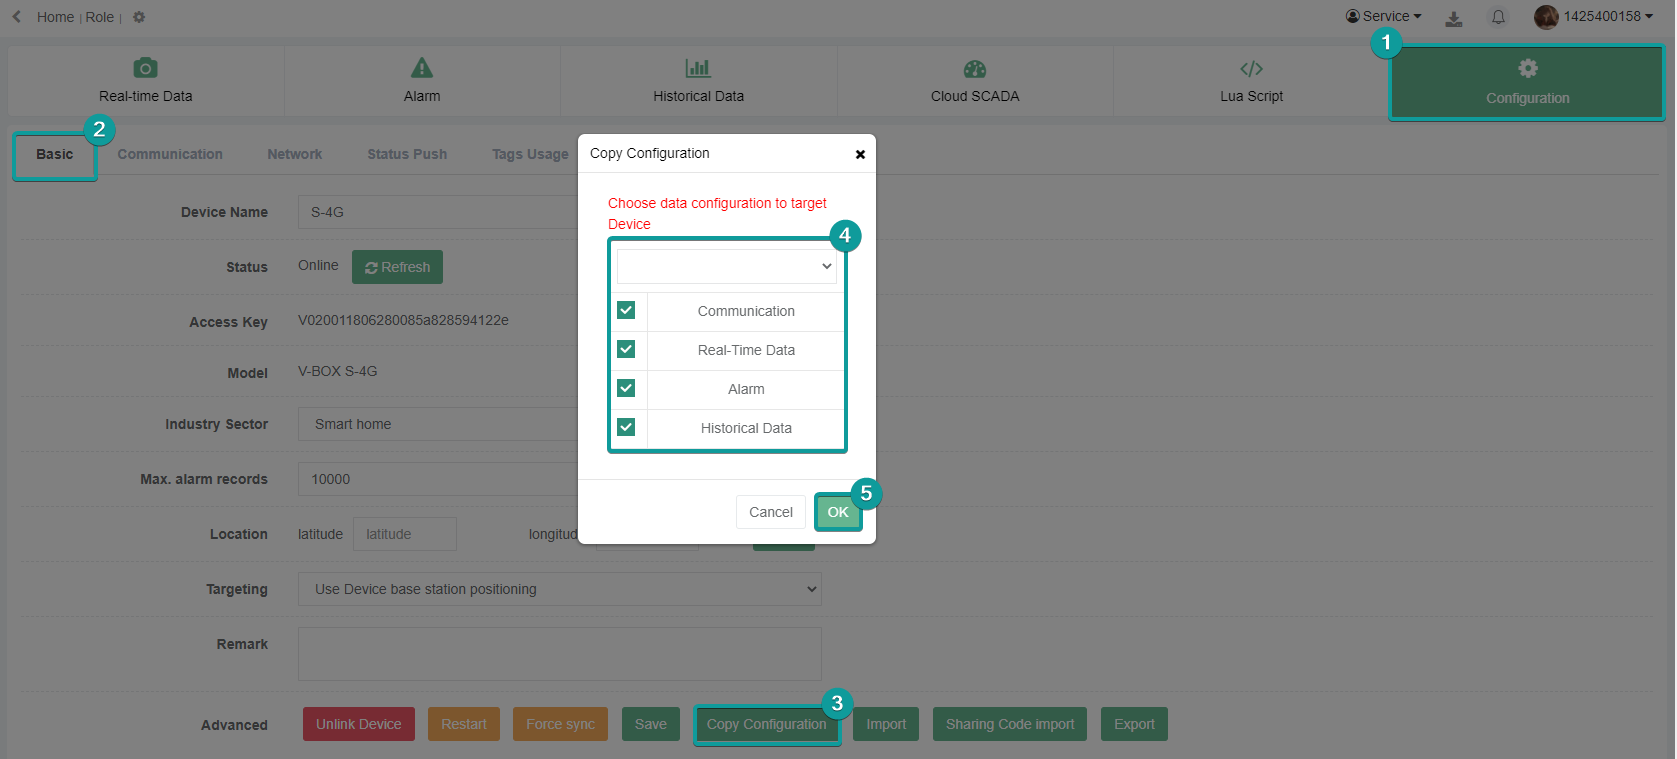
Copy configuration
Copy configuration is to copy the device configuration from one v-box to another v-box. If the configurations of multiple devices are the same or alike, the user can configure the information of one v-box first, and copy the configuration to another v-box through the [Copy Configuration] function. The configuration can only be copied if there is a v-box of the same model in the account. As shown in the following figure.
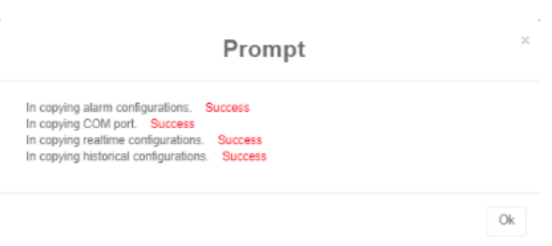
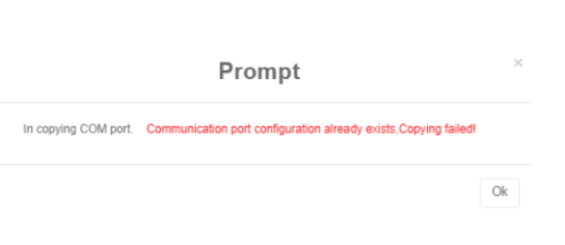
If the configuration is copied successfully, the following figure will be prompted.
Export/Import
Communication
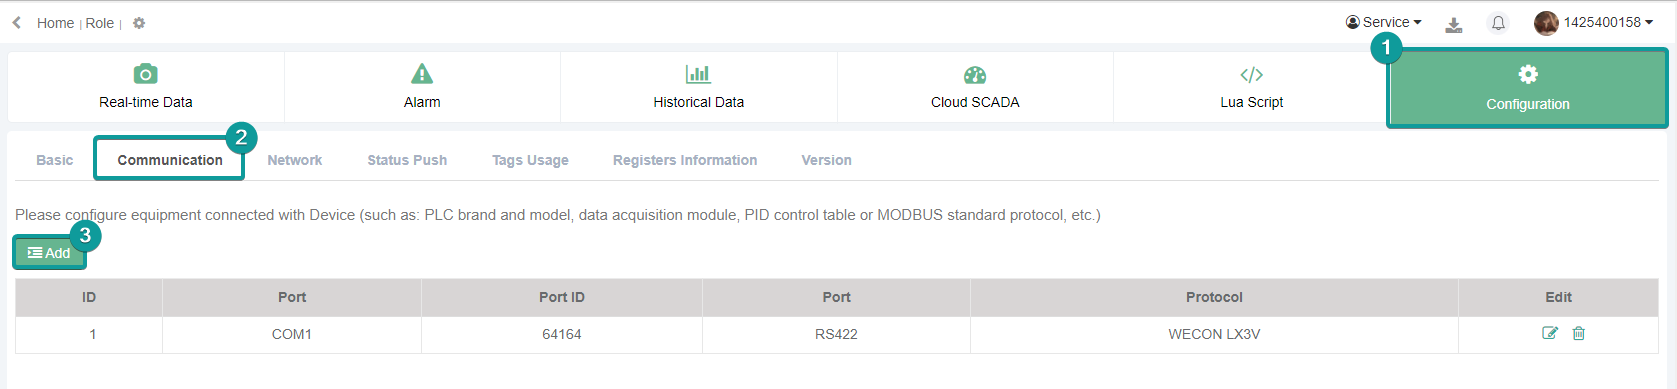
Users can add, modify and delete communication configuration in "Configuration"->"Communication", but only the administrator account has permissions to operate this function.
Add communication port configuration
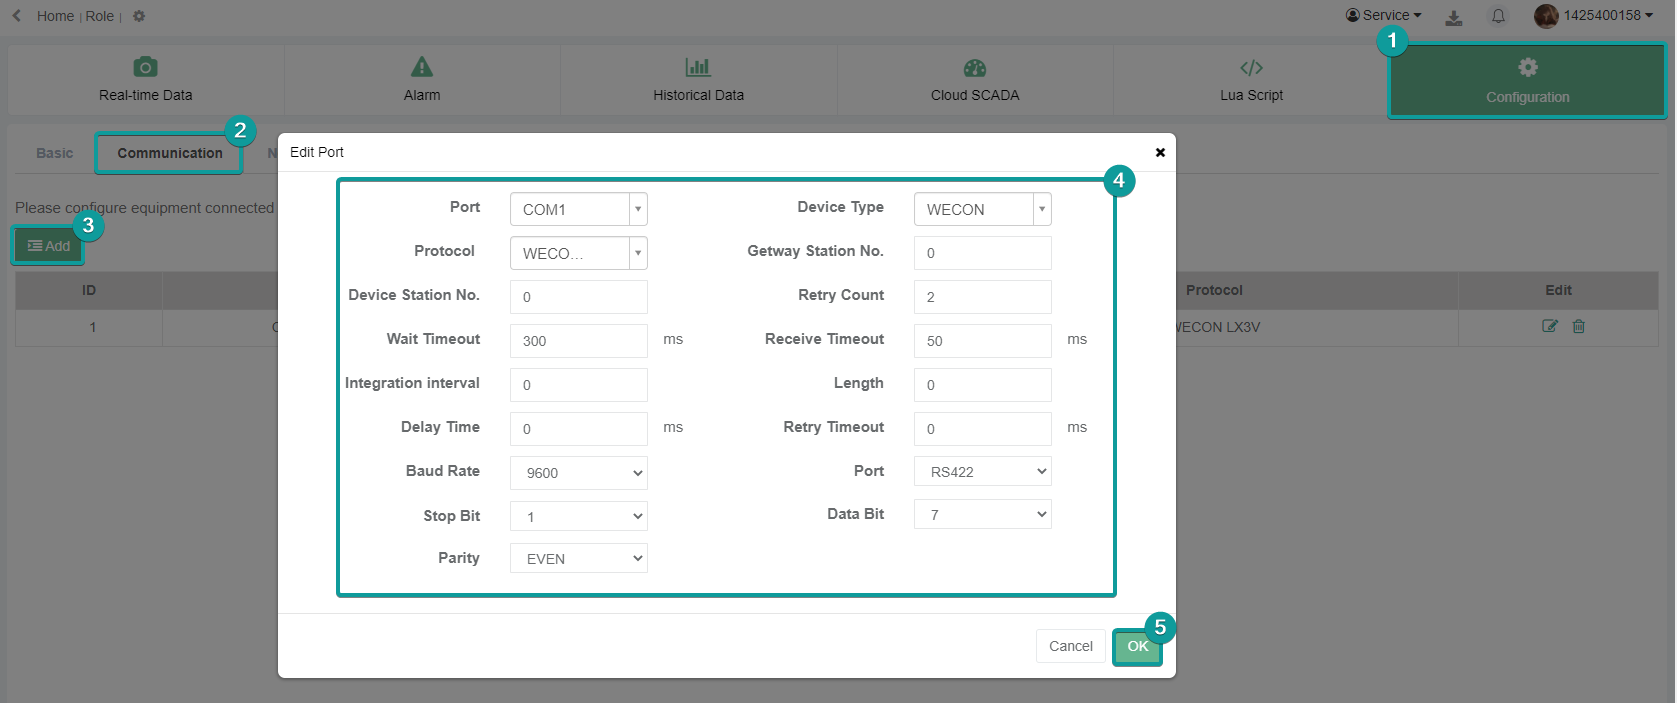
Click the Add button  to configure the communication port information. If the configuration are configured successfully, the system will synchronize the configuration information and drive files to the v-box.
Modify and Delete
The administrator can click the button ![]() to modify the data of the v-box except for the machine code. If the drive file changes, the monitoring point and data of the communication port will be deleted synchronously.
to modify the data of the v-box except for the machine code. If the drive file changes, the monitoring point and data of the communication port will be deleted synchronously.
Click the button ![]() to delete the communication port configuration, the monitoring point data associated with the communication port configuration under the v-box will also be deleted, and a dialog box will pop up to confirm whether the operation continues.
to delete the communication port configuration, the monitoring point data associated with the communication port configuration under the v-box will also be deleted, and a dialog box will pop up to confirm whether the operation continues.
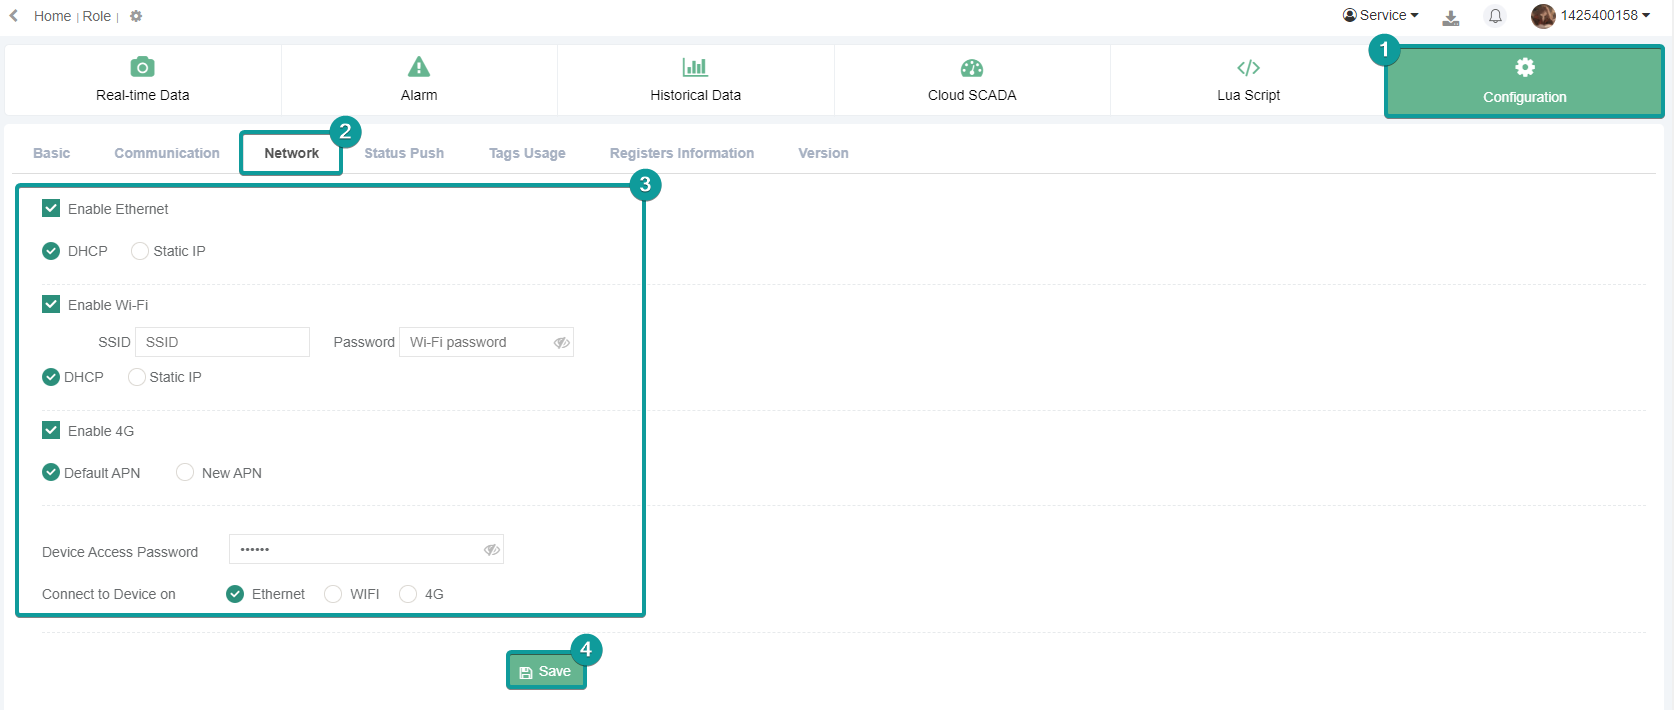
Network
Users can view the network configuration of V-BOX and update and change it.
Status push(Email)
Status push is to push the data set by the v-box to the mailbox.
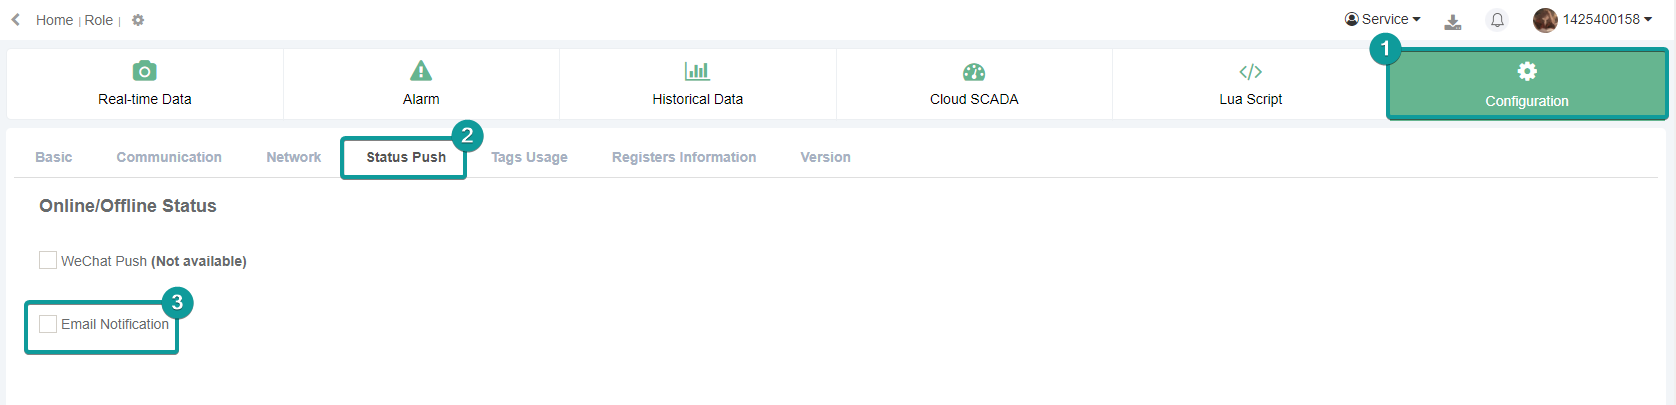
Email notification. Set the email push information in Service--Email.
Add recipient. Add the recipient name, email address, and enable the email permission.
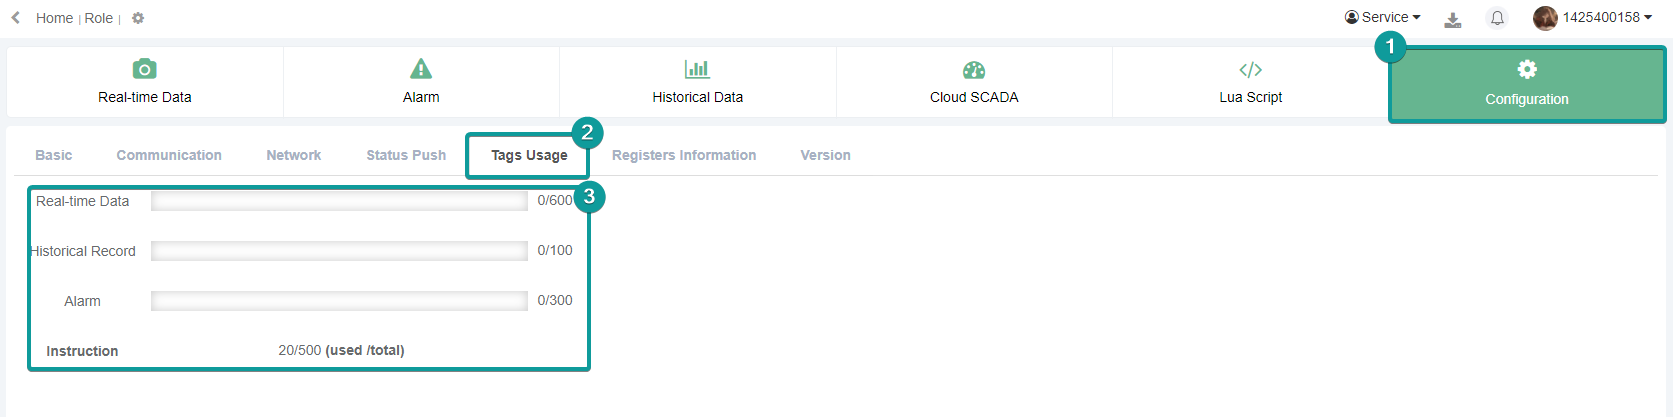
Tags usage
It records the current use and a maximum number of data monitoring points of data monitoring, historical records, and alarm records of the current v-box.
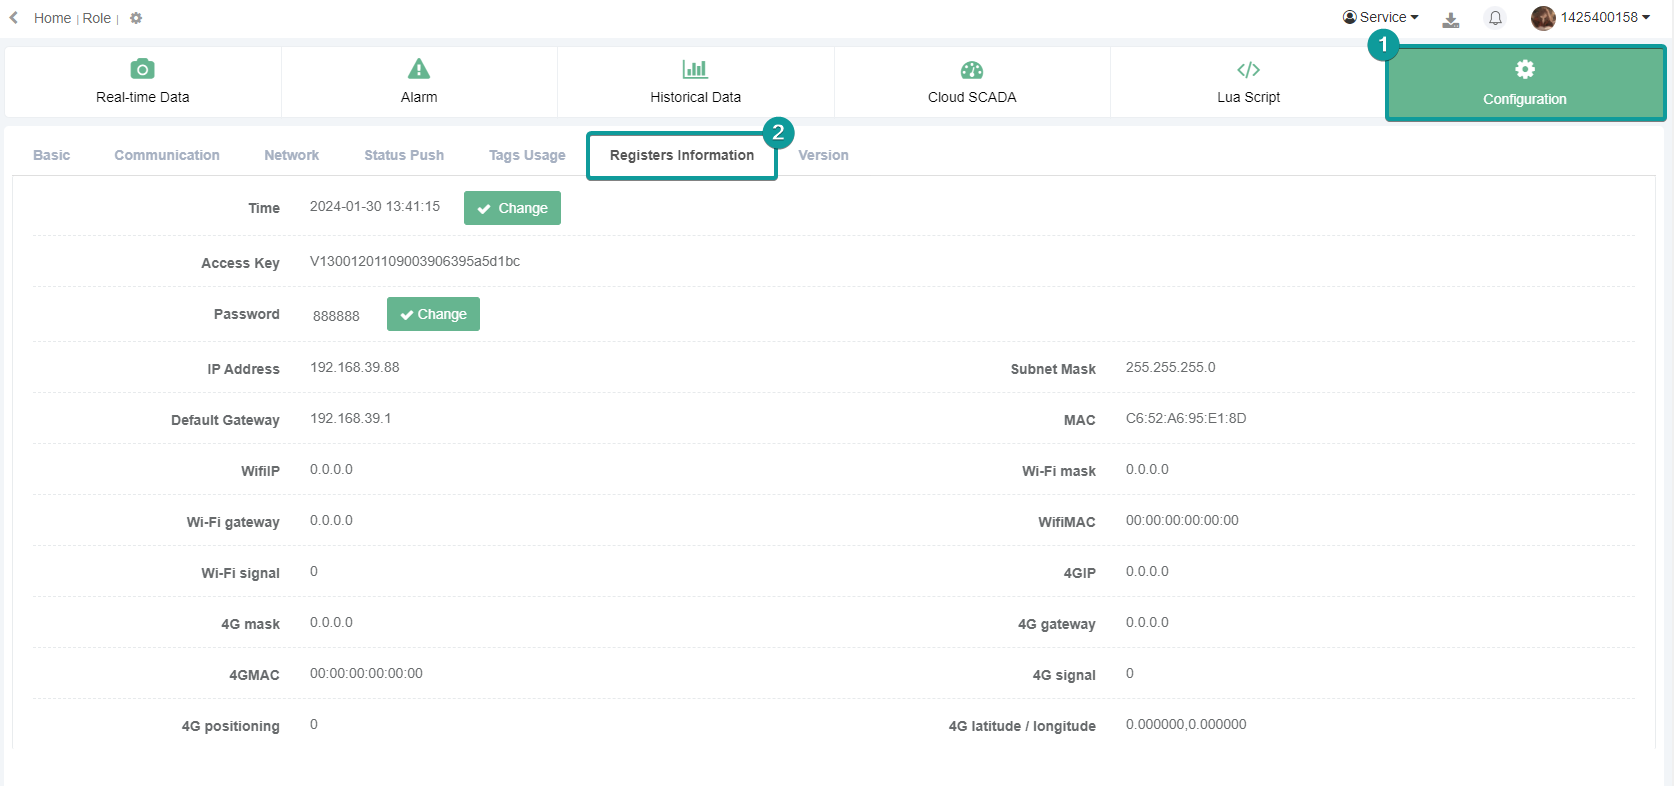
Registers information
It records the V-box information, such as IP address, WIFI.
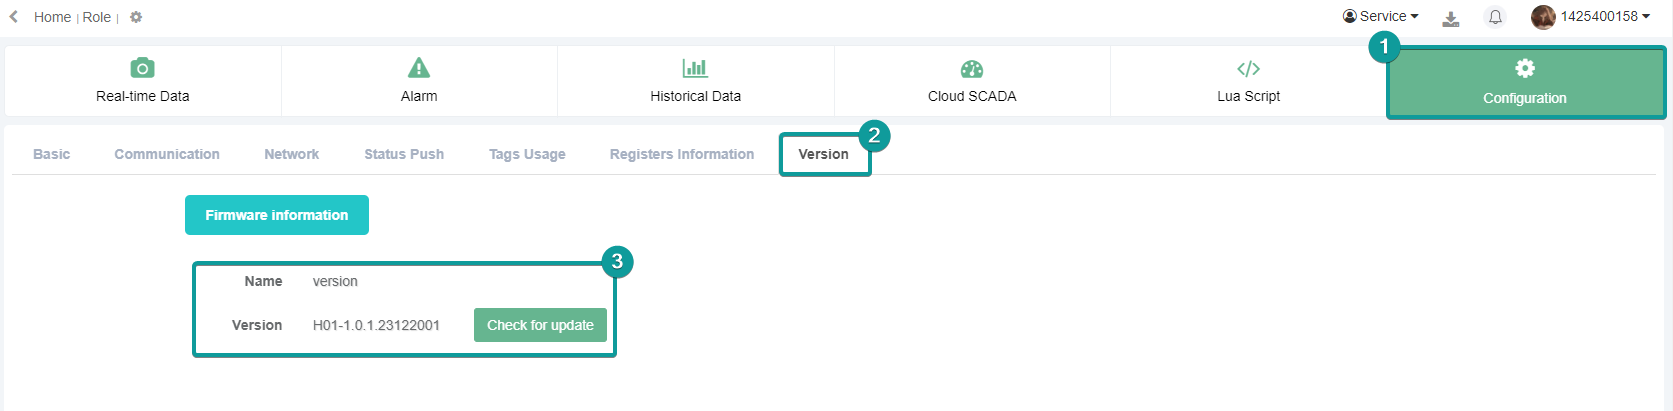
Device version
As the product is constantly updated, the functions of thev-box can be judged based on the version information.
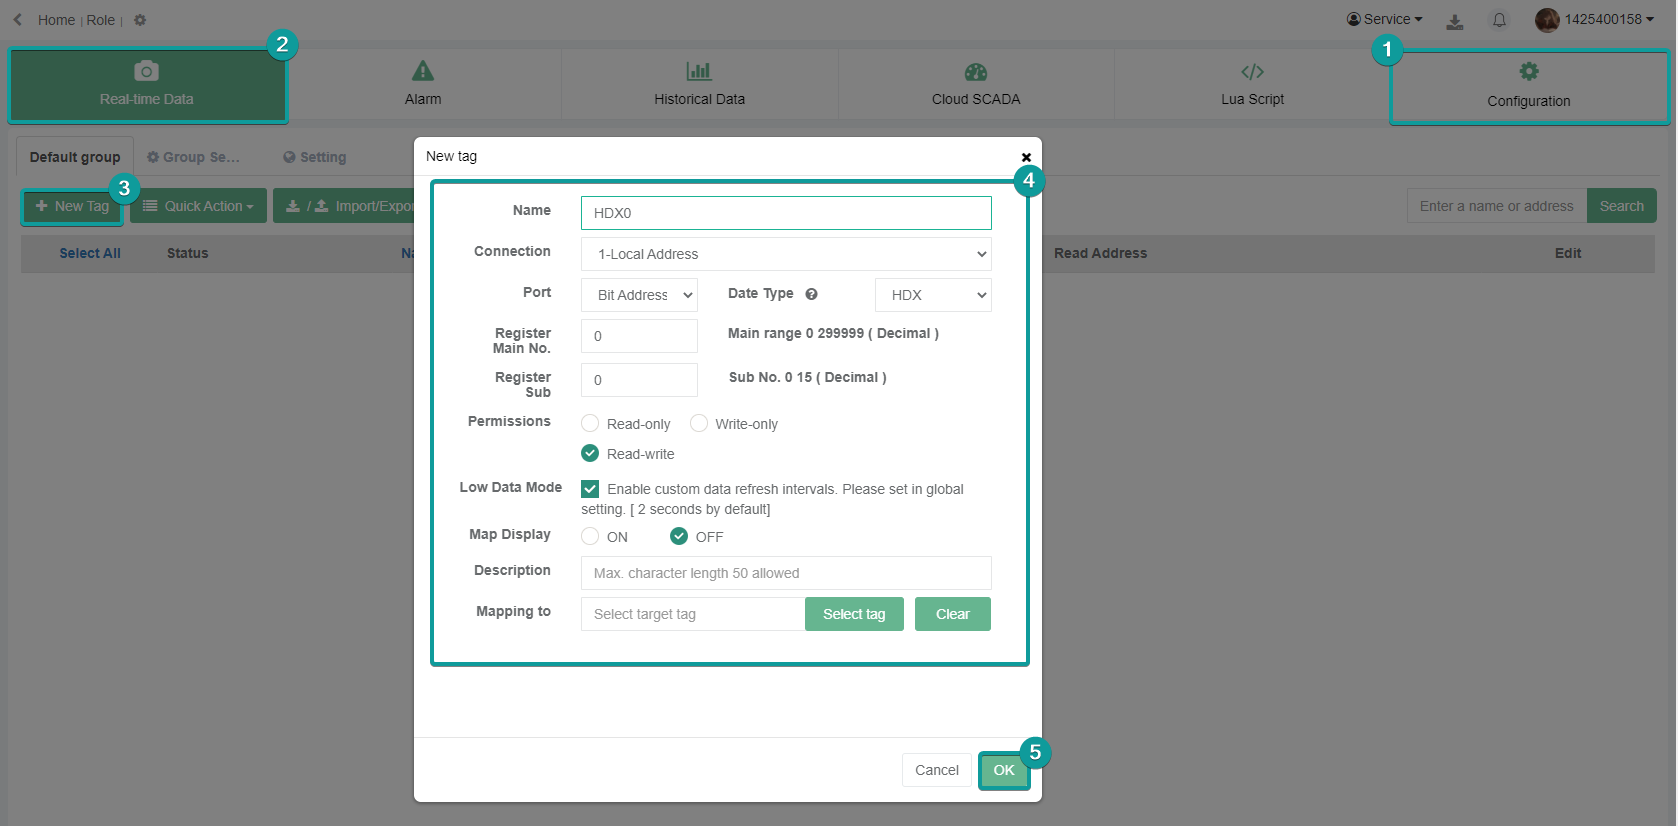
Real-time data
In the "Real-time Data" interface, users can configure real-time monitoring points to easily obtain equipment data, and operate online. To add a real-time monitoring point, users need to select a group or enter the real-time monitoring point name, the connected device (ie, communication port), address type, register type, and other data.
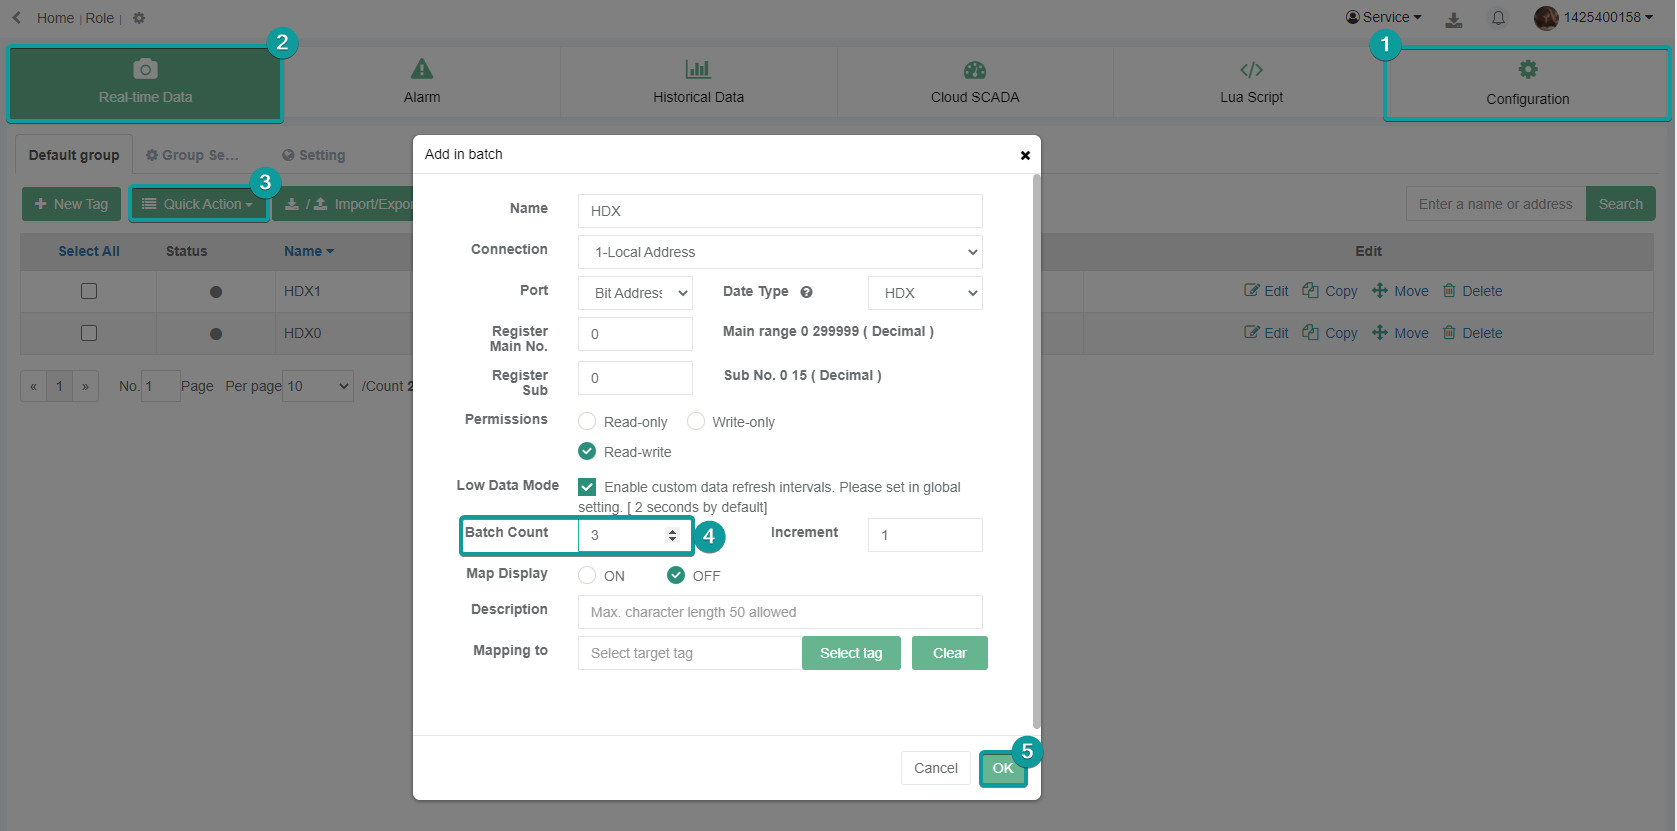
Add and delete in batch
Before batch deletion, select the monitoring points to be deleted, and then select batch deletion. For batch add, you need to set the batch number and increment. The increment is to fill in the address interval settings in those addresses added in batch.
Import and export

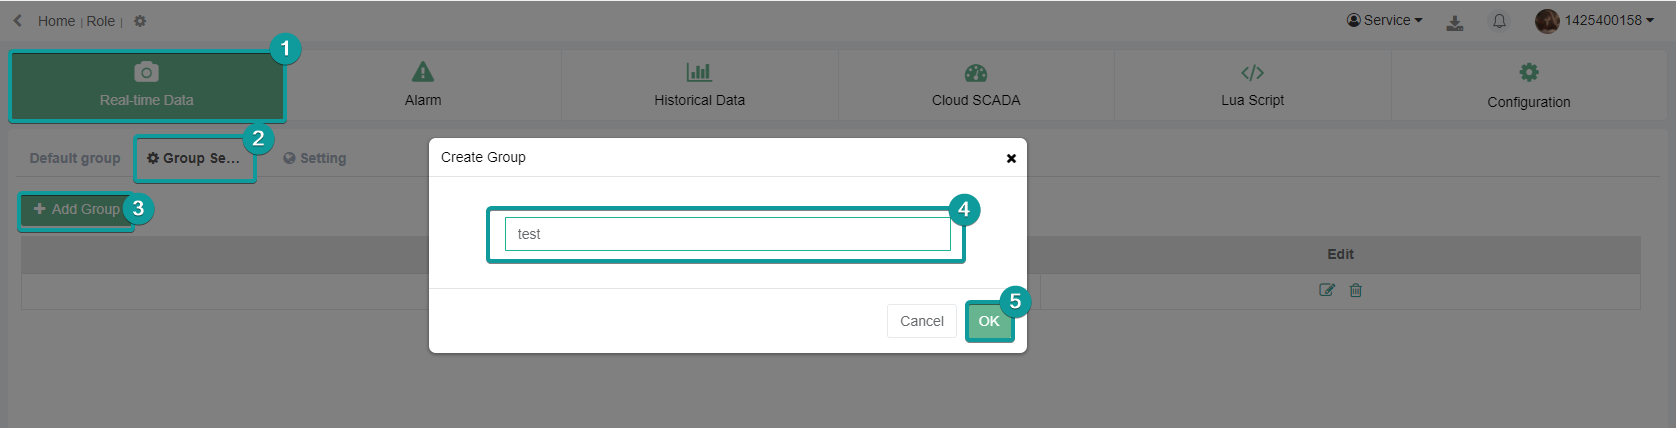
group management
Real-time monitoring points can be grouped and managed, and monitoring points can be moved to different groups. Users can click the “Group Settings” to add, modify, and delete groups.
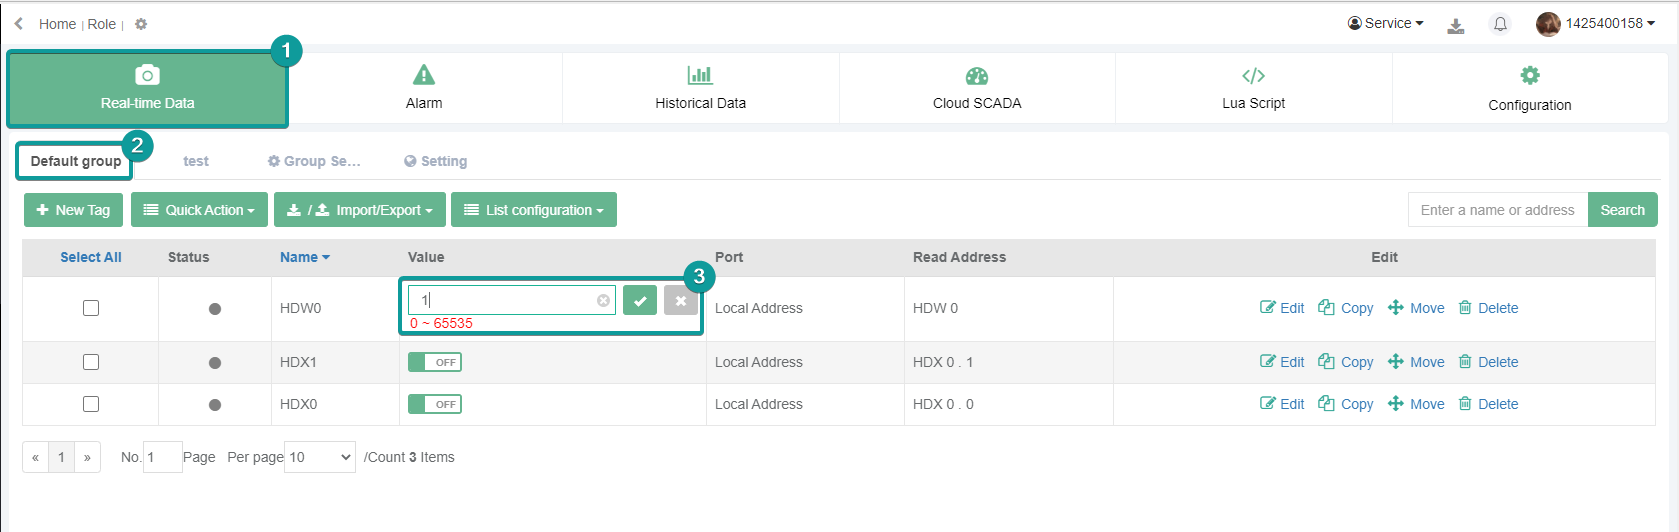
Real-time data modification
Users can modify the real-time data of the monitoring point. Click the data of one monitoring point to edit, and click ![]() ,the monitoring point real-time data will be modified to the data entered. Click
,the monitoring point real-time data will be modified to the data entered. Click ![]() to cancel the modification.
to cancel the modification.
Address Mapping
Required hardware and software configurations
- two V-BOXs
- two PLCs
- a V-NET account
System network topology
| PLC 1 | ⇔ | PLC 2 | ||
| D500 | source data 1 | D500 | target data 1 | |
| D502 | target data 2 | D502 | source data 2 | |
V-BOX 1
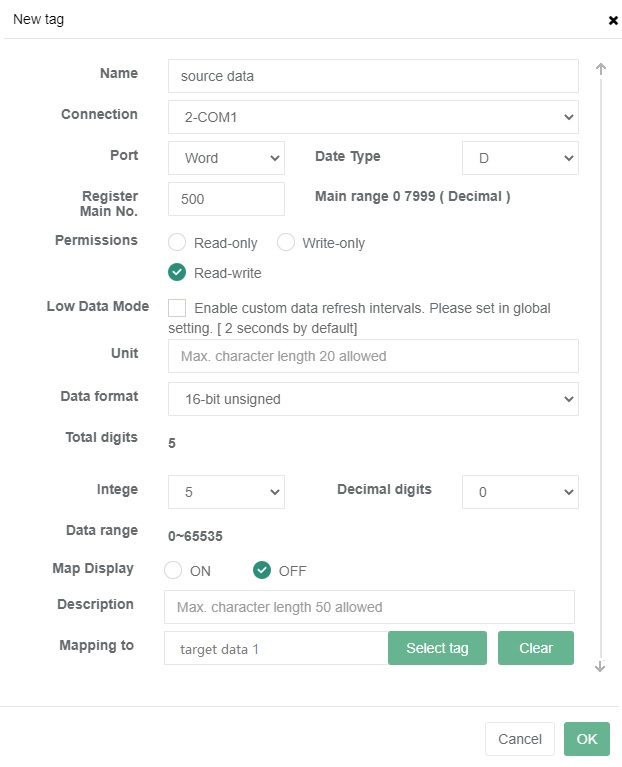
- Add monitoring point D500 as "source data 1", and select the monitoring point D500 (target data 1) of V-BOX 2 in the map, as shown in the following figure.
- Add monitoring point D502 as "source data 2".
V-BOX 2
- Add monitoring point D500 as "source data 1".
- Add monitoring point D502 as "source data 2", and select the monitoring point D500 (target data 1) of V-BOX 2 in the map, as shown in the following figure.

The configuration data will be automatically sent to V-BOX when it is online. Source data 1 of address D500 in PLC1 will be mapped to the target data 1 of address D500 in PLC2, and the source data 2 of address D502 in PLC2 will be mapped to the target data 2 of address D502 in PLC1.
| V-BOX1 + PLC 1 | ⇔ | V-BOX 2 + PLC 2 | ||
| D500 | source data 1 | D500 | target data 1 | |
| D502 | target data 2 | D502 | source data 2 | |
There is a video for mapping.
Alarm
Users can configure the alarms, and view the current alarms and historical alarms. Alarms can be divided into current alarm and historical alarm according to the administrator's confirmation.
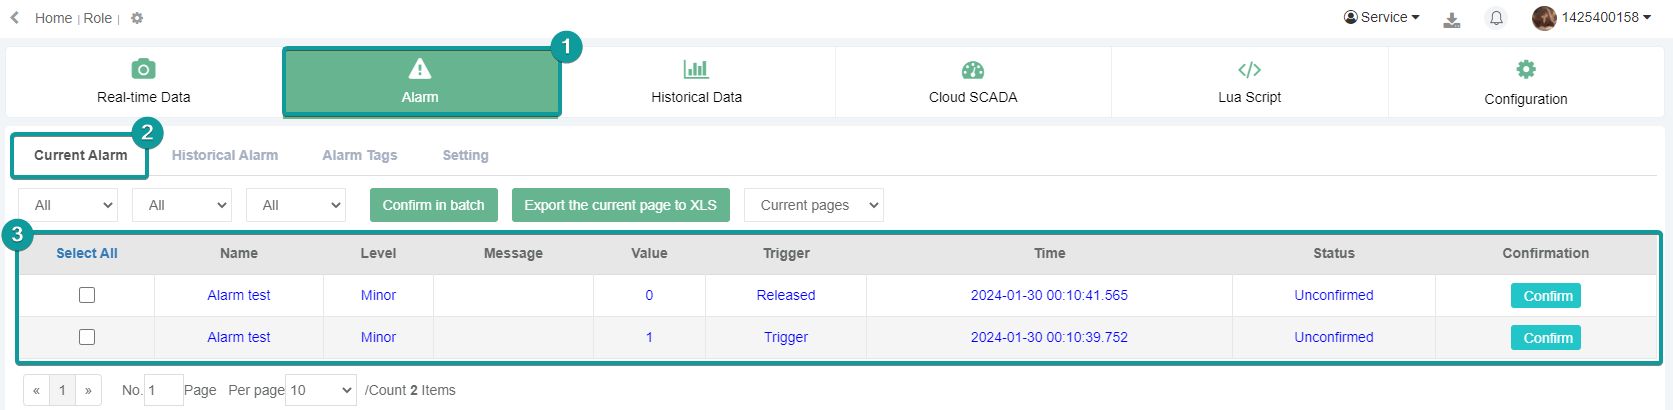
Current alarm
The alarm data in the "current alarm" sub-page are all the records that have not yet been "confirmed". The administrator can "confirm" the current alarm data to change its state. The alarm data can be queried according to the code, name, start and end date, and other conditions.
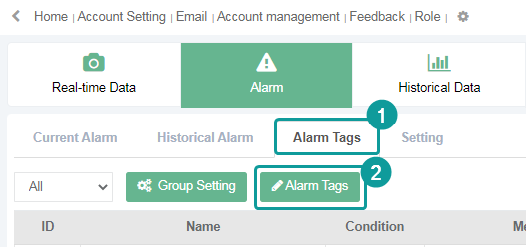
Alarm tags
In the sub-page of "Alarm Registration" under "Alarm Record", users can add a new alarm. When adding an alarm record, users need to select or enter data such as name, group, the connected device (ie communication port), address type, etc.
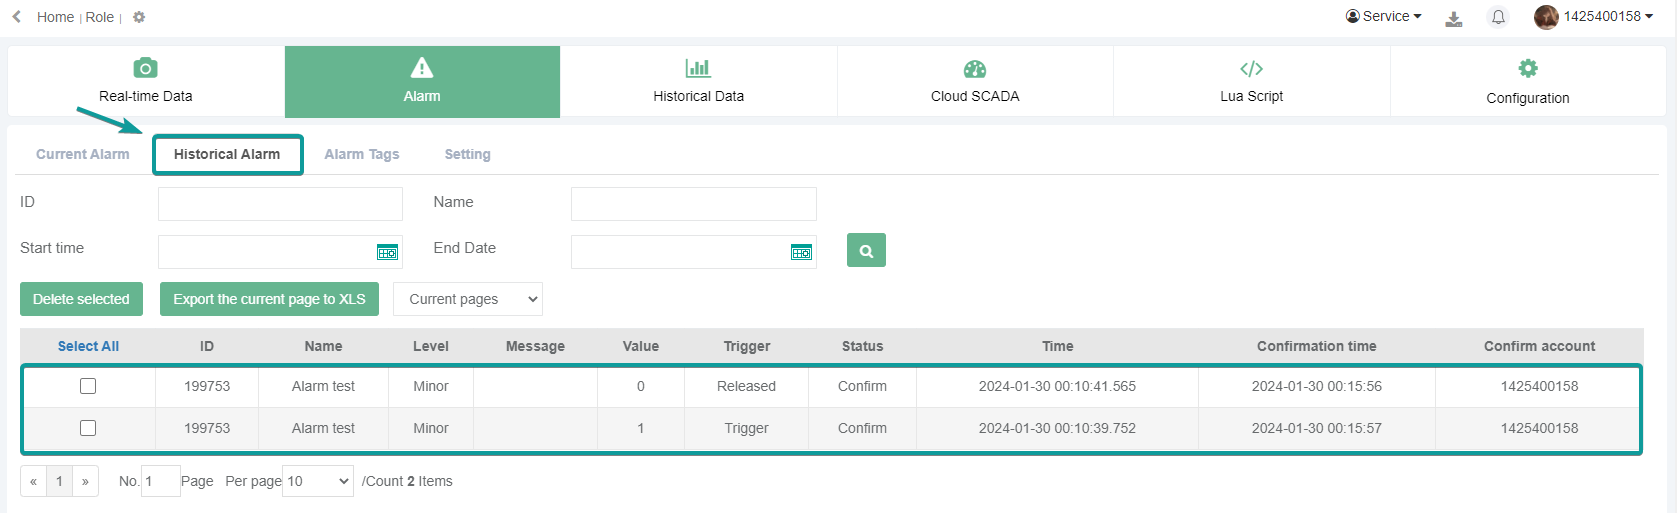
Historical alarm
The alarm data after the "confirm" operation is the historical alarm data and will be transferred to the "historical alarm" sub-page. The data can be queried according to the code, name, start and end date, and other conditions.
Historical data
Users can add the address to be monitored, collect data according to conditions, and form data tables, which can be used for query and storage.
Historical Data Group Setting
When adding data points, you need to first create the group in the Grouping Settings.
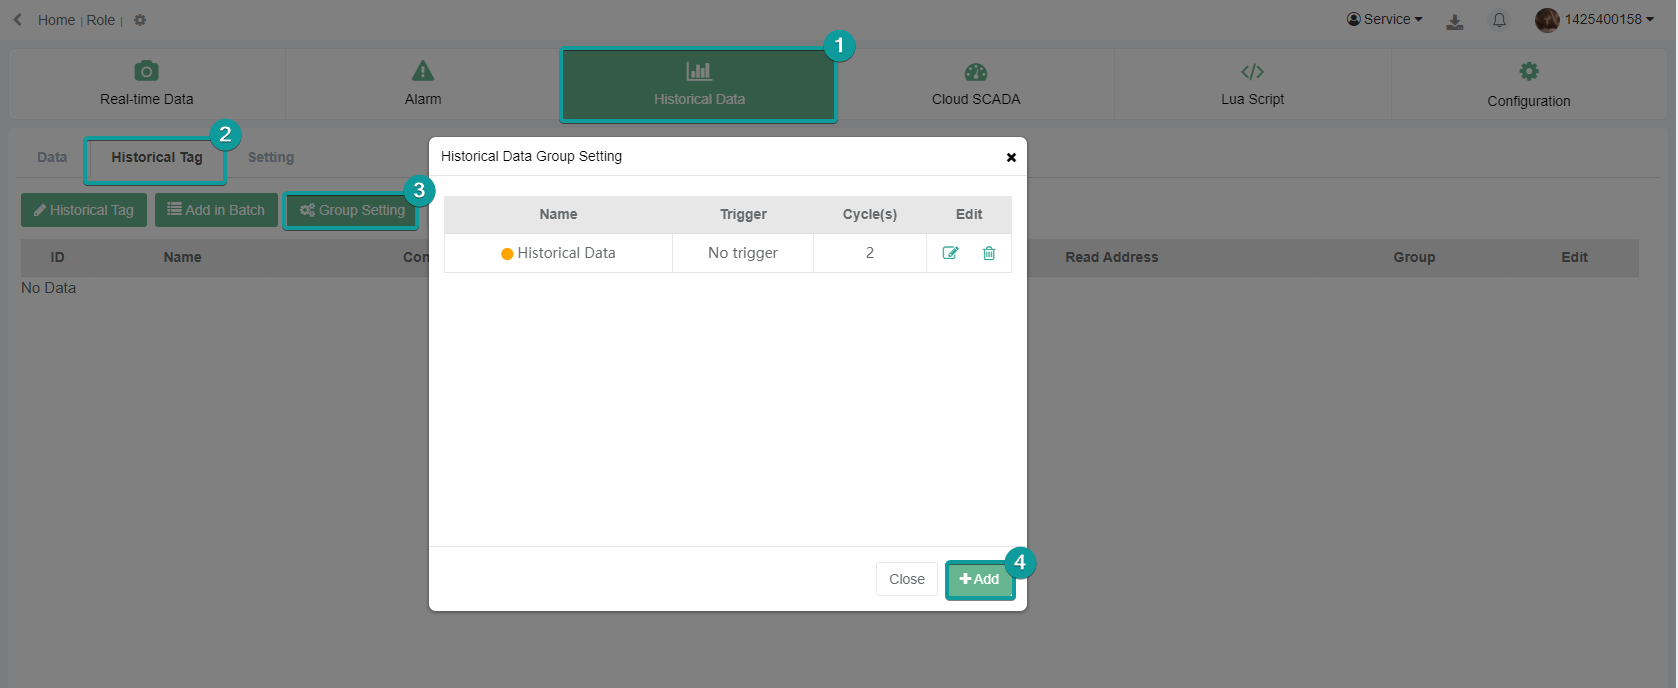
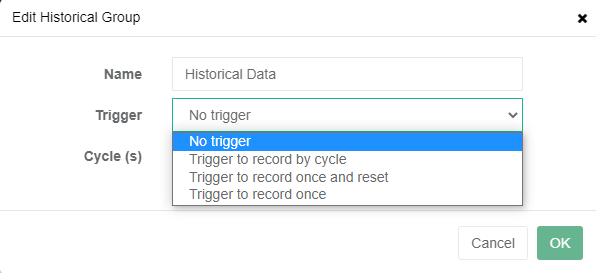
In the new group, you can create the group name, select the trigger type, and set the sampling period. Trigger types are: no trigger, trigger to record by cycle, trigger to record once and reset, trigger to record once.
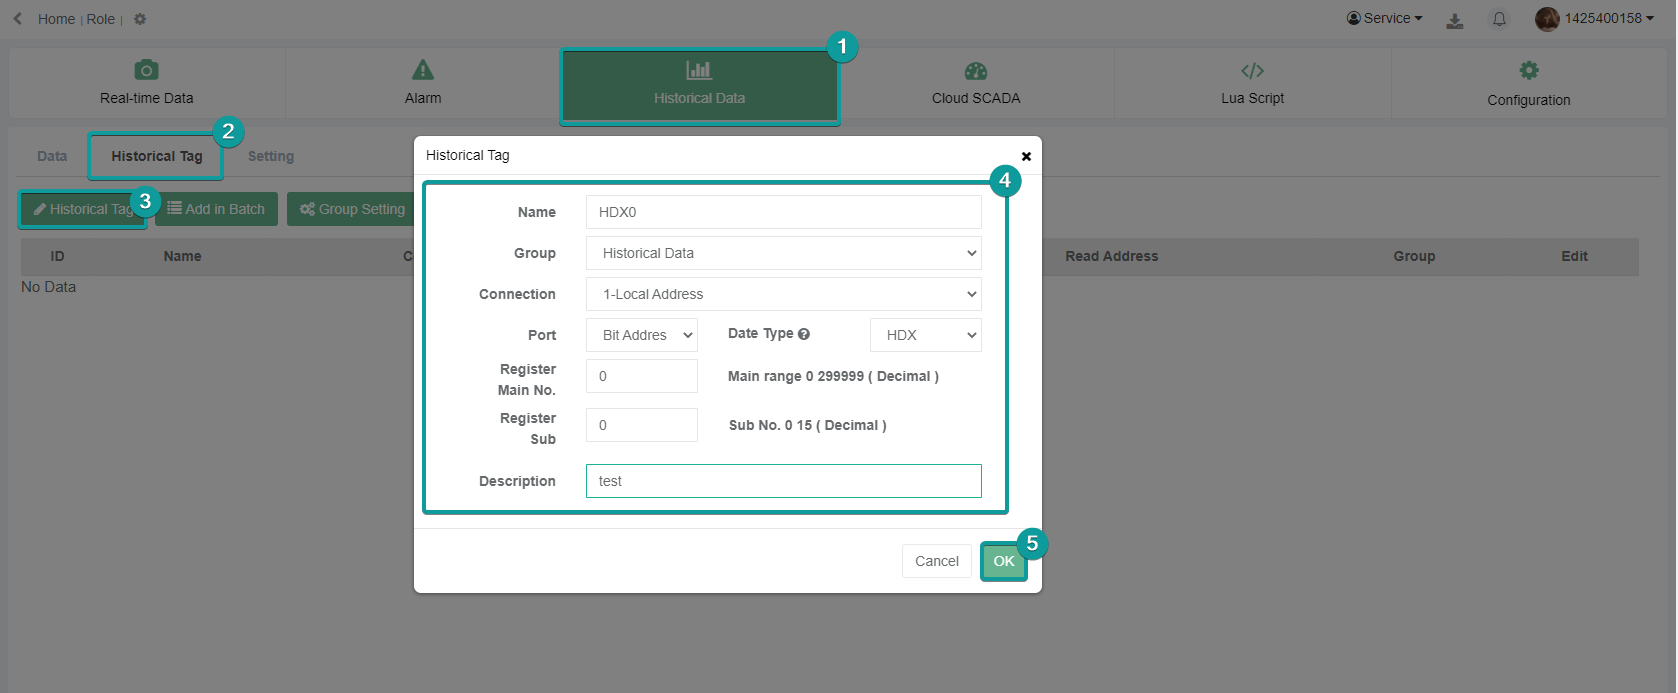
Historical tags
On the "Historical tags" sub-page of "Historical Data", Users can configure historical data, including name, the connection device (communication port), address type, and register type, etc.
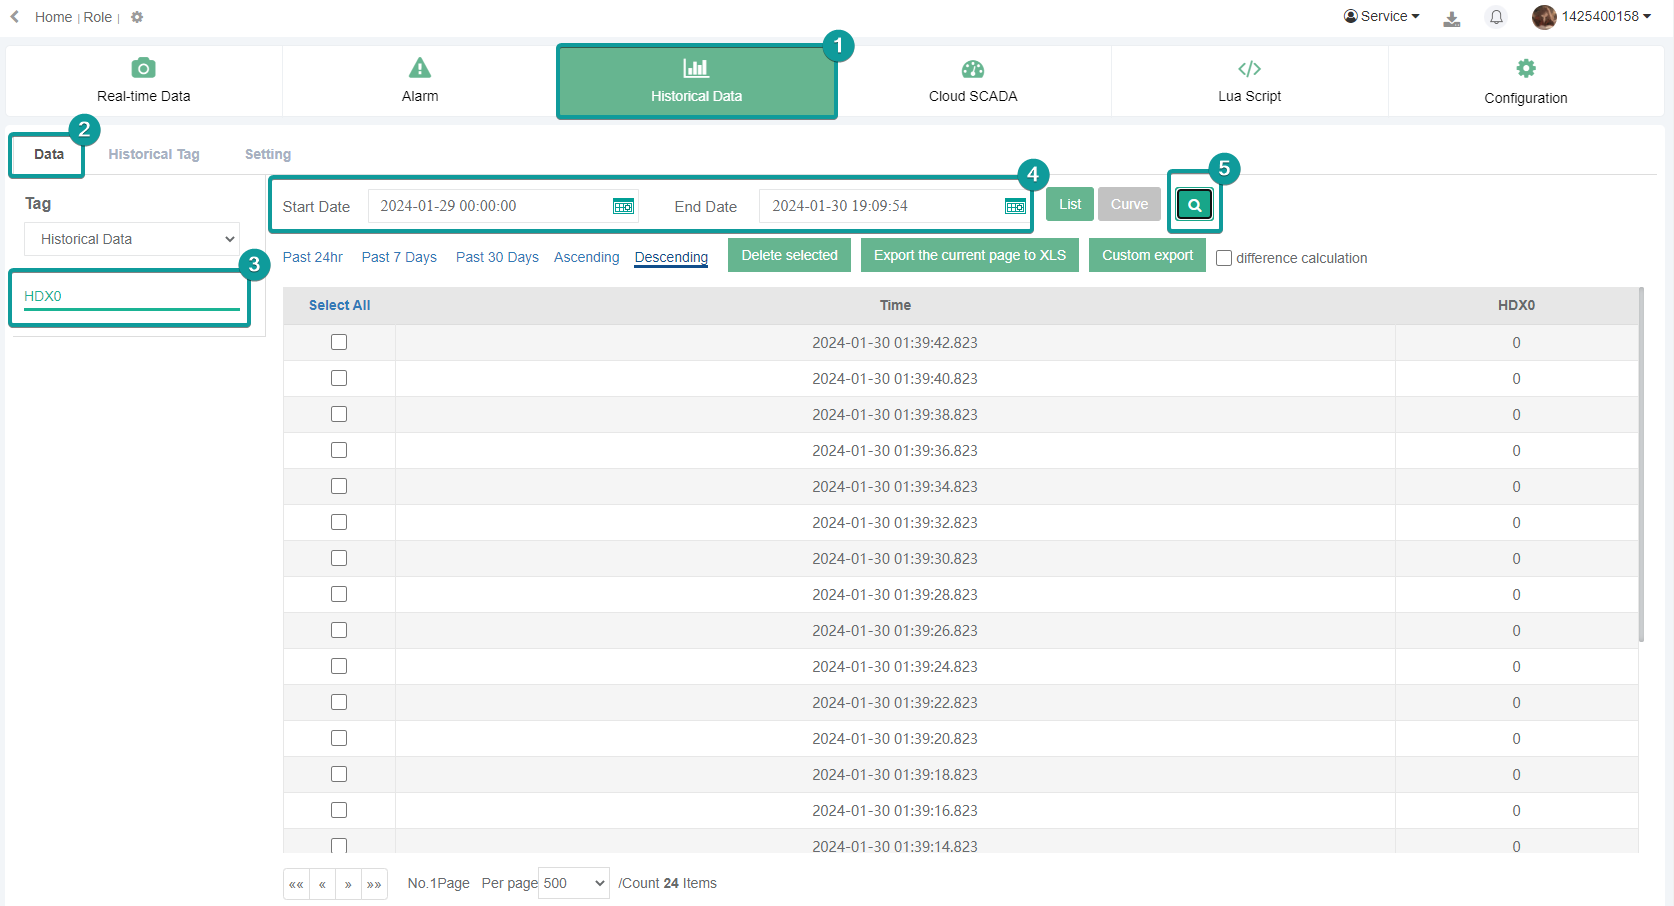
Data query
On the "Data" sub-page of "Historical Data", Users can query and delete historical data. including name, the connection device (communication port), address type, and register type, etc., When querying data, users need to select or enter the monitoring point and start and end dates. The display of historical data can be viewed in both tables and curves.
Cloud SCADA
Cloud SCADA is to monitor remote configuration interface.
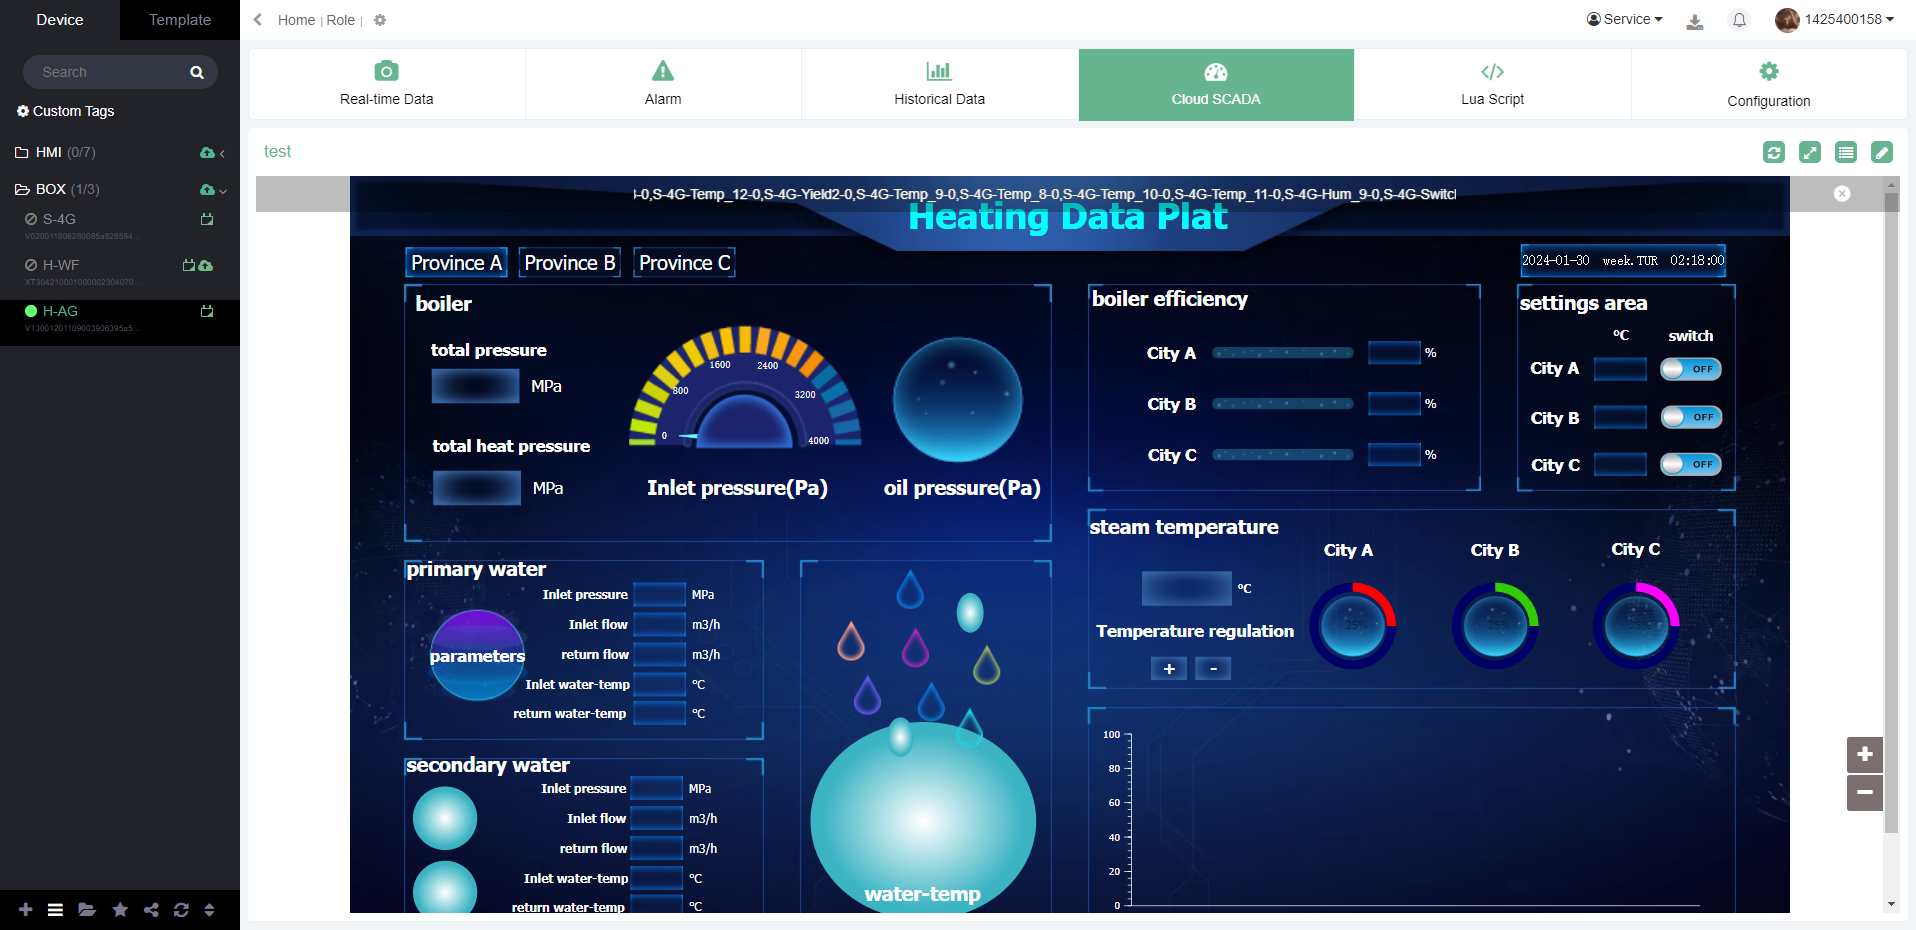
One v-box can be bound to at most one cloud SCADA project.
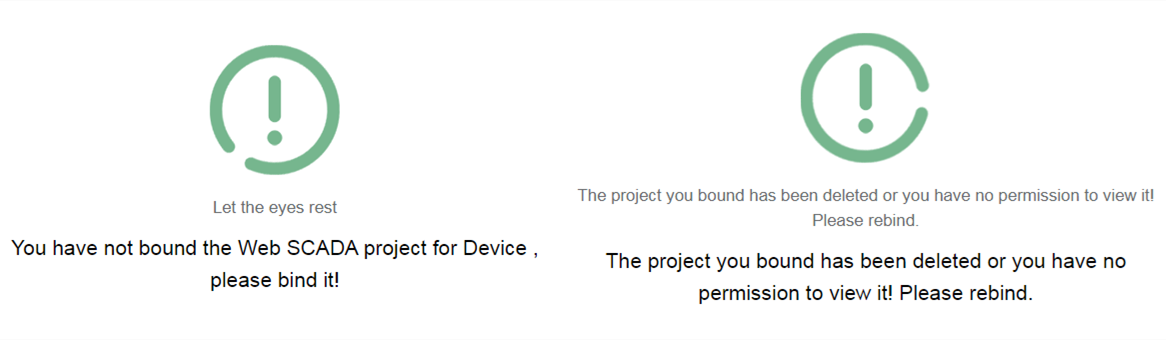
- If the v-box is not bound to a cloud SCADA project, it will prompt "you have not bound the Web SCADA project for Device, please bind it!".
- If the bound project has been deleted, it will prompt "The project you bound has been deleted or you have no permission to view it! Please rebind.". Shown as below.
V-box will preference to use the cloud SCADA project in the template. If a cloud SCADA project template has been bound to the v-box, it cannot bind or modify the cloud SACDA project of the v-box separately.
If the v-box is not bound to a template, the v-box can choose to bind the cloud SCADA project specified in the cloud SCADA platform. The cloud SCADA project across the v-box is not optional.
The v-box uses The template cloud SCADA project to design on the cloud SCADA platform, But bthe browsing and viewing access are in the V-NET. The projects can not be browsed and viewed in the cloud SCADA platform.
If the template project is modified, Cloud SCADA of all v-boxes using this template will update synchronously.
LUA script
Lua script management
Click "LUA script" to jump to the LUA script management module of v-box. The module has the functions including a script list, new script, edit script, delete scripts in batch, sync scripts, sync scripts in batch, import scripts, export scripts, debug, view box scripts, etc.

New script
Create a new script
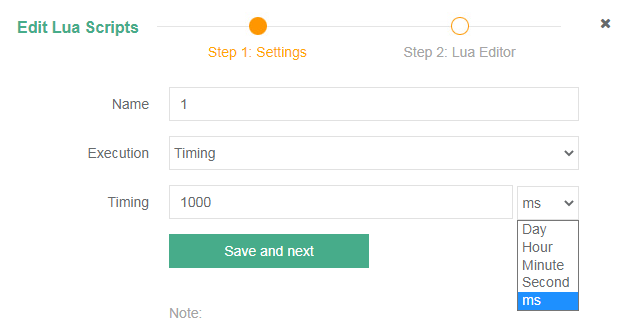
Click the button  to fill in the name and execution, then click "save and next" to create a new script.
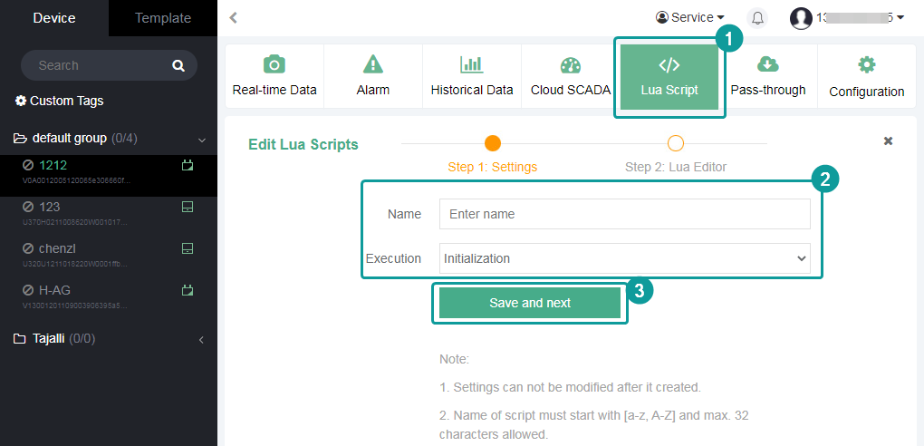
- Name. The name of the script must start with [a-z, A-Z] and a maximum of 32 characters are allowed.
- Execution. There are four script execution conditions as the following.
| Execution condition | Function | Number |
|---|---|---|
| initialization | Execute only once after power on. | Maximum one |
| Execution if connected | Execute after the v-box is connected to the server. | Maximum one |
| Execution if Disconnected | Execute when the box is disconnected from the server. | Maximum one |
| Timing | Executed cyclically according to the set timing time | Maximum five |
- Timing. If the user selects "Timing" as execution condition, the time and the time unit need to be entered.
Edit script
- Click
 to jump to the LUA script edit interface and the script editor will display the initialization code.
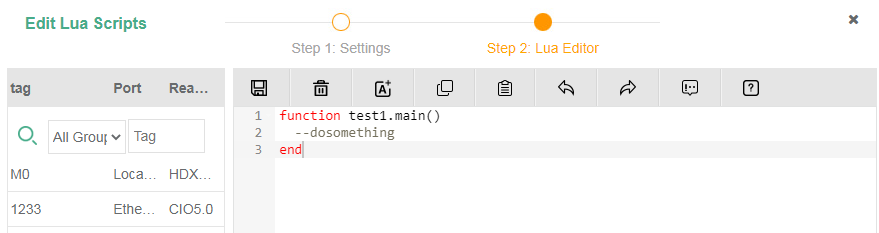
- The LUA script written by the user will be written in the initialized function structure, and the structure is not allowed to be modified
Script list
The added script is displayed in the script list. A Row represents a script.
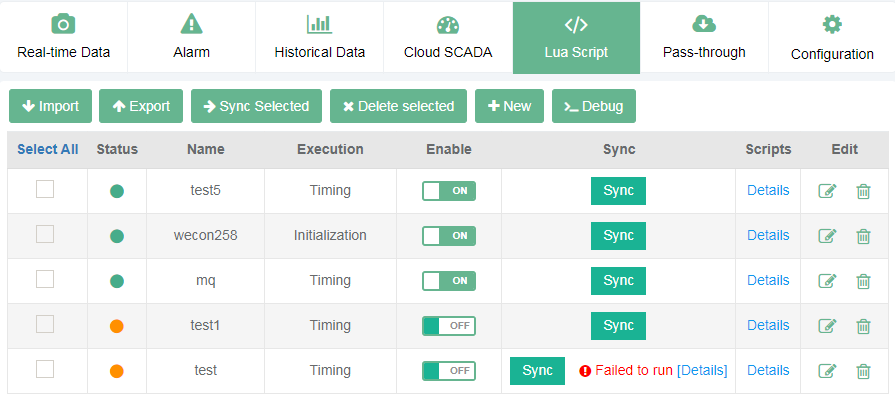
The following table describes the parameters in the script list.
| Parameter | Instruction |
|---|---|
| Status | The two status of script, including sync and not synced |
| Name | Script name |
| Execution | Script execution condition |
| Enable | Script enablement switch. |
| Sync | ON is to enable the script, and OFF is to disable the script. When the v-box is offline or penetrating, the button is grayed out and cannot be operated. |
| Scripts | View the scripts that are already running on the v-box. |
| Operation | Edit or delete the script. |
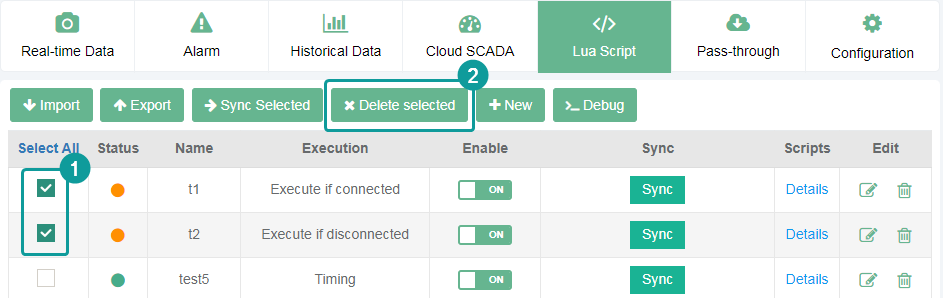
Delete script
Edit the button to  delete the script. Select multiple scripts, click the button
  to delete in batch.
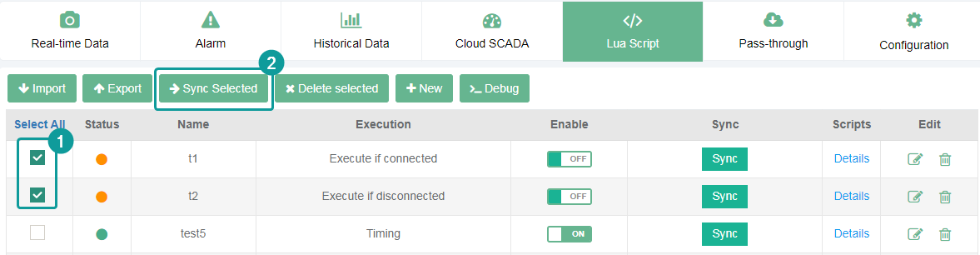
Sync in batch
Select the scripts in the list, click the button  to sync in batch. The failed sync information will display after the sync button in the script list.

Import and export script
- Export script. Click the button
 , all the scripts of the v-box can be exported as a file with a .script extension.
 - Import script. Click the button
 , the file with a script extension can be imported to the v-box. After the script is imported, the script in the current v-box is cleared.
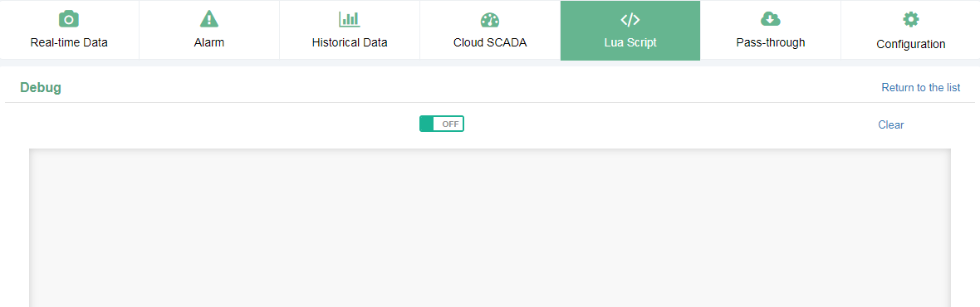
Debug
Click the button  to jump to the script debug interface. Shown as below.
Script editor
The script editor is an online editor to write Lua scripts. When creating new scripts and modifying scripts, users can switch to the script editor page to write the Lua script of the v-box script.
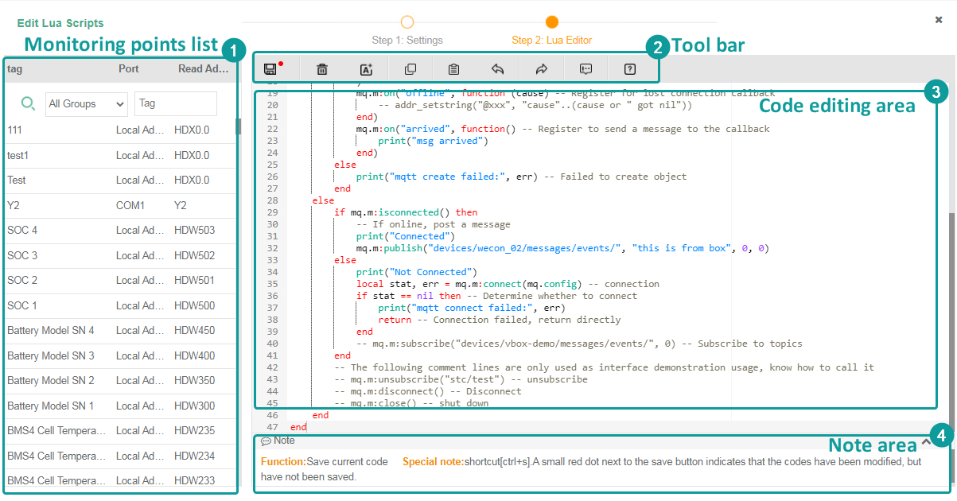
Monitoring points list
- The area displays all the monitoring points of the current v-box with a function of search monitoring points.
- Click the line of the monitoring point, and the monitoring point will be inserted at the current cursor of the script editor. The inserted monitoring point will be added with the symbol "@" in front of the monitoring point name in the editor and defined as a string. For example, "@City A temperature", the monitoring point variable will check grammar following the grammatical rules of the string. After the script is synchronized, the monitoring point variable will be converted to an address on the server-side and sent to the v-box side for use.
Toolbar
The toolbar is at the top of the script editor.

From left to right, the functions are as below
- Save codes. Save the current codes, with the small red dot next to it indicating that the code was modified but not saved.
- Clear codes. Clear the current codes in the script editor, and restore them to the initialization structure.
- Insert new address. Inserts a new bit or word address at the current cursor.
- Copy codes. The shortcut keys are "ctrl+c". For some browsers with earlier versions (IE8 and below), it may not be able to copy content for use outside of this editor. It is advised to use "ctrl+c".
- Paste codes. The shortcut keys are "ctrl+v". This button is limited to pasting text copied from the current editor except using Internet Explorer. t is advised to use "ctrl+v".
- Cancel. Cancel the actions in the editor at each step.
- Restore. Restore the actions in the editor at each step.
- Comment. Comment or uncomment the code in the current line or the selected line.
- Help. Jump to help document of script editor, and it is a simple introduction to Lua script editing.
Code editing area
The Lua script editor provides Lua scripts for users to write scripts and can perform syntax verification, keyword prompts, common code snippet prompts, variable prompts, code completion, etc. At the same time, it provides monitoring point management functions, which can be directly Insert the address as a variable in the code.
- syntax check
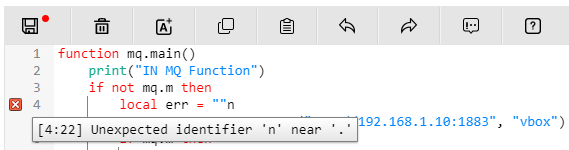
Users can check the validity of the syntax in real-time when writing Lua code. As shown in the figure above, there will be an icon  next to the line number of the syntax error line, and the error message will be prompted after the mouse placing. When multiple lines have errors, it will be displayed on the first line of the error. After solving the error in this line, it will be displayed on the next line of the error line.
The syntax check includes the following contents.
- Check the spelling of keywords.
- Check the definition of variables.
- Check the usage specifications of operators.
- Check the syntax of the function structure.
- Script prompts
When writing code, the script editor provides hints for fuzzy matching keywords, defined variables, code snippets, etc. Click the corresponding prompt line to complete the codes.
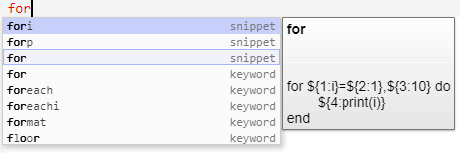
The provided prompt codes and complete codes include the following categories:
- Keywords. Lua language keywords, built-in method names, built-in constants, library functions.
- Code snippet. commonly used code snippets in Lua language.
- Defined variables (local), the names of all the defined variables.
| Name | Sample code | Name |
|---|---|---|
Code snippet
| local x = 1 | Variable definition |
function fname(...) -- body end | Function structure | |
for i=1,10 do print(i) end | for loop structure | |
while (condition) do -- body end | while loop structure | |
if (condition) then -- body end | Conditional structure | |
| Method name | _G|_VERSION|assert|collectgarbage|dofile|error|getmetatable|ipairs|" + "load|loadfile|next|pairs|pcall|print|rawequal|" + "rawget|rawlen|rawset|require|select|setmetatable|" + "tonumber|tostring|type|xpcall|create|isyieldable|resume|running|" + "status|wrap|yield|debug|gethook|getinfo|getlocal|" + "getmetatable|getregistry|getupvalue|" + "getuservalue|sethook|setlocal|setmetatable|setupvalue|setuservalue|traceback|upvalueid|upvaluejoin|" + "abs|acos|asin|atan|ceil|cos|deg|exp|" + "floor|fmod|huge|log|max| maxinteger|min|mininteger|" + "modf|pi|rad|random|randomseed|sin|sqrt|tan|" + "tointeger|type|ult|clock|date|difftime|time|config|cpath|" + "loaded|loadlib|path|preload|searchers|searchpath|byte|char|dump|" + "find|format|gmatch|gsub|len|lower|match|pack|packsize|rep|reverse|" + "sub|unpack|upper|concat|insert|move|pack|remove|sort|unpack|charpattern|" + "codepoint|codes|offset|" + "foreachi|maxn|foreach|concat|remove| | |
| Built-in constants | true|false|nil|_G|_VERSION |
- Codes highlight
| Code type | Color |
|---|---|
| Normal code | Black |
| Keyword | Red |
| Variable | Black |
| String | Blue |
| Built-in method name | Green |
| Constants and built-in constants | Purple |
| Library function | Black |
| Comments, [[xx]] | Gray |
Note area

- It is located below the script editor and hidden by default. A prompt is displayed when user clicks a custom method name or the mouse moves over the toolbar button.
- Double click the prompt box or click the button
 to close it.
 - Click the up or down arrow to expand or collapse the prompt message.
Save reminder
If the script content is modified and not saved, a confirmation dialog box will be displayed when jumping to another module. The message varies with browsers.

Resumable upload
Video: Resumable upload
3000ig/8000ig HMI and RE/RH,E/H V-BOX can support a function for resumable upload. The function is to temporary save the data when the device is offline and upload those data to Cloud when the device is online again.
The following table shows the maximum number of the resumable data and the biggest file size of the resumable data:
| RE/RH | 3000ig/8000ig HMI | E/H V-BOX | |
|---|---|---|---|
| data | 100,000 | 100,000 | 2,000 |
| file size | 2M | 2M | N/A |