2.04 Device Template
2.4 Device Template
Users can use custom universal template to allow all V-Boxes bound to the template to use the same configuration. V-Box using the template will synchronize the configuration of the template's related data points and communication protocols, and their original configurations will be overwritten by the template's configurations.
2.4.1 Template creation and introduction
In the device template list,user can view all created templates, and perform operations such as [Add Template], [Edit], [Copy], [Configuration], [Synchronize], and [Delete] on the template, as shown in the figure below.

Search template: At the top of the template list, you can enter the template name, group, and template creation time for fuzzy search, and matching templates will be displayed.
2.4.2 Group management
When creating a new template, you need to select an owned group. This allows you to more conveniently manage template data. Groups support [Add], [Edit], and [Delete] operations.
2.4.2.1 Add/Edit group
After clicking Add/Edit Group, enter the group name and click the [OK] button to add the group.

2.4.3 Add/Edit template
(1) Add
Create a new template, as shown in the figure below.

The above figure creates a template named "New" under the "11" group, with the device model being H-4G. Click the [OK] button to create the template.
(2) Edit

The above example shows that a template named "New" is edited. Under the "11" group, the device model is H-4G. Click the [OK] button to edit the template.
2.4.4 Copy template

The above figure shows an example of copying a template named [New] to a new template named [H-4GtoS-4G], with the device model being [S-4G] and the group being [11].
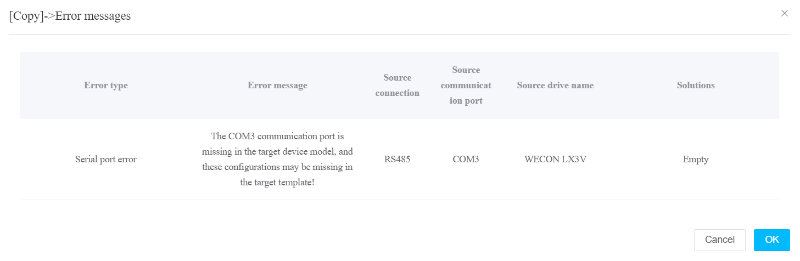
2.4.4.1 Serial port error
Error description: The copied target model does not have some serial ports configured in the source template. For example, the target model does not have the COM3 serial port as shown in the figure below.
Solution: After clicking [OK], the COM3 serial port will not be copied.
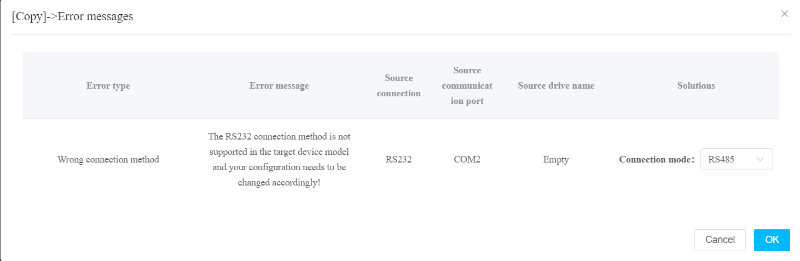
2.4.4.2 Connection error
Error description: The copied target model does not have the connection mode under some serial ports configured in the source template. For example, the target model does not have the RS232 serial port under the COM2 serial port in the following figure.
Solution: After clicking [OK], for example, the connection mode under the COM2 serial port will be changed to the [RS485] connection mode selected in the figure.
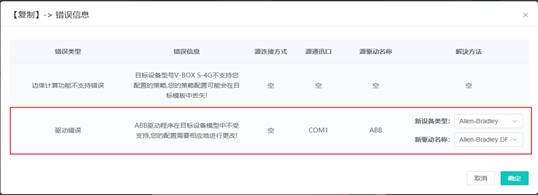
2.4.4.3 Driver error
Error description: The copied target model does not have the driver under some serial ports configured in the source template. For example, the target model does not have the ABB serial port driver under the COM1 serial port in the following figure.
Solution: After clicking [OK], for example, the driver under the COM1 serial port will be changed to the [Allen-Bradley DF1] serial port driver of the [Allen-Bradley] device type selected in the figure.
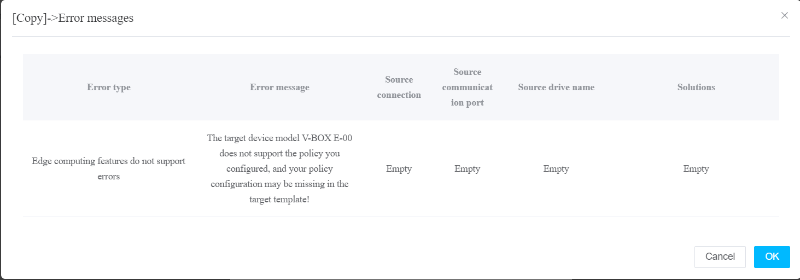
2.4.4.4 Lua script not supported error
Error description: The source template configures Lua script, but the target model does not have Lua script permissions. For example, the target model E-00 does not have the permissions in the following figure.
Solution: After clicking [OK], the Lua script of the source template will not be copied to the new template.
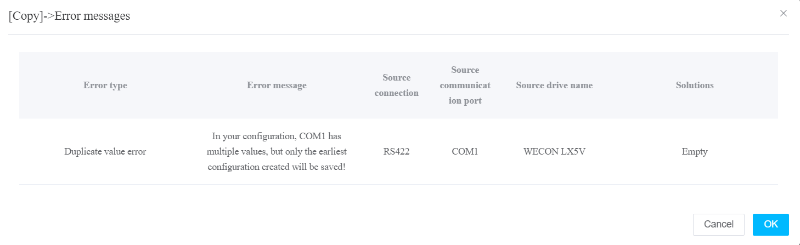
2.4.4.5 Duplicate value error
Error description: The source template has multiple COM serial ports, but the copied target model does not have multiple COM serial ports. For example, the target model does not have multiple COM1 serial ports as shown in the figure below.
Solution: After clicking [OK], the earliest created serial port configuration will be saved, and the remaining serial ports will be deleted. For example, the serial port with COM1, [RS422] connection mode, and driver name [WECON LX5V] in the figure will be deleted.
2.4.5 Synchronize template
Click the [Synchronize]. The template synchronization pop-up window will be displayed. You can select a maximum of ten V-Boxes of the template model at the same time. After the synchronizing, the configurations in the V-Box will be overwritten.
Note:
- The synchronization process may take a long time. Please wait patiently until the synchronization is completed. The pop-up window will close and prompt that the synchronization is successful.
- Template synchronization will cause the original data configuration of V-Box to disappear.

2.4.6 Template configuration
Click the [Configuration] button to enter the detailed configuration page of the current template. In the page, you can configure the template's communication port, data monitoring, alarm record, history data, Lua script, Cloud SCADA and global configuration, as shown in the figure below.

- Communication port: Configure the communication port used by the template.
- Data monitoring: Configure the real-time monitoring points. But there is no real-time data of the monitoring points in the template.
- Alarm record: Configure alarm records. But the template does not have specific alarm data. Alarm data needs to be viewed in the V-Box of the synchronized template.
- History data: Configure the historical data of the template. But the template does not have specific historical data. Historical data needs to be viewed in the V-Box of the synchronized template.
- Lua script: Configure the strategy of Lua script.But the template does not support individual script deployment, nor can it browse scripts running on the V-Box.
- Cloud SCADA: Template configuration can only configure one cloud SCADA project. Click the button in the upper right corner to jump to the cloud SCADA platform to design the project.
- Global configuration: Configure the template to low data mode and push data, as shown in the following figure.

2.4.7 Template Cloud SCADA
Add a template Cloud SCADA, create a project for the template, will jump to the Cloud SCADA platform for design.
2.4.7.1 Add/Edit Cloud SCADA project
If the template already has a cloud SCADA project, click the [Edit] button in the upper right corner to jump to the cloud SCADA platform to design the project for the template.
If the template has not yet configured a cloud SCADA project, click the icon to pop up a new template cloud SCADA window, enter the resolution, industry and other information, and then click [OK] to create it, as shown in the figure below.

2.4.7.2 Template Cloud SCADA toolbar

- Refresh: Click the icon
 to update the latest cloud SCADA template data.
 - Full screen browsing: Click the icon
 to display the cloud SCADA template in full screen.
 - Edit current Cloud SCADA: Click the icon
 to jump to the SCADA platform for design.
 - Delete: Click the icon
 , and the cloud SCADA under the template and the related template data on platform will be deleted.