LX3V-2ADV
1 Mounting instruction
Before the installation make sure that the PLC host and the equipment connected to BD module have been powered off. Please install the BD module in the corresponding position of the PLC, and lock the two standard screws.
Caution:
- This BD module only support the following firmware versions or later. Users can check the PLC firmware version in D8001.
- LX3VP:25103;
- LX3VE: 25201;
- LX3V-A2:25014;
- LX3V-A1: 22006;
- LX2V: 24005;
When mounting module to PLC, all the lights are blinking after power ON PLC please purchase a new PLC.
- Please fixed BD module on the PLC, poor contact may lead to failure.
- BD module and top cover of PLC’s tightening torque is 0.3 ~ 0.6 N.m.
2 Special feature
- LX3V-2ADV-BD module equips with 2 channels analog input. This module will be mounted in the PLC.
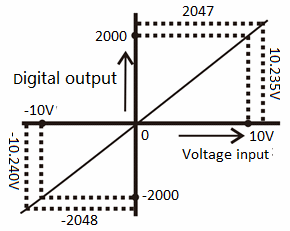
- The input voltage of LX3V-2ADV-BD module between -10 to 10V, and the digital value will be saved in special system address, but the numerical relationship between input and output value cannot be changed.
| Expansion port 1 (far away from PLC light ) | ||
|---|---|---|
| Address | Description | |
| M8112 | The flag of switching input mode in CH1 OFF: Voltage input mode (-10V~10V, -2000~2000) | ON: Disabled |
| M8113 | The flag of switching Input mode in CH2 OFF: Voltage input mode (-10V~10V, -2000~2000) | |
| D8112 | The digital value of channel 1; (-10V~10V, -2000~2000) | |
| D8113 | The digital value of channel 2; (-10V~10V, -2000~2000) | |
| Expansion port 2 (from the PLC light near) | ||
| Address | Description | |
| M8116 | The flag of switching Input mode in CH1 OFF: Voltage input mode (-10V~10V, -2000~2000) | ON: Disabled |
| M8117 | The flag of switching Input mode in CH2 OFF: Voltage input mode (-10V~10V, -2000~2000) | |
| D8116 | The digital value of channel 1; (-10V~10V, -2000~2000) | |
| D8117 | The digital value of channel 2; (-10V~10V, -2000~2000) | |
3 Dimension
| IN-2ADV input voltage range: -10~10V | |
|---|---|
| Vi1+ | Anode of the channel 1 voltage input |
| Vi1- | Cathode of the channel 1 voltage input |
| • | No connection |
| Vi2+ | Anode of the channel 2 voltage input |
| Vi2- | Cathode of the channel 2 voltage input |

LED lights indicating:
- LED1: ON when power ON.
- LED2: flashes when communications.
- LED3 (AD 1): On indicates enable, OFF indicates disable, flicker indicates exceeding the measurement range.
- LED4 (AD 2): On indicates enable, OFF indicates disable, flicker indicates exceeding the measurement range.
If the BD module is plugged into the PLC which uses old firmware version, when PLC power on, all LEDs will be flashing.
4 Specification
- Please refer to the LX3V user manual for the general specification of LX3V-2ADV-BD.
- LX3V-2ADV-BD is powered supply by LX3V main unit.
| Item | Specification |
|---|---|
| Voltage input | |
| Input range | DC -10 ~ 10V (Input resistance:150KΩ) |
| Digital output | 12 bits binary |
| Resolution | 4mV (10 : 1/2000) |
| Precision | ±1% |
| AD conversion time | One PLC scanning cycle |
| Characteristic |
|
| Insulation | No insulation in each PLC channel |
| Occupied points | None |
5 Wiring
Caution:
- Don’t put the LX3V-2ADV-BD module near high-voltage power cable. Keep away the power cable at least 100mm;
- Do not solder any terminal with the others device;
- Do not connect any unsuitable cable;
- Please fix cable;
- Do not connect any unit to the unused terminal;
Suitable cable
Connect to output device with AWG25-16.
Max tighten torque of terminal is 0.5 to 0.6N.m.
Table 5‑1
| Line type | Cross sectional area(mm2) | End-of-pipe treatment |
|
|---|---|---|---|
| AWG26 | 0.1288 | Stranded cable: stripped jacket, rub Conductor, then connect the cable. Single-core cable: stripped jacket, Then connect the cable. | |
| ...... | ...... | ||
| AWG16 | 1.309 |
Input mode

6 Example
The input analog of all channels(-10V~10V)is stored inside the data memory(D8112, D8113)in the form of data. Values will be automatically stored when the “END” order is sent out. The value is calculated by the designated analog data conversion characteristics of the special auxiliary relays M8112 and M8113.
Basic Program Examples
✎Note:
- Start M8112 and M8113; designate the analog data conversion characteristics of CH1 and CH2.
- After execution of analog data conversion, do not change the values of D8112 or D8113 through operator program, programming tools or graphic operating terminal.
The following program can set CH1 and CH2 into voltage input mode. After ADV conversion, values of all channels are stored into D0 and D2.

Examples of Applications
Since the LX3V-2ADV-BD does not have offset and gain functions, if it needs for the values out of the standard specifications, Additional programming orders will be needed to multiply or divide the converted value.
✎Note:
- Since the use of additional programming orders, the converted precision and resolution of the analog value are different with the specifications.
- The original range of the analog output does not change.
Voltage Input Mode
Under the voltage input mode, the 2ADV will convert the analog value -10V~10V into data output -2000~2000. If the data range used in the application is 0-20000, then the range -2000~2000 must be converted into 0-20000, as is shown in the following program examples. The data converted from the analog values are stored in D8112 or D8113.
Since the data range is converted from -2000~2000 into 0-20000,therefore the resolution of the analog input is no longer just 8uA.

If the data range used in D0 is (0-20000), please refer to the following text:Figures used in the user’s applications:D0=5×(D8112 or D8113)+10000.
We can give an example as follows based on the program of the above mentioned formula (under the situation of CH1)
