Omron
Omron
CJ2M Series Ethemet
Supported device:CJ series, CJ1W-EIP21,CJ2M-EIP21
HMI Settings
| Items | Settings |
|---|---|
| Protocol | OMRON CJ TCP FINS Ethemet |
| Connection | Ethernet |
| Port No. | 9600 |
| Device No. | 0 |
| HMI No. | 0 |
Address List
| Type | Device registers | HMI registers | Format | Range | Note |
|---|---|---|---|---|---|
| Bit | CIO | CIO | CIO d | 0~99999 | |
| W | W | W d | 0~99999 | ||
| D | D | D d | 0~99999 | ||
| H | H | H d | 0~99999 | ||
| A | A | A d | 0~99999 | ||
| T | T | T h | 0~99999 | ||
| CF | CF | CF d | 0~99999 | ||
| FF | FF | FF d | 0~99999 | ||
| C | C | C d | 0~99999 | ||
| EM0 | EM0 | EM0 d | 0~99999 | ||
| EM1 | EM1 | EM1 d | 0~99999 | ||
| EM2 | EM2 | EM2 d | 0~99999 | ||
| EM3 | EM3 | EM3 d | 0~99999 | ||
| EM4 | EM4 | EM4 d | 0~99999 | ||
| EM5 | EM5 | EM5 h | 0~99999 | ||
| EM6 | EM6 | EM6 d | 0~99999 | ||
| EM7 | EM7 | EM7 d | 0~99999 | ||
| EM8 | EM8 | EM8 d | 0~99999 | ||
| EM9 | EM9 | EM9 d | 0~99999 | ||
| EMA | EMA | EMA d | 0~99999 | ||
| EMB | EMB | EMB d | 0~99999 | ||
| EMC | EMC | EMC d | 0~99999 | ||
| Lamp | Lamp | Lamp d | 0~0 | ||
| Word | CIO | CIO | CIO d | 0~99999 | |
| W | W | W d | 0~99999 | ||
| D | D | D d | 0~99999 | ||
| H | H | H d | 0~99999 | ||
| A | A | A d | 0~99999 | ||
| T | T | T h | 0~99999 | ||
| CF | CF | CF d | 0~99999 | ||
| FF | FF | FF d | 0~99999 | ||
| C | C | C d | 0~99999 | ||
| EM0 | EM0 | EM0 d | 0~99999 | ||
| EM1 | EM1 | EM1 d | 0~99999 | ||
| EM2 | EM2 | EM2 d | 0~99999 | ||
| EM3 | EM3 | EM3 d | 0~99999 | ||
| EM4 | EM4 | EM4 d | 0~99999 | ||
| EM5 | EM5 | EM5 h | 0~99999 | ||
| EM6 | EM6 | EM6 d | 0~99999 | ||
| EM7 | EM7 | EM7 d | 0~99999 | ||
| EM8 | EM8 | EM8 d | 0~99999 | ||
| EM9 | EM9 | EM9 d | 0~99999 | ||
| EMA | EMA | EMA d | 0~99999 | ||
| EMB | EMB | EMB d | 0~99999 | ||
| EMC | EMC | EMC d | 0~99999 | ||
| IR | IR | IR d | 0~99999 | ||
| DR | DR | DR d | 0~99999 |
Configure the communication protocol


PLC Setting:
①[PLC]→[Change Communication Settings]→[Network Type] Ethernet→[setting…]→[Derive]→[IPaddress]set the IP address as PLC’s ,192.168.40.99→[Port Number]9600→[OK]→[OK]
Note:The IP address of the PLC is displayed on the LED when the PLC is powered up

②[PLC]→[Work Online]→USB connection between PC and PLC→The connection prompt appears→[Yes]

③PLC default parameters: [IO Table and Unit Settings] → [Built-in Port/Inner Board] [1500] CJ2M-EIP21→[TCP/IP] → [Transfer [Unit to PC]] → Transfer successfully, click [Close]
[IP Address] Use the following address → [IP Address] 192.168.40.99, [Subnet Mask] 255.255.255.0.
Note: Please configure the IP parameters of PLC according to the field needs

④Two rotary coding switches should be set depanding on the program paremeter:
a) rotary coding switch for unit No. :For example, [Built-in Port/Inner Board] [1500] CJ2M-EIP21(Built In EtherNet/IP Port for CJ2M)(Unit: 0),the rotary coding switch should be dialed to 0

b) rotary coding switch for node No. :The high byte 4 of the IP address should be the same as theone configured by the software. such as [IP address] 192.168.40.99. The IP address high byte 4 is 99,rotary coding switch is to use hexadecimal 63 corresponds to decimal 99, node number dialling code 161 corresponds to: 6, 160 corresponds to: 3.

Cable Wiring
Pin Definition Diagram

CP1E Series Serial
Supported device: OMRON CS1(CP1E/CP1H)
HMI Settings
| Items | Settings | Note |
|---|---|---|
| Protocol | OMRON CS1(CP1E/CP1H) | |
| Connection | RS232 (9600, 2, 7, EVEN) | |
| Port No. | None | |
| PLC station No. | 0 |
Address List
| Type | Device registers | HMI registers | Format | Range | Note |
|---|---|---|---|---|---|
| Bit | CIO | CIO | CIO d | 0~99999 | |
| W | W | W d | 0~99999 | ||
| D | D | D d | 0~99999 | ||
| H | H | H d | 0~99999 | ||
| A | A | A d | 0~99999 | ||
| TF | T | T h | 0~99999 | ||
| CF | CF | CF d | 0~99999 | ||
| T | FF | FF d | 0~99999 | ||
| C | C | C d | 0~99999 | ||
| EM0 | EM0 | EM0 d | 0~99999 | ||
| EM1 | EM1 | EM1 d | 0~99999 | ||
| EM2 | EM2 | EM2 d | 0~99999 | ||
| EM3 | EM3 | EM3 d | 0~99999 | ||
| EM4 | EM4 | EM4 d | 0~99999 | ||
| EM5 | EM5 | EM5 h | 0~99999 | ||
| EM6 | EM6 | EM6 d | 0~99999 | ||
| EM7 | EM7 | EM7 d | 0~99999 | ||
| EM8 | EM8 | EM8 d | 0~99999 | ||
| EM9 | EM9 | EM9 d | 0~99999 | ||
| EMA | EMA | EMA d | 0~99999 | ||
| EMB | EMB | EMB d | 0~99999 | ||
| EMC | EMC | EMC d | 0~99999 | ||
| Word | CIO | CIO | CIO d | 0~99999 | |
| W | W | W d | 0~99999 | ||
| D | D | D d | 0~99999 | ||
| H | H | H d | 0~99999 | ||
| A | A | A d | 0~99999 | ||
| T | T | T h | 0~99999 | ||
| CIO | CF | CF d | 0~99999 | ||
| C | C | C d | 0~99999 | ||
| EM0 | EM0 | EM0 d | 0~99999 | ||
| EM1 | EM1 | EM1 d | 0~99999 | ||
| EM2 | EM2 | EM2 d | 0~99999 | ||
| EM3 | EM3 | EM3 d | 0~99999 | ||
| EM4 | EM4 | EM4 d | 0~99999 | ||
| EM5 | EM5 | EM5 h | 0~99999 | ||
| EM6 | EM6 | EM6 d | 0~99999 | ||
| EM7 | EM7 | EM7 d | 0~99999 | ||
| EM8 | EM8 | EM8 d | 0~99999 | ||
| EM9 | EM9 | EM9 d | 0~99999 | ||
| EMA | EMA | EMA d | 0~99999 | ||
| EMB | EMB | EMB d | 0~99999 | ||
| EMC | EMC | EMC d | 0~99999 | ||
| IR | IR | IR d | 0~99999 | ||
| DR | DR | DR d | 0~99999 |
Configure the communication protocol


PLC Settings(CX-Programmer)
Open cx-programmer, create a new PLC project or open the project that has been created.
Create new project: [File]→[New]→[Device Type]CP1E→[settings]→[General]→[CPU Type]N30→[OK]→[OK].

PLC Default Parameters:[Settings]→[Built-in RS232C Port]→[Communication Settings]→[Standard]9600,1,7,2,E means:[Baud rate] 9600, [Data bits]7, [Stop bits] 2,[Parity] EVEN→[Unit Number]0 →[Mode]Host Link(Defaut).

Cable Wiring

Pin Definition Diagram

CP2E Series Serial
Supported device:CP2E series,CP2E-N20DT-D
HMI Settings
| Items | Settings |
|---|---|
| Protocol | OMRON CJ TCP FINS Ethemet |
| Connection | Ethernet |
| Port No. | 9600 |
| Device No. | 0 |
| HMI No. | 0 |
2.1 Create new HMI project
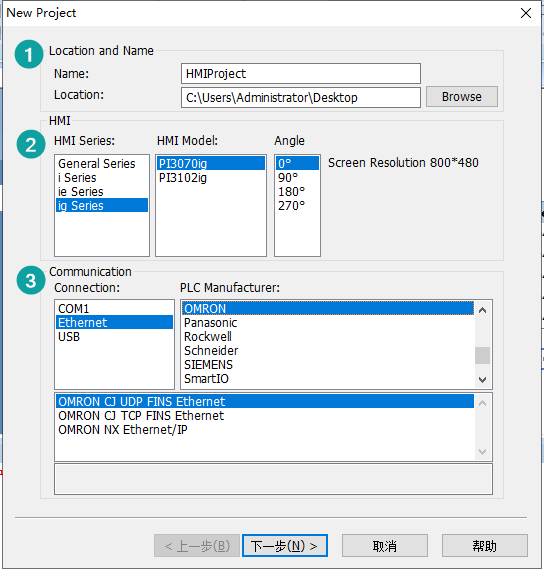
Open PIStudio Software>>New Project, as shown in the figure below, set the touch screen project model and communication device type in sequence.
2.2 Config HMI communication settings
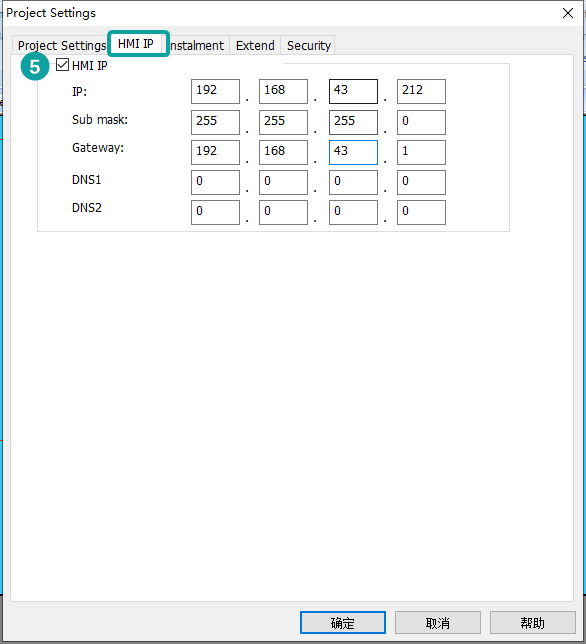
(1) Select the protocol as CJ UDP FINS Ethernet, then set the right PLC IP and corresponding port.
For example, in this case, PLC IP is 192.168.43.101.

- Set the HMI IP as the same segment with PLC side. For this case, it is 192.168.43.212.
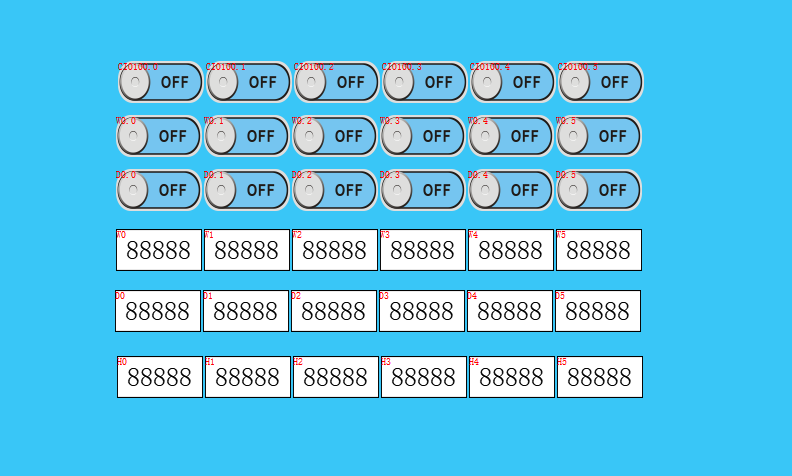
- Program the HMI screen and put PLC address.
2.3 Config PLC communication settings
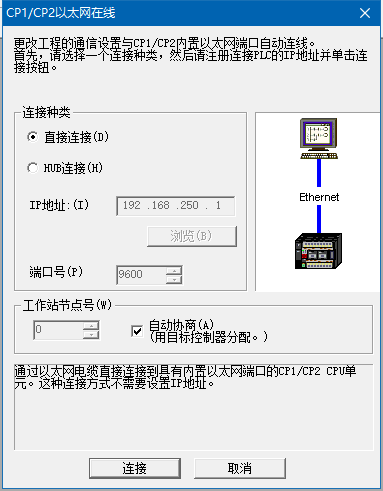
(1) Using CX Programmer P9.72 or version above to connect the PLC. Click "PLC" on toolbar, select "auto online", select "CP1/CP2 built-in Ethernet online".

(2) Select "Direct connection" on the pop-up window. After connecting, it will prompt whether to upload the PLC program automatically, this can be selected as user need.
(3) After the connected successfully, upload the configuration settings in "Settings" from the program tree on the right side.

- After opening the Settings , select the option "transfer from PLC" to upload the configuration information from the PLC.

Figure 2-8
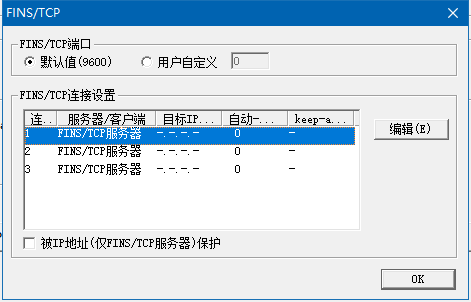
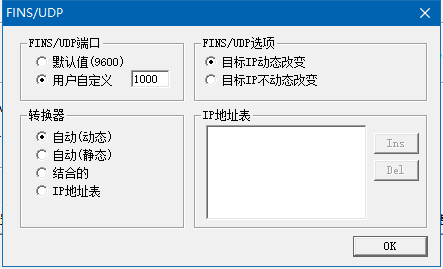
- On the built-in Ethernet(Last one tab from Settings), will see the IP address, Node number and other related information. Node number need to configured as 101, Node number does not exist in the option of 0.

- We will see the corresponding information available on the corresponding FINS/TCP and FINS/UDP settings.
3.Notice
(1) The number of Ethernet nodes of Omron CP2E PLC is not set as 0 but can only start from 1. If the number of nodes is 0, the IP settings of PLC may be invalid and cannot be pinged through PC command window;
(2) After config the parameters of Ethernet, it will take effect only after power off and restart;
(3) When multiple PLCs communicate simultaneously, try to ensure that the port numbers are not duplicated.
EC55 Protocol
Supported device: EC55 temperature instrument
1)HMI Settings
| Items | Settings | Note |
| Protocol | Omron EC55 | |
| Connection | RS485 (9600, 2, 7, EVEN) | |
| Port No. | None | |
| PLC station No. | 0 |
2)Address List
| Type | Register | Device range | HMI range | Function |
| Double word | C0 | 0-13 (Hex) | 0-19 | Set read only parameter for area 0 |
| C1 | 0-4D(Hex) | 0-77 | Set Read/Write parameter for area 0 | |
| C3 | 0-CD(Hex) | 0-205 | Set Read/Write parameter for area 1 | |
| Word | 80 | 0-13(Hex) | 0-19 | Set read only parameter in area 0 |
| 81 | 0-4D(Hex) | 0-77 | Set Read/Write parameter in area 0 | |
| 83 | 0-CD(Hex) | 0-205 | Set Read/Write parameter in area 1 | |
| CP | - | 0-6 | Read controller intrinsic property | |
| CS | - | 0-2 | Read controller states | |
| CA | - | 0-17 | Action command |
3)Device Settings
Omron E5CC PLC configuration
After entering the Communication Settings menu, please set the parameters to the default values for the following table. Press the cycle key of the instrument to enter the next setting.

According to PLC configuration and communication port configuration information of the HMI, provide the corresponding steps and configuration screenshots. This configuration needs to communicate properly with the above PLC configuration. The project settings are as follows

✎Note: The communication settings for HMI should be consistent with this setting.
Cable Wiring


✎Note:
- COM3 only available in PI8000/PI9000 series.
- CA address could not support continuous writing function;
- Because of CP address intrinsic property: read control intrinsic property, so please place the character input part in use. Set address with CP0 and character length 10, used to display controller type. And place a number input part, set address with CP5 (cache size). Do not place other CP type address without CP0 in screen, otherwise CP type address is invalid
- When set value into read & write address, it is necessary to switch the temperature instrument meter to the corresponding interface according to the menu of the instrument where the address locates, so that the value could be written, otherwise, the value could not be written; When the communication write setting of the instrument is turned off, the writing function is invalid. Writing function could be opened by using the 00 address of the CA register, which write 01 value.
- When continuous writing of a value to a read-write address, please make sure all continuous writing address could be written. Otherwise, if one of these addresses could not be written, then all continuous writing commands will fail.
- Because of the mechanism problem, this protocol could not support CompoWay/F function that is read-write function of variables in protocol document.
- When using double-word address, set the data format to 32 bits, otherwise the read/write function is unable.
- Please set the communication delay time of 10ms in setting, to avoid that the instrument may not be able to communicate in a short time due to too fast data access and too much connection requests.
 Because of the particularity of the instrument, it is necessary to write the value of the address in the menu interface corresponding to the address, and to enter the menu where the address locates, so that the value could be written.
Ethernet/IP (NX/NJ Serirs)
Supported series: Omron NX/NJ series
HMI Setting
| Items | Settings | Note |
| Protocol | Omron NX/NJ Ethernet/IP | |
| Connection | Ethernet | |
| Port No. | 44818 | |
| PLC station No. | 1 |
Address list
| Data type | Memo | Range |
|---|---|---|
| BOOL | 1 | FALSE(0) or TRUE(1) |
| BYTE | 8 | 0~255 |
| WORD | 16 | 0~65535 |
| DWORD | 32 | 0~4294967295 |
| LWORD | 64 | 0~(2^64-1) |
| SINT | 8 | -128~127 |
| USINT | 8 | 0~255 |
| INT | 16 | -32768~32767 |
| UINT | 16 | 0~65535 |
| DINT | 32 | -2147483648~2147483647 |
| UDINT | 32 | 0~4294967295 |
| LINT | 64 | (-2^63)~(2^63-1) |
| ULINT | 64 | 0~(2^64-1) |
| REAL | 32 | -3.402823466E+38~3.402823466E+38 |
| LREAL | 64 | -1.7976931348623158E+308~1.79769313 48623158E+308 |
| DATE | 32 | 1970-01-01~2106-02-07 |
| TIME | 32 | 0D0H0M0S0MS~49D17H2M47S295MS |
| DATE_AND_TIME | 32 | 1970-1-1-0:0:0~2106-02-07-06:28:15 |
| TIME_OF_DAY | 32 | 0:0:0~23:59:59.999 |
| STRING |
Instruction
1) In Sysmac Studio, please select [Publish Only] for [Network Publish] when setting address tag.
2) When [Do not publish] is selected for a tag, different import methods may lead to different results. When import tags by [Get Tags from Device], the tag will be eliminated. If [Import tags] is selected, the tags will be imported, but the communication will not succeed.

Export labels from Sysmac Studio
Launch Sysmac Studio, under Global Variables create the address labels, and thenselect [Tools] -> [Export Global Variables];


Create a .CSV file,and Paste the [CX-Designer] into it.

Launch PIStudio, in [Communication] Settings add [Omron Ethernet/IP (NX/NJ Serirs)] protocol;

Click [Label manage];Click [Import Tags form file] and then Choose the .CSV file you need;

Communication Settings
Set PLC IP in [Device IP] settings;


Cable Wiring

CJ2M Series Serial
HMI Setting:
| Parameters | Recommended |
|---|---|
| PLC type | OMRON CV/CJ1M/CS1H |
| PLC I/F | RS232/RS485 |
| Baud rate | 9600 |
| Data bits | 7 |
| Parity | Even |
| Stop bits | 2 |
| PLC sta. no. | 0 |
PLC Setting:
Open cx-programmer, create a new PLC project or open the project that has been created.
Create new project: [File]→[New]→[Device Type]CJ2M→[settings]→[General]→[CPU Type]CPU31→[OK]→[OK].

PLC Default Parameters:[Settings]→[Serial Port]→[Communication Settings]→[Standard]9600,1,7,2,E means:[Baud rate] 9600, [Data bits]7, [Stop bits] 2,[Parity] EVEN→[Unit Number]0 →[Mode]Host Link.
Note:The serial port parameters should be set depending on field requirements

Device Address:
| Bit/Word | Device type | Format | Range | Memo |
|---|---|---|---|---|
| B | CIO | DDDDDdd | 0 ~65535.15 | I/O and Internal Relay |
| B | W | DDDDDdd | 0 ~65535.15 | Hold Relay |
| B | D | DDDDDdd | 0 ~65535.15 | Link Relay |
| B | H | DDDDDdd | 0 ~65535.15 | |
| B | A | DDDDDdd | 0 ~65535.15 | |
| B | TF | DDDDD | 0 ~ 99999 | |
| B | CF | DDDDD | 0 ~ 99999 | Auxiliary Relay |
| B | T | DDDDDdd | 0 ~65535.15 | |
| B | C | DDDDDdd | 0 ~65535.15 | |
| B | EM0 | DDDDDdd | 0 ~ 99999.15 | |
| B | EM1 | DDDDDdd | 0 ~ 99999.15 | |
| B | EM2 | DDDDDdd | 0 ~ 99999.15 | |
| B | EM3 | DDDDDdd | 0 ~ 99999.15 | |
| B | EM4 | DDDDDdd | 0 ~ 99999.15 | |
| B | EM5 | DDDDDdd | 0 ~ 99999.15 | |
| B | EM6 | DDDDDdd | 0 ~ 99999.15 | |
| B | EM7 | DDDDDdd | 0 ~ 99999.15 | |
| B | EM8 | DDDDDdd | 0 ~ 99999.15 | |
| B | EM9 | DDDDDdd | 0 ~ 99999.15 | |
| B | EMA | DDDDDdd | 0 ~ 99999.15 | |
| B | EMB | DDDDDdd | 0 ~ 99999.15 | |
| B | EMC | DDDDDdd | 0 ~ 99999.15 | |
| B | Lamp | D | 0~0 |
| Bit/Word | Device type | Format | Range |
|---|---|---|---|
| W | W | DDDDD | 0 ~ 99999 |
| W | D | DDDDD | 0 ~ 99999 |
| W | H | DDDDD | 0 ~ 99999 |
| W | A | DDDDD | 0 ~ 99999 |
| W | T | DDDDD | 0 ~ 99999 |
| W | C | DDDDD | 0 ~ 99999 |
| W | CIO | DDDDD | 0 ~ 99999 |
| W | EM0 | DDDDD | 0 ~ 99999 |
| W | EM1 | DDDDD | 0 ~ 99999 |
| W | EM2 | DDDDD | 0 ~ 99999 |
| W | EM3 | DDDDD | 0 ~ 99999 |
| W | EM4 | DDDDD | 0 ~ 99999 |
| W | EM5 | DDDDD | 0 ~ 99999 |
| W | EM6 | DDDDD | 0 ~ 99999 |
| W | EM7 | DDDDD | 0 ~ 99999 |
| W | EM8 | DDDDD | 0 ~ 99999 |
| W | EM9 | DDDDD | 0 ~ 99999 |
| W | EMA | DDDDD | 0 ~ 99999 |
| W | EMB | DDDDD | 0 ~ 99999 |
| W | EMC | DDDDD | 0 ~ 99999 |
| W | IR | DDDDD | 0 ~ 99999 |
| W | DR | DDDDD | 0 ~ 99999 |
Wiring Diagram:
RS-485

Pin Definition Diagram

RS-232
CPU Port (CPM2A,CQM1/1H,C200H/HS/ALPHA series)
Communication Module:
CPM1-CIF01 adapter (for CPM1/CPM1A/CPM2A series, CQM1/CQM1H series) CPM1H-SCB41 communication module (for CQM1H-CPU51/61)
The serial port pin assignments may vary between HMI models, please click the following link for more information.

C200HE Series Serial
Supported series: Omron C200HE series
HMI Settings(recommended)
| Item | Recommended |
|---|---|
| Protocol | OMRON HOSTLINK |
| Connection | RS232 |
| Baud rate | 9600 |
| Stop bits | 2 |
| Data bits | 7 |
| Parity | EVEN |
| PLC Station No. | 0 |
| HMI Station No. | 0 |
Address List
| Type | Device registers | HMI registers | Format | Range |
|---|---|---|---|---|
| Bit | IR | IR | IR d | 0~99999 |
| Bit | LR | LR | LR d | 0~99999 |
| Bit | HR | HR | HR d | 0~99999 |
| Bit | AR | AR | AR d | 0~99999 |
| Bit | TIMB | TIMB | TIMB d | 0~99999 |
| Bit | CNTB | CNTB | CNTB d | 0~99999 |
| Bit | TIM | TIM | TIM d | 0~99999 |
| Bit | DM | DM | DM d | 0~99999 |
| Bit | CNT | CNT | CNT d | 0~99999 |
| Bit | WR | WR | WR d | 0~99999 |
| Bit | LAMP | LAMP | LAMP d | 0~0 |
| Word | IR | IR | IR d | 0~99999 |
| Word | LR | LR | LR d | 0~99999 |
| Word | HR | HR | HR d | 0~99999 |
| Word | AR | AR | AR d | 0~99999 |
| Word | TIM | TIM | TIM d | 0~99999 |
| Word | DM | DM | DM d | 0~99999 |
| Word | CNT | CNT | CNT d | 0~99999 |
| Word | WR | WR | WR d | 0~99999 |
Cable Wiring

