2.1 Register
Users could register a V-BOX account through a mobile phone number or email. The registration interface is shown in the figure below, but users in other countries (except China) could only register with an e-mail address.
For mobile app register interface:

For PC V-NET register interface:


Operating procedures of Registering by an Email address
- Enter user name, the user name should be a unique name. If the username already exists, the prompt message will appear, as below. And numbers, letters, and underscores are legal characters for the username, and the length of the user name shall not exceed 20 digits;

- Enter the email address.
- Set the password, and please ensure that the password which has been entered secondly shall be consistent.
- Select "I have read and accept it", after reading "Registration Clauses", please make sure you could accept all terms of this agreement.
- Click "Register" to execute account registration, and the prompt message would display as below.

2.2 User login
When the user logs in, the account could be the user name or email address (subject to the registered account). Only when the user name or email address is legal and matches the password, can the login succeed. The same account could be logged in at the same time on the web and mobile, but not on different PC devices at the same time. If you use the same account to log in on different PC devices successively, the account on the device that logs in first would be forced offline.
The configuration of the main picture, background color, and background picture of the middle part in the landing page could be modified. Set the module parameters for configuration through the super management (main station super management and virtual super management) background landing interface. The virtual super management could only be configured if it is approved. The login interface is shown as below:

Operating procedures of login
- Select user interface, Chinese or English are supported;
- Enter user name, such as WECONSupport
- Enter password;
- Check "Keeping the state of sign in within 30 days", if necessary, kindly note, please don't use this option in public PC;
- Click "Sign in" button

2.3 Retrieve password
When the user forgets the login password, the password could be retrieved through email. The password could be modified successfully only when the entered verification code is consistent with the verification code received by the user on email and the entered password is legal, As shown below.

2.4 Information navigation bar
Information navigation bar is on the top of the right interface of the V-NET platform, and it would be displayed on all pages of the platform (except for special pages, such as full-screen map pages, etc.), as shown in following figure.

Shortcut menu
The shortcut menu configuration is on the left side of the information navigation bar, the shortcut menu of user-defined configuration is displayed here. The homepage is a fixed menu and could not be cancelled. The shortcut menus that could be configured include Role, Account setting, Email, Account management. The configurable shortcut menu could be configured in the administrator account.
Click the button  on the information navigation bar to choose to close or display the shortcut menu in the pop-up box, as shown in the following figure.

Service
“Service” module includes eight functions, including Account Management, Role, Cloud SCADA, Email, Help, Feedback, HTTP access, Request to share.

(1) Account management. Refer to detail for 06 Account management
(2) Role. Refer to detail for 07 Role management.
(3) Cloud SCADA. Refer to detail for 4.5 Cloud SCADA
(4) Email. Refer to detail for 4.1.5 Status push(Email)
(5) Help. Click it to jump to this user manual.
(6) Feedback. Click it to jump to the user feedback interface and fill in product requirements, function suggestions, product defects, etc., as shown in the following figure.

(7) HTTP access.
Click it to jump to the configuration interface of HTTP access, as shown in the following figure.

(8) Request to share.
After the other account agrees to the request of sharing the v-box or ig screen, after the other party’s account agrees, the device requested to be shared would be displayed in the "Share with Others" list under my account. To request sharing, the machine code of the v- box or ig screen must be entered.
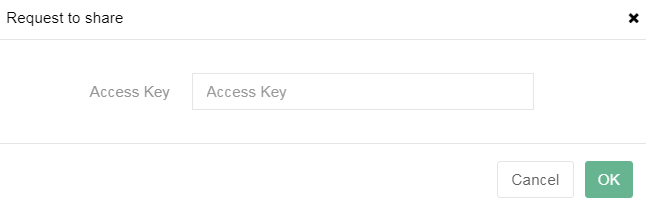
The system would send a share request to the device account and wait for the other account's approval or rejection.

Account Information
The right of the information navigation bar displays the currently logged-in account information, including user avatar, username. Click username to display a drop-down box, including User avatar, Administrator account name, Account type, Change password, Modify avatar, Account details, Localization, and Sign out.
(1) Modify avatar. Upload the user avatar. If the user does not upload the avatar, the default profile picture is used. As shown below.

(2) Change password. Users need to enter the old password and the new password. Only when the entered password is valid would the operation succeed. Shown as below.

(3) Account details. It includes users' information and company information.
- users' information includes Username, Email, Phone number, and click "edit" to change email or phone number.
- Company information includes Company name, Owner, Contact. Phone number and Email. As shown below.

(4) Localization. Click it to hange the time zone, region, and map of the account. After the change, the time reported by the device would be converted and displayed in the set time zone. As shown below.


2.5 Home page
The home page is the page that the user jumps to by default after logging in to the platform. Users could jump through the shortcut menu configured in the information navigation bar. The home page includes four modules, including device statistics information, map thumbnail, announcement, and current alarms. The home page is shown in the following figure.

Device statistics information
The device statistics information includes the current alarm numbers of the v-box/ig screen, the items of current alarm devices, the number of online devices, and the number of upgradeable devices. The progress bar in the statistical information is the proportion of data and total number.
① Current alarm items. The number of current alarms is divided by the number of all alarms.
② Number of current alarm devices. The current number of devices with alarms is divided by the total number of all devices.
③ Number of online devices. The number of online devices is divided by the total number of all devices.
④ Number of upgradeable devices. The number of devices that can upgrade firmware is divided by the total number of all devices.
Click the number of upgradeable devices, it would jump to the upgradeable device list page, where you could upgrade the v-box online, as shown in the following figure.

Map thumbnail
The map thumbnail could realize the functions of color switching, point aggregation and dispersion, normal and satellite map switching, as shown in the following figure.

Click the [Details] button in the upper right corner of the map thumbnail to enlarge the map.
| Icon | Name | Meaning |
|---|---|---|
| On line | V-box or ig screen is online. |
| Off-line | V-box or ig screen is off-line. |
| Passthrough | V-box or ig screen status is in passthrough. |
| VPN passthrough | V-box or ig screen status is in VPN passthrough. |
| Ordinary download channel is ready | V-box or ig screen is ready for ordinary download channel (can perform ordinary download). |
| Ordinary download | V-box or ig screen status is in ordinary download. |
| Off-line alarm | V-box or ig screen status is in off-line alarm. |
| On line alarm | V-box or ig screen has at least one current alarm, and the device status is in online alarm. |
Announcement
It displays the latest 10 notification announcements, including device transfer, sharing, system notification, and other messages. As shown in the following figure.

Current alarms
It displays the latest 10 current alarms of the designated v-box/ or ig screen that the user has the authority to operate. As shown in the following figure.

2.6 Device List Management
2.6.1 Device list
There are five functional areas in the device list modules: Multi-grade device list, Template list, Customized monitoring points, Device search, and Toolbar.
The multi-level device list displays all the devices under the account and displays it in the form of a multi-level grouped tree menu. Select the v-box device  , it would automatically jump to the functional module interface. There are seven modules, including Real-time Data, Alarm, Historical data, Cloud SCADA, Lua script, Pass-through, and Configuration. As shown in the following figure.

Select the ig screen  , it will automatically jump to the functional module interface. There are four modules, including Remote monitoring, Data view, Pass-through, and Basic. As shown in the following figure.

(1) Group right-click menu
Position the mouse on the multi-grade group name, right-click the mouse to display a drop-down menu bar, including Map, Add, and Rename functions. As shown in the following figure.

- Map. It displays the location of all v-boxes or ig screens under this group on the map.
- Add. Add a new v-box or ig screen to this group.
- Name change. Change the group name
(2) Device right-click menu
Position the mouse on the name of a v-box or ig screen under a multi-grade group name, right-click the mouse to display a drop-down menu bar, including Follow, Share Device, Move Group, Copy Access Key, Transfer, Replace, Pass-through, Cloud SCADA, Share configure, Export, Import, Mark on the map, Generate template. As shown in the following figure.
V-BOX

ig screen

① Follow
Select the device in the list and right-click, then click [follow] to add the devices you need to focus on to the following list, and the followed v-box or ig screen could be viewed in the "My Follow" list, right-click and select cancel follow to delete it. As shown in the following figure.

② Share device
Share the v-box or ig screen device with permission (read and write) to other accounts. After sharing, the device is still in its own device list, and other accounts could view it without receiving it.
Select the device in the list and right-click, then click [share device] in the menu bar to share the device. After sharing successfully, view the details in the "My Shares" list. As shown in the following figure.


③ Move group
Select the device in the list and right-click, then click [Move group] to modify the group to which the v-box or ig screen belongs. As shown in the following figure.


④ Copy Access Key
Select the device in the list and right-click, then click [Copy Access Key] to copy the access key of the v-box or ig screen to the clipboard. As shown in the following figure.


⑤ Transfer
Transfer the v-box or ig screen from one account to another. the v-box or ig screen would not change any information except for the user, The transfer would be successful after the account received the device, and the device will no longer be in your own account.

⑥ Replace
Select the device in the list and right-click, then click [Replace], and the old v-box (same model) will be replaced with a new one in this account. The new one could not be bound to any account during the replacement process. As shown in the following figure.


⑦ Pass-through
Select the device in the list and right-click, then click [Pass-through] to jump to the Pass-through interface. As shown in the following figure.


⑧ Cloud SCADA
Select the device in the list and right-click, then click [Cloud SCADA] to jump to the Cloud SCADA interface. As shown in the following figure.


⑨ Share configuration
Share the configure of v-box by the share code, and the validity period of the share code must be set. Select the device in the list and right-click, then click [Share configure] to share the share code of the v-box. Copy the share code, jump to the [configure] interface, and click the [sharing code import] to import the share code. As shown in the following figures.


⑩ Export
Select the device in the list and right-click, then click [Export] to export the configure of the device.
⑪ Import
Select the device in the list and right-click, then click [Import] to import the configuration for the device.
⑫ Mark on map
Select the device in the list and right-click, then click [Mark on map] to mark the new latitude and longitude on the map for the current v-box or ig screen.
⑬ Generate template
Select the device in the list and right-click, then click [Generate template] to generate a new template from the device configuration. The generated template is in the template list.
2.6.2 Device search
Enter the device name or the machine code in the search box, and it will automatically match to find the device. As shown in the following figure.

2.6.3 Custom tags
Click [Custom tags], it would pop up the interface, including Real-time Data, Alarm, Historical Data. Users could customize a certain monitoring point under the designated v-box to the data monitoring interface, and view all alarm records and historical data. As shown in the following figure.

2.6.4 Toolbar
The toolbar at the bottom of the module is mainly a collection of buttons for operating on the v-box or ig screen and device list. As shown in the following figure.

2.6.4.1 Add device
 Add new v-box or ig screen.
2.6.4.2 Device list
 Display the multi-grade device list of all the v-boxes and ig screen.
2.6.4.3 Group management
 Administrators could manage v-box and ig screen groups.

① Add group. When adding a group, the group name should be entered. As shown in the following figure.

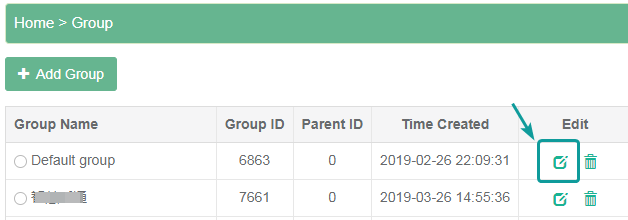
② Edit group. When editing a group, the new group name should be entered. As shown in the following figures.

③Delete group. When deleting a group, if there are devices under the selected group, the group cannot be deleted. To ensure operational reliability and data security, a dialog box would pop up to confirm whether the operation continues. As shown in the following figure.

2.6.4.4 My follow
 It is the list of v-boxes or ig screens followed by the account. As shown in the following figure.

2.6.4.5 Share list
 The share list is divided into share with others and my share.
① Share with others
It is the list of v-boxes or ig screens shared by other accounts. All the data in the v-box or ig screen could be viewed, but the configuration could not be modified. Only the sharer could cancel the sharing of the v-box or ig screen, and the shareee could not cancel the sharing. Right-click the name of the device could view the sharer. As shown in the following figure.

② My share
It is the list of v-boxes or ig screens shared by the account. Right-click the name of the device could view the details of the sharee, and modify the configuration. As shown in the following figure.


✎Note:
- After the account cancels the sharing, the v-box or ig screen will be removed from the sharing list of both accounts.
- When the main account is unbound or handed over to the v-box or ig screen, the shared information of the v-box or ig screen would be automatically canceled.
- When the permission of the engineer account is modified or the assigned v-box or ig screen changes, the shared v-box or ig screen would change synchronously.
2.6.4.6 Refresh list
 Refresh the list of v-box or ig screen.
2.6.4.7 Device multi-condition order
 The v-box or ig screen is sorted according to a different status. The filter conditions include display order and other order. Click the restore button in the upper right corner to re-select the filter order conditions.

① Display order (Condition display) includes device type, device status, and device association. Filter all v-box or ig screen lists according to the selected conditions.
② Other order ( Selected first) include device name, device type, device status, and device association. Sort all the v- boxes or ig screens in the list according to the selected order condition.