2.10 System Management
2.10 System Management
2.10.1 Message push configuration
2.10.1.1 Email setting
(1) Sender configuration
Enter SMTP settings: used to configure the sender of the email push message, you need to enter the sender's email and other settings.
Detect SMTP settings: Enter the email address to be verified, and a test email will be sent to the email address to remind "SMTP settings successful".

(2) Detect email
After configuring the sender's email address and other information, enter the test recipient's email address (which can be different from the sender's email address). If the configuration is correct, it will prompt "Email sent successfully, a test mail will be received in the test Email address". You can check the sent test email in the mailbox, as shown in the figure below.

Please refer to the following table for common email servers and default port numbers:
| Email server | Port number | |
|---|---|---|
| 163 mail | smtp.163.com | 465 |
| 126 mail | smtp.126.com | 465 |
| QQ mail | smtp.qq.com | 465 |
| sina mail | smtp.sina.com | 465 |
| sohu mail | smtp.sohu.com | 465 |
| yahoo mail | smtp.mail.yahoo.com.cn | 465 |
| gmail | smtp.gmail.com | 465 |
| exmail | smtp.exmail.qq.com | 587 |
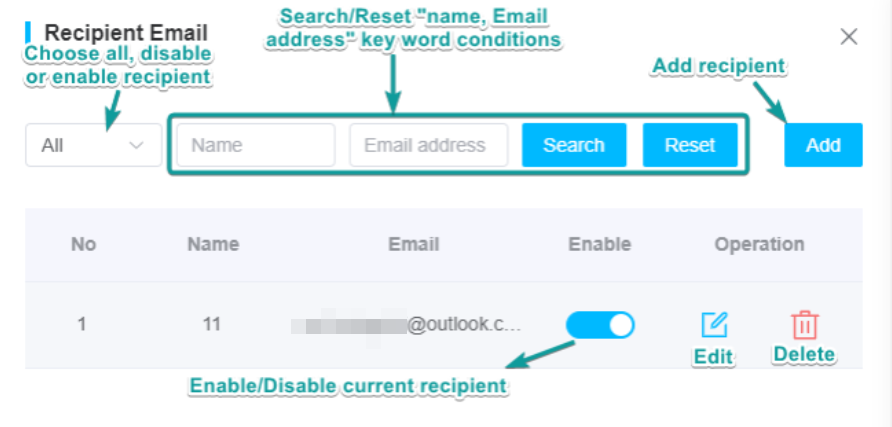
(3) Recipient Email
①In the email configuration interface, click [Recipient Email] in the upper right corner.

②Add the "recipient email" of the current account, The added recipient email cannot be the same as the existing recipient mailbox, as shown in the figure below.
Name: length limit is 32 characters, character type is unlimited.
Recipient email: limit xxx@xxx.xxx format, length limit is 64 characters.

You can search, edit, delete, enable, and disable the address book of the "recipient email" of the current account, as shown in the figure below.
2.10.1.3 Push settings
Configure the platform push message method, as shown in the figure below.

Merge strategy: adjust the push cycle of alarm messages (this setting is only valid for alarm message push). The instructions are as follows.
①Merge strategy means pushing data within a specified interval at one time, which is only valid for alarm type strategies.
②Delay time: After the V-Box reports the message, it will push the report again after the specified time (default 10s), which cannot be set to be greater than the notification frequency.
③Notification frequency: The maximum time a message waits after being triggered.

Add strategy: Add a new push strategy, configure the platform push message type and push method. The instructions are as follows.
①Push method: trigger, period
②Message type: alarm, maintenance and device status
③Push channel: email

(1) Add strategy - Push method
1)Push method: Trigger
①Message type: alarm
Select alarm monitoring points: supports cross-page and cross-device multi-selection, up to 10 monitoring points can be selected;
Alarm monitoring point alarm level:  red-particularly serious alarm,
  orange-serious alarm,
  theme color (the example image is cyan)-general alarm;

Select monitoring points, the interface description is as follows.

②Message type: maintenance

③Message type: device status

2)Push method: Period
Periodic pushing: Every day - every hour, every week - Monday 08:00, every month - 1st 08:00, as shown in the figure below.

(1) Add strategy - Push channel
Push channel: Email
Check the [Email] selection button, add the content to be pushed by email, click the button, and select the "Email Recipients" list, as shown below. (If there is no list, please add it in [Mail Configuration])
 : Insert the "bit address" and "word address" in the email.

2.10.2 System log
Log management consists of: operation log + device operation log. Sensitive operations such as control, modification, setting, and login are stored, and statistics are accurate to events and people. Operation logs can also be exported, which helps decision makers better analyze.
Purpose of log management;
- Evidence traces. When there are multiple users operating the system, disputes are bound to arise. At this time, logs come in handy to accurately determine responsibility.
- Troubleshooting. Bugs that occur during device operation and problems that occur during use often cannot be reproduced. In this case, R&D personnel can troubleshoot and locate the problem by retrieving device logs.
- Analyze user behavior and optimize system design to make it more in line with user habits.
2.10.2.1 Operation log
Record user operation logs: XX user's "login/exit, new, modify, delete, import/export" operations, as well as the status display of successful and failed modifications, as shown in the figure below.

2.10.2.2 Device running log
Record the operation log of the device: the operation of "device status, device instruction, device configuration" of XX device, as well as the status display of successful and failed modification, as shown in the figure below.

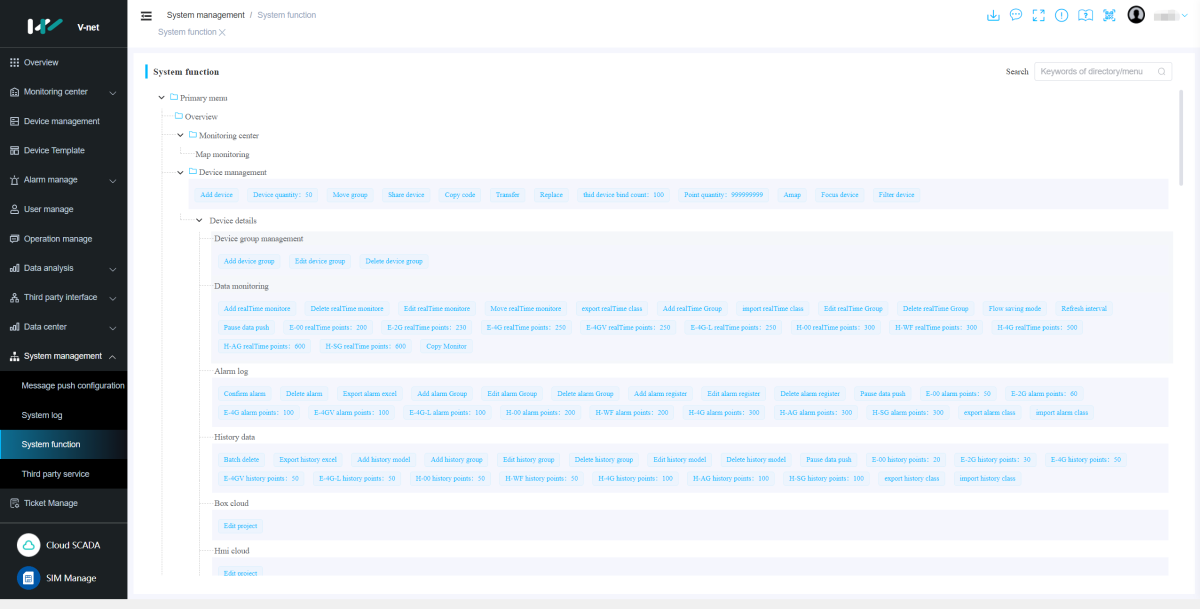
2.10.4 System function
The system function is used to view the role function permissions of the current account.
2.10.4 System function
The system function is used to view the role function permissions of the current account.

2.10.5 Third party service
2.10.5.1 EZVIZ configuration
EZVIZ configuration: Configure the EZVIZ Cloud related content used in the current account, such as large screen monitoring in large screen monitoring and video components in cloud SCADA. The current functions include: operations on EZVIZ accounts and operations on EZVIZ Cloud devices. Among them, operations on EZVIZ Cloud accounts include: adding, editing, and unbinding.
(1)Add account
Click the [+Add Account] button and enter the alias, correct appKey and appSecret in the pop-up window, as shown in the figure below.

(2)Get the EZVIZ Cloud key
"appKey and appSecret" need to log in to the EZVIZ Cloud account, and after registration, obtain the application key in the application information. (Subject to the actual operation process of the EZVIZ Cloud platform)

(3)Add EZVIZ Cloud device
Click on the device list to view or add EZVIZ cloud devices.

Click [+Add Device] and fill in the "Serial Number and Verification Code" of the EZVIZ Cloud Camera Base, as shown in the figure below.

2.10.6 System configuration
System configuration-device configuration. It is more convenient to set the device history data statistics. Support various filtering conditions and one-key opening function. You can open history statistics for both V-Box and HMI.

2.10.7 Menu manage
The menu management page is designed to help users configure custom sidebar menus. It supports creating multiple custom menus and assigning menus to sub-accounts.

2.10.7.1 Add menu
①Click the "Add custom menu" button in the upper left corner, as shown in the figure below, to enter the operation of adding a new menu.

②A pop-up window will appear on the right, where you can define the custom menu name and menu description first.

②Click on a specific menu item to enter the modification of the menu item name, as shown in the figure below.

③Click the icon on the right side of the menu item to open the icon settings pop-up window. Click the icon in the pop-up window to modify the icon of the menu item, as shown in the figure below.

③Click the checkbox on the left side of the menu item to switch whether the menu item is displayed in the sidebar (check to display, uncheck to hide), as shown in the figure below.

④Click the switch button on the right to enter the modification state of the menu item name in another language (currently only Chinese and English are supported), as shown in the figure below.

④Click the "Confirm" button in the lower right corner of the new custom menu to complete, as shown in the figure below.

2.10.7.2 Modify menu
The custom menu will be displayed on the page in the form of a card. The first menu displays the default menu of the platform, which cannot be modified or deleted. Click the "Enter to modify" button on the menu card to modify the menu content.

2.10.7.3 Switch menu
Click the "Click to activate " button in the upper right corner of the menu card to switch the menu, as shown in the figure below.

2.10.7.4 Delete menu
Click the "Delete menu" button on the menu card to delete the menu.

2.10.7.5 Assign menu
In the Role management tab under the User manage page, when editing a role, you can assign the custom menu created by the current user to the sub-account, as shown in the figure below.
