03 Project Settings
Communication
The following steps will show how to change HMI project communication settings.
Operating procedure
Click "Project"→"Communication" to open setting window.

Click "Setting" to open "Communication device" window.

Select connection way, device protocol.
Click "Settings" to change communication parameters, COM is for serial connection, Device IP is for Ethernet connection.

Click "OK" to save changes.
Result
HMI communication is changed.
Project settings
This place is mainly available for parameters settings, like model selection, storage method or some others parameters.
The ![]() is on the Project menu from toolbar, at upper left side of software.
is on the Project menu from toolbar, at upper left side of software.
General Procedure
The procedure of "Project Settings" as below picture shows.

Project settings

HMI model
"HMI Model" provides the function of modifying the HMI model to help the user switch the project to suit different models. Because different models have different resolution, when user trying to change this option, PIStudio will ask you whether want to generate a backup of older version project if you enable the option project backup.

Operating procedure
- Open "Project Settings" windows.
- Select HMI Series.
- Select HMI model.
- Check the box of "Project backup" according to the needful.
- Click "OK" to save settings and exit window.
Enable screensaver
Screensaver provides the function is that prevent the HMI from displaying the same screen for a long time due to unattended operation. After a certain interval, the HMI will jump into a screensaver screen.

Standby Time: The interval time to enter the screensaver Range 0~43200 seconds.
Screensave No.: Set which screen will jump into when screensaver is executed.
Operating Procedure
- Open "Project Settings" windows.
- Check the box of "Enable Screensaver".
- Modify Standby Time according to your need.
- Select screensaver screen in drop-down list, use screen No.1 for example.
Enable Dynamic Screensaver
Same as Screensaver. Dynamic Screensaver provides the function is that prevent the HMI from displaying the same screen for a long time due to unattended operation. But Dynamic will be able to display animation.

Enable dynamic screensaver: If the screen is not operated within the set waiting time, it will automatically enter the set animation effect, and operating the screen again will exit the dynamic screensaver.
Standby Time(minutes): When the screen is not operated, the waiting interval to enter the dynamic screensaver, ranges 1~720.
Animation Type: Types of effects currently provided are Raster, Blinds, and Bubble.
Initial screen
The "Initial screen" provides the interface to user to set initial screen. Initial screen means the first one displayed screen when HMI is powered on.
![]()
Operating Procedure
- Open "Project Settings" windows.
- Select initial screen in drop-list, use screen 2 as an example.
- Click "OK" button to save setting and exit windows.
Operation record
This setting needs to be used in conjunction with "User Permission" function, which is valid only when "User Permission" function is turned on. The detailed information of "User Permission", "Operation Record" is mainly recording the operation for the current user after user login.
![]()
Byte order
Floating point is one of the commonly used data formats, and it is two-byte order mode. PIStudio provides the interface in "Project Settingss" for setting the byte order.The default mode is Little-endian. This function has no effect on the HSW addresses.

Operating Procedure
- Open "Project Settings" windows.
- Select "Little-endian" or "Big-endian" mode.
- Click "OK" button to save setting and exit window.
Switch action
The "Switch action" provides the action trigger settings. It is the effect timing of when the button executes the action.
![]()
- Take effect when click down: The action will be executed when pressing button.
- Take effect when click up: The action will be executed when releasing button.
Operating Procedure
- Open "Project Settings" windows.
- Select switch action mode.
- Click "OK" button to save setting and exit window.
Backlight
"Backlight" is for controlling LCD, after designated time of inactivity, HMI LCD will turn OFF automatically, but this setting will be invalid when alarm is ON. The default setting is never turning OFF LCD.
![]()
Operating Procedure
- Open "Project Settings" windows.
- Select duration time.
- Click "OK" button to save setting and exit window.
Data record storage
This setting needs to be used in conjunction with [Data Record] function, which is valid only when [Data Record] function is effective. The data record files will be saved in Flash.
![]()
Operating Procedure
- Open "Project Settings" windows.
- Select storage path.
- Click "OK" button to save setting and exit window.
Designer Password
"Designer Password" provides the encryption functions of the HMI project, including upload and decompile operations. Also it affects the user permissions, installments and other functions.
"Designer Password" could well protect the project file from being cracked, also it is extremely important data, if the user set the password change, please do a good job of password backup, once lost it, the project will not be uploaded from the HMI to the computer, also nobody could decompile .wmt file without password.

Operating Procedure
- Open "Project Settings" windows
- Enter password
- Click "OK" button to save setting and exit windows
Use screen ID address
"Use Screen ID address" provides the function of controlling HMI screens by specific address' value. The address could be set by the user.

Operating Procedure
- Open "Project Settings" windows.
- Check "Use Screen ID Address".
- Edit address.
- Click "OK" button to save setting and exit windows.
Result
User HDW0 as an example:
- If HDW0=0, HMI displays Screen No.0.
- If HDW0=1, HMI displays Screen No.1.
- …
HMI IP settings
This is for setting HMI static IP (HMI also could support DHCP). When enable DHCP mode, the setting is invalid.
There are also system internal for setting them.

Operating Procedure
- Open "Project Settings" windows.
- Open "HMI IP" sub-window.
- Check "HMI IP".
- Enter IP.
- Click "OK" button to save setting and exit windows.
Remote access password
"Remote Access Password" is for PI8000/PI9000 series HMI, the password is for remote function, when users use Smart APP on mobile or weconcloud website on PC, which could access HMI screen remotely, the APP or website will require this password.

Operating Procedure
- Open "Project Settings" windows;
- Open "HMI IP" sub-windows;
- Enter password;
- Click "OK" button to save setting and exit windows;
Server of HMI remote access
"Server of HMI remote access" is for PI8000/PI9000 series with -R model HMIs, when users use Smart APP on mobile or weconcloud website on PC, there are two options from selection available for speed up access. Server 1 is for Chinese users, Server 2 is for aboard users.

Installment
"Installment" meets the needs of the designer or equipment manufacturer to provide the trial period to the end customer.
At the same time, it provides the function of installment charges to designers and equipment manufacturers. The expiration date could be defined by the user.

Static mode
The expiry time and key of each period could not be empty, and they need to be configured in advance. And the expiry time of the latter period need to be later than the expiry of the previous period.
- Use admin key: It can be used for unlock all expirations,in addition to each period key.If users select [use admin key] function,once users enter the admin key when HMI expires,the installment payment function will be disabled.
- Admin: Password (Key) for "use admin key";
- Max periods: The period of static installment payment range is 0-12.When the maximum number of period is 0,it means that the instalment payment function is disabled;
- Begin Period: Set the installment payment to start from the first period, the range is 1-13;
- List: Configure a list based on [Maximum Periods] and [Begin Period],where user can configure the password and expiration time for each period.
- Use admin key: It is independent password, and all the expired password can be unlocked by it. If you check it, the installment function would be disabled after you input the admin key. The key can be a combination of "A~z", "a~z" and "0~9"(case-sensitive).
Dynamic mode
To enable the function of the installment payment, you must set up the following parameters
- Password: Each project installment has a unique identifier. The expiry password is calculated according to password and due time.
- Current time: Select time due for the first time on the time interface.
- Expiry time: Display the current PC time (cannot set)
- Valid days: According to the due time and current PC time, system would automatically calculate the number of days (cannot manually modify).
It is configured as following:
- Password key is 123456, and the first expiration time is 2021.07.18.
- When the HMI system time reaches 2021.07.18, the HMI will pop up the password interface.
- At this time, you could use the "Password Tool" under the toolbar as shown in following picture, where the installment password needs to be the same as the one when it is downloaded to the HMI, such as 123456.
- Assuming that the next expiration time is set to 2021.07.18, the generated password is "5e9035ef".
- After entering this password on the password interface, HMI automatically recognizes that the next expiration time is set to 2021.07.18.

Operating Procedure
- Open "Project Settings" windows.
- Open "Installment" sub-windows.
- Select "Static mode" or "Dynamic mode".
- Enter password, expire time and other parameters if necessary.
- Click "OK" button to save setting and exit windows.
Result
At 5th May 2022, 18:00 HMI screen will be locked and ask enter password.
Common settings
- Enable valid period for password: The password generated by "Enable valid period for password" only valid for that day on the HMI.
- Set Bit: Set bit when HMI displays the installment screen.
- Clear Bit: Clear bit when user enters the right installment password.
- Upcoming Alert: HMI show the installment alert before expire date (before 1,3 or 5 days)
Password tool
For the detail, please click "Password tool".
Extend

Into setup
It provides entrance ways of the backstage interface.

- Startup: it means after the HMI starts and displays the LOGO, press and holding the upper-right corner within the set time is able to enter the background interface. If the time is exceeded the setting time, the long press would be invalid.
- For example, the Time is 5 seconds, then within 5 seconds after the LOGO is displayed, long press the upper-right corner can normally enter the screen. But if more than 5 seconds, long press will not be able to access.
- Running: it means when HMI running the project, press and holding the upper-right corner over certain time, it would enter the backstage interface.
- For example, the Time is 5 seconds, then long press the upper-right corner lasting over 5 seconds, it would able to access.
Operating procedure
- Open "Project Settings" windows.
- Open "Extend" sub-windows.
- Select "Startup" or "Running".
- Set "Time".
- Set "Password" if you require the password when entering the backstage interface.
Special expansion
"Special expansion" is for extending audio play and camera input functions for special HMI models.

Operating procedure
- Open "Project Settings" windows.
- Open "Extend" sub-windows.
- Check the box.
- Click "Set" button to open setting screen.
- Do configuration for function.
- Click "OK" to save and exist.
![]()
Operating procedure of Multi-link
- Open "Project Settings" windows.
- Open "Extend" sub-windows.
- Check the Enable Multi-link.
- Select the HMI is acting as Master or Slave station.
- Click "OK" to save and exist.
Result
One HMI can display in multiple screens, through Master-Slave connection.
Input device
It is used for enable input devices, like keyboard and mouse.
![]()
Operating procedure
- Open "Project Settings" windows.
- Open "Extend" sub-windows.
- Check "Enable keyboard" and "Display cursor".
- Click "OK" to save and exist.
Result
The arrow will be display in screen when HMI is running, and keyboard could be used to enter code and control arrow.
HotKey Configuration Description
Enable function
Select “Expansion" of "System Configuration"/"Engineering Parameters" in the toolbar of SACDA, and enable the keyboard before enabling the hotkeys, as shown in the following figure.

Hotkey configuration
(1) Check the "HotKey Configuration" function. When the external keyboard is enabled, the hotkey function can be customized. By configuring the lua script corresponding to each hotkey, the specific functions can be executed after the hotkey is triggered.

| System hotkeys | Features |
| Shift+ "↓" | Switch mouse mode: Default mode: The mouse can move freely. This mode is only valid when the project configuration displays the mouse; |
| Switch mouse mode: The selected box mode. The border of the selected part is set red; | |
| Switch mouse mode: The selected grayed out mode, the selected part gray out; | |
| Switch mouse mode: Mouse selected mode. The mouse rests on the selected part. This mode is only valid when the project configuration displays the mouse; | |
| Up, down, left and right direction keys | In the mouse movement mode, the free movement of the mouse cursor can be controlled; |
| In the mouse selected mode, the mouse cursor can be controlled to move directly to the center position of the specified parts of the current screen; | |
| In the selected box mode, the selected parts of the current picture can be switched. The border of selected parts will be set red; | |
| In the selected grayed out mode, the selected parts of the current picture can be switched. The selected parts will be grayed out; | |
| In the mouse selected mode, selected box mode, selected grayed out mode, the types of widgets that support toggling selected widgets are bit switches, word switches, function switches, word status, super combination buttons, value inputs, text inputs, and lua custom; | |
| Backspace | Backspace function in keyboard; |
| Spacebar | The first option is selected by default in the left and right option bars of the T9 keyboard; |
| Shift+ "↑" | Switch T9 keyboard input method mode; |
| Shift+ “←” | Switch T9 keyboard symbol mode; |
| Numbers 1-6 on the left side of the keyboard | 6 options corresponding to the left and right option bars of the T9 keyboard; |
| F1~F6 | 6 options corresponding to the left and right option bars of the T9 keyboard; |
| The "-" key next to Backspace | Left page turning of left and right option bars of T9 keyboard; |
| F7 | Left page turning of left and right option bars of T9 keyboard; |
| The "+" key next to Backspace | Right page turning of left and right option bars of T9 keyboard; |
| F8 | Right page turning of left and right option bars of T9 keyboard; |
| Shift+ "F7" | Page up of the upper and lower option columns of T9 keyboard; |
| Shift+ "F8" | Page down of the upper and lower option columns of T9 keyboard; |
| Shift+ "F1 ~ F3" | 3 options corresponding to the up and down option bars of T9 keyboard; |
| Shift+ "Backspace" | Same as esc, exit the keyboard; |
| Shift+Number and special symbol keys on the left side of the keyboard | Realize special character input, such as: ~! @ # $% ^&* () _ + {}: "<>? |
| Ctrl + Shift (press Ctrl before Shift) | Switch T9 Pinyin, alphabet and number modes of keyboard; |
| Shift+Letter | In the lowercase mode of the keyboard: Shift +letter, which can enter uppercase; In the uppercase mode: Shift +letter, which can enter lowercase; |
| Num Lock | When the corresponding indicator light is not on, the keypad numbers are not allowed to be input; |
| Enter | In the mouse movement mode and the mouse selected mode, press the Enter key, which indicates that it clicks at the mouse cursor position. (Corresponding to the press, lift and click event); |
| In the selected box mode and selected grayed out mode, select the object and then press the Enter key, which indicates that clicking triggers the center position of the selected area; | |
| In the keyboard screen and not entering the mouse selected mode, the selected box mode, the selected gray-out mode. Press the Enter key, indicating that the input is completed; | |
| Caps Lock | Switch letter case modes of the 1001and 1003 built-in keyboard. Lighting indicates switching to the uppercase mode; |
System hotkeys
HMI screen itself comes with supported hotkey function.
| HSW1892 | Polling time interval setting for keyboard keys | = 0, 50ms; = 1, 40ms; = 2, 30ms; = 3, 20ms; = 4, 10ms; |
| HSW1893 | Cursor mode switching | = 0, Default free mode; = 1, The selected box mode; = 2, The selected grayed out mode; = 3, Mouse selected mode; |
| HSW1894 | Enable specific serial keyboard | = 1, Enable; = Others, Disabled; |
| HSW1895 | Control whether keyboard keys take effect under certain circumstances | = 0, When default screen rest and screensaver status, the button trigger does not take effect; = 1, HSX1895.0=1. The button trigger will take effect when it is in the screen rest status; = 2, HSX1895.1=1. The button trigger will take effect when it is in the screensaver status; |
| HSW10611 | Set up server | = 0, Select the server configured in "Project Parameters" = 1, Select server 1 = 2, Select server 2 |
| HSW11767 | Remote screen display adaptation mode switching | = 0, Default mode. Horizontal screen project remote full screen zoom display; Vertical screen project remote zoom display in equal proportion; = 1, Full-screen zoom display; = 2, According to the screen size ratio, zoom display in equal proportion; = 3, According to the screen pixels, no zoom display; |
Lab
Lab is used for enable experimental function.
![]()
- Quick compilation: Reduce the consuming time of recompilation for current project.
- Xml Optimization: Improve xml operation efficiency and speed up screen compilation.
- Enable Lua Debugging: Control the Lua debugging window whether opened or not when using the Lua script.
Vector
It is the function deal with the display issue.
![]()
- Vector Font: Optimize the display of fonts, solve the ambiguity issue of font display, and support the large font size over 120.
- Vector Image: Pack the vector images into the compiled .wmt file to avoid the loss of vector images after project is decompiled.
Operating procedure
- Open "Project Settings" windows.
- Open "Extend" sub-windows.
- Check "Vector Font" or "Vector Image".
- Click "OK" to save and exist.
Udisk pop-up

There are two methods to enable Udisk pop-up function.
- Click "Project setting" → "Udick pop-up", the built-in screen 5004 would pop up after inserting the Udisk.
- Udisk pop-up flag file: Create a blank text file in the root directory of the U disk, named "download.dat", and the screen could pop up after inserting the U disk.
Udisk pop-up interface
The interface of the Udisk pop-up is 5004 built-in screen. If the pop-up interface is not operated within 10s of the pop-up, it will be closed automatically.

- Project: Enter the download project interface.
- Firmware: Enter the download project interface.
- Backstage: Enter the backstage directly.
- Exit: Close the pop up screen.
FTP server

Enable method: "Project parameter" → "Extend" → check "FTP service".
Usage:
- Enter "ftp:// + the IP address of the HMI" in the folder address bar.

- You can also enter “ftp://ftpuser:000000@192.168.39.242” to access the interface directly (with a username and password).

- If the ftp service is enabled, it will prompt for a username and password, and if not, it will prompt that the connection to the server cannot be established.

- Enter the username and password as configured in the project.

Description of folder and permission
- AlarmFile is alarm record. It can only download files(HMI to PC), but cannot upload files(PC to HMI).
- DataLogFile is data log record. It can only download files(HMI to PC), but cannot upload files(PC to HMI).
- RecipeFile is recipe. It can only download files(HMI to PC), but cannot upload files(PC to HMI).
- UserMgrFile is operation record. It can only download files(HMI to PC), but cannot upload files(PC to HMI).
- Sdcard is the mounting directory of SD card. There will be the subdirectory of S1, S2, S3, etc. when connected SD card. It can upload and download.
- Udisk is the mounting directory of USB flash drive. There will be the subdirectory of U1, U2, U3, etc. when connected USB flash drive. It can upload and download.
Maximum number of connections: up to 5 clients can be supported to access the interface at the same time.
Password modification: Use the changePsd function in the lua function ftpserver library to modify password.
- Prototype: ftpserver.changePsd(oldPsd,newPsd)
- Function: change the login password of ftpserver
- Parameters:
- oldPsd(string) old password
- newPsd(string) new password.
- Format: only letters, numbers and underscores are allowed, and the length must be 6 to 8 digits.
- Returns.
- Success: true
- Failure: nil,err
Security
Security means objects and screen security, but this function is only available in 3000i series and HMI+ series or above.
Only when object password is set,object password function could be used in object.

Objects password
Users should enter password to access the protected object. This could avoid some misoperation on object. There are 12 levels in object password setting, and each level corresponds to each password.

Enable object password: Check it to enable object security function. There are 12 levels corresponding to different passwords. The password of levels is set by the highest level.
- Passwords for levels: It is used to set password for every level, it is composed of numbers and letters (case sensitive)within 8 digits.
- Start level: It is used to set initial level while this function is enabled.
- Highest level: It is used to set how many levels of password could be used.
- Independent password:
- Unchecked: You should enter the corresponding level password when unlocking each level of object, and the higher level password could unlock the lower level object.
- Checked: You could only type the corresponding level password when unlocking each level of object.

- The configured password could not be empty, otherwise, when users close the configuration screen, there will be an error: "Please set password for level".
- If configured object password level is higher than highest password setting in Project Settingss, there will be an error note during compiling: "The security level of this object is out of range!" . Users need to set password level again to solve the problem.
Screen Lock
The screen lock function provides another way for the security of HMI operation. When clients do not perform any operation for a set period of time, the HMI screen would be locked, and the password is required when HMI is operated again.

- Screen lock: Check it to enable this function.
- Password: this password is used for unlocking screen, it is composed of numbers and letters (case sensitive) within 8 digits.
- Lock time: It is used for setting time how long the screen will be locked if users do not operate, range: 1 to 240 minutes (integer).
LAN Monitoring Security

In the same Local Area Network, user can enter the IP of the HMI on the webpage to achieve LAN monitoring of the HMI
The terminal access number of remote monitoring or LAN monitoring for each series of HMI models is limited, as following table shows:
| Model | System Version | LAN Monitoring | Remote Monitoring | Supported visits number |
|---|---|---|---|---|
| 3000 | HMI V2.0 | ✔ | × | 1 |
| 3000i | HMI V2.0 | ✔ | × | 1 |
| 3000ie | HMI V2.0 | ✔ | × | 1 |
| 3000ig-O | HMI V2.0 | ✔ | × | 1 |
| 3000ig/3000ig-C | HMI V1.0/HMI V2.0 | ✔ | ✔ | 4 |
| 8000 | HMI V1.0/HMI V2.0 | ✔ | ✔ | 4 |
| 8000ig | HMI V1.0/HMI V2.0 | ✔ | ✔ | 4 |
| 9000 | HMI V1.0/HMI V2.0 | ✔ | ✔ | 4 |
After this function is enabled, user name and password need to be entered for LAN monitoring, which can avoid some uncontrollable security problems to a certain extent;
Webpage monitoring:
After enable this function, when user input IP to access HMI, you need to enter the user name and password configured by HMI in the login interface first, and then you can access after verification(The login interface supports switching language between Chinese and English, the default is Chinese)

If it is not configured this function in the project, it also can modify from the background interface.
System->Extend

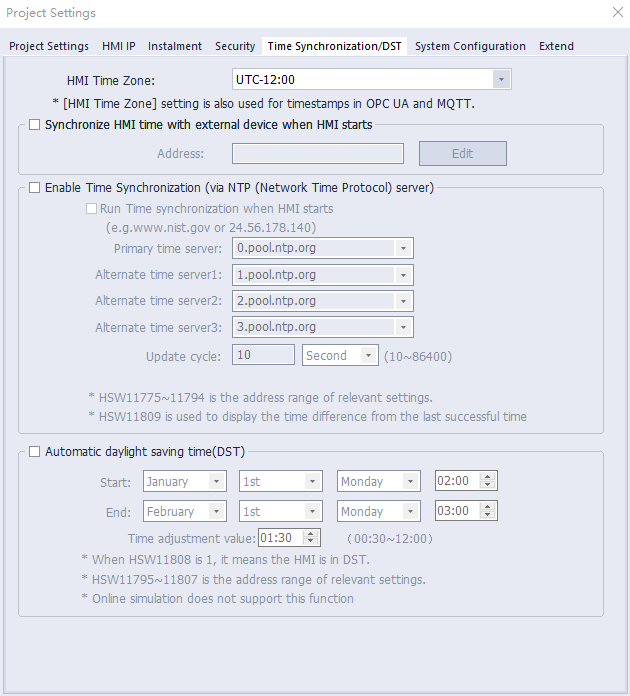
Time Synchronization/DST
To accommodate regional time differences and daylight saving time in some areas, PI provides an NTP time update function. This function allows users to configure the HMI display time as needed and automatically adjusts to daylight saving time.
PI offers two configuration methods: tool configuration and special register configuration.
Tool configuration
Project Setting →Time Synchronization/DST
- HMI Time Zone: Customize the device's time zone. Once configured, the system time zone will be changed to the user-selected time zone.
- Synchronize HMI time with external device when HMI starts: After enabling, select the first address to store time information. After configuration, read six consecutive addresses representing year, month, day, hour, minute, and second.
- Enable Time Synchronization:
- Run Time Synchronization When the HMI Starts: Performs a time synchronization immediately upon device startup.
- Primary Time Server : The first time server is required and the others are optional. IP can be customized. The drop-down list shows commonly used time servers.
- Update cycle: After the project is downloaded to the device, the update interval is in seconds. The HMI will synchronize the time every update interval.
- Automatic daylight saving time(DST):
The start and end times can be set for daylight saving time. During the daylight saving time period, the device time will be adjusted forward by the time adjustment value.
For example:
Register Configuration
Except for the time zone and server IP address, all other configurations can be modified through registers.
Registers corresponding to the relevant configurations:
| Special Register | Function | Remark | |
| HSW11775 | Enable NTP | 1: Enable 0: Disable | |
| HSW11776 | Immediate time synchronization | 1: The device will synchronize its time immediately after powering on. 0: The device will not synchronize its time immediately after powering on, but will synchronize its time after the update cycle has expired. | |
| HSW11777 | Primary time server IP (required after NTP is enabled) | Primary time server IP high word 1 | |
| HSW11778 | Primary time server IP high word 2 | ||
| HSW11779 | Primary time server IP high word 3 | ||
| HSW11780 | Primary time server IP high word 4 | ||
| HSW11781 | Alternate time server1 (optional) | Alternate time server1 IP high word 1 | |
| HSW11782 | Alternate time server1 IP high word 2 | ||
| HSW11783 | Alternate time server1 IP high word 3 | ||
| HSW11784 | Alternate time server1 IP high word 4 | ||
| HSW11785 | Alternate time server2 (optional) | Alternate time server2 high word 1 | |
| HSW11786 | Alternate time server2 high word 2 | ||
| HSW11787 | Alternate time server2 high word 3 | ||
| HSW11788 | Alternate time server2 high word 4 | ||
| HSW11789 | Alternate time server3 (optional) | Alternate time server3 high word 1 | |
| HSW11790 | Alternate time server3 high word 2 | ||
| HSW11791 | Alternate time server3 high word 3 | ||
| HSW11792 | Alternate time server3 high word 4 | ||
| HSW11793 | Update cycle | Update cycle high order | |
| HSW11794 | Update cycle low order | ||
| HSW11795 | Daylight saving time | 0: Enable daylight saving time 1: Disable daylight saving time | |
| HSW11796 | Time adjustment value | Hour | |
| HSW11797 | Minute | ||
| HSW11798 | Month when daylight saving time starts | Valid range: 1-12 | |
| HSW11799 | Which week of the month will Daylight Saving Time start | Valid range: 1-5 | |
| HSW11800 | Day of the week when daylight saving time begins | Valid range: 0-6 (0 represents Sunday) | |
| HSW11801 | The hour when daylight saving time starts | Valid range: 0-23 | |
| HSW11802 | The minute when daylight saving time starts | Valid range: 0-59 | |
| HSW11803 | Month when daylight saving time ends | Valid range: 1-12 | |
| HSW11804 | Which week of the month will Daylight Saving Time end | Valid range: 1-5 | |
| HSW11805 | Day of the week when daylight saving time ends | Valid range: 0-6 (0 represents Sunday) | |
| HSW11806 | The hour when daylight saving time ends | Valid range: 0-23 | |
| HSW11807 | The minute when daylight saving time ends | Valid range: 0-59 | |
| HSW11808 | State of daylight saving time | 1 , it is in daylight saving time 0 , it is not in daylight saving time | |
| HSW11809 | Time difference since the last successful time synchronization | Unit: Second |
Font pack
"Font pack" is for setting built-in font for HMI project, in this way, the text in some objects of the HMI could be displayed in the desired font.
Operating Procedure
- Click the button to open setting window.
- Check "Change Built-in font".
- If all the 8 languages use the same font, please click "Set all" to open setting window as below show.

- Select font as picture shows.

- Click “OK” to save settings.
Result
- The built-in font of language 1 will be Arial.
- The built-in font of language 2 will be Calibri.
- The built-in font of language 3 will be Bodoni MT.
- The built-in font of language 4 will be Comic sans MS.
- The built-in font of language 5 will be Centaur.
- The built-in font of language 6 will be SimHei.
- The built-in font of language 7 will be Times New Roman.
- The built-in font of language 8 will be Bauhaus 93.
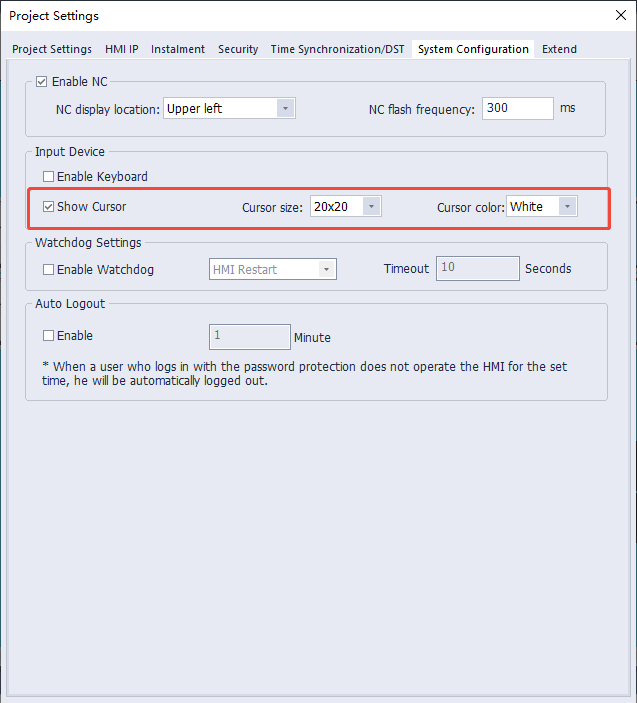
System configuration
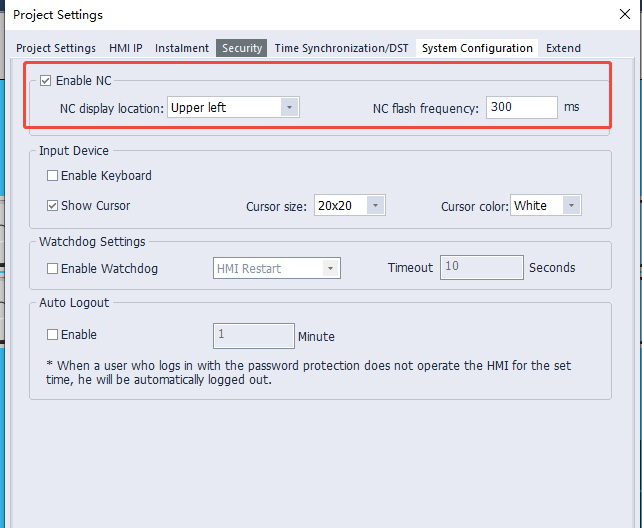
NC
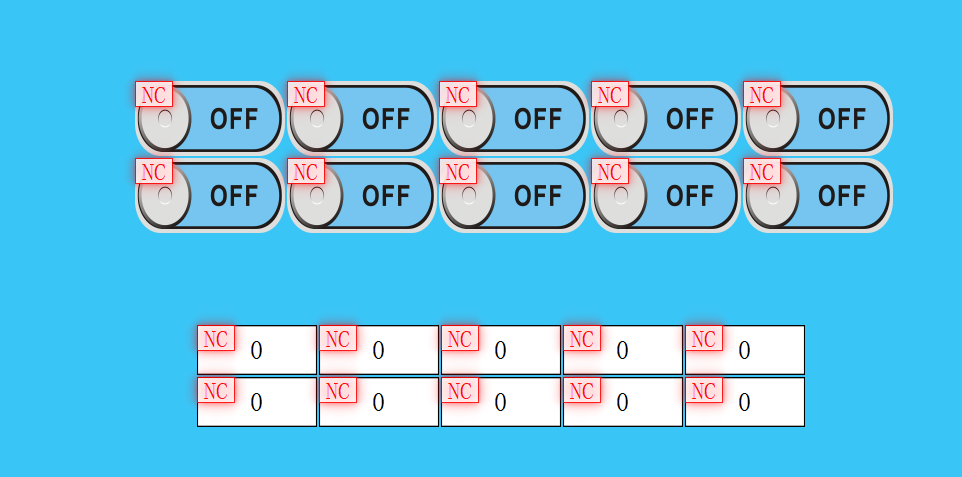
1. Enable NC(Non-Communication Timeout) : When communication address is timeout , the corresponding address will display a NC, making it easy to quickly identify which control's address has timed out.
2. NC Display Position: Configure the NC display position.
3. NC Flashing Frequency: Configure the NC flashing frequency; the default is 300ms, and the range is 0 to 65536ms, with 0ms indicating constant on.
The effect is shown below:
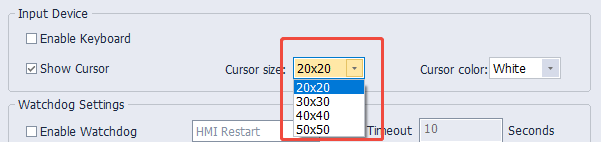
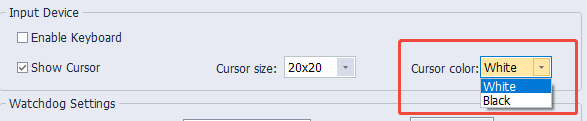
Cursor style
Mouse cursor style settings, appropriate mouse can be chosen according to the device resolution. Four sizes and two colors can be selected.