WECON
WECON
LX3 Series
Supported series: WECON LX2V/ LX2E/ LX3V/LX3VP/LX3VE/LX3VM
HMI Settings
| Item | Settings | Note |
|---|---|---|
| Protocol | WECON LX2V/ LX2E/ LX3V/LX3VP/LX3VE/LX3VM | |
| Connection | RS422/RS485 | |
| Baud rate | 9600 | |
| Data bit | 7 | |
| Parity | EVEN | |
| Stop bit | 1 | |
| PLC station No. | 1 |
Address List
| Type | Device registers | HMI registers | Range | Note |
|---|---|---|---|---|
| Bit | X | X OOOOOO | 0~303237 | |
| Y | Y OOOOOO | 0~303237 | ||
| M | M DDDDD | 0~99999 | ||
| T | T DDDDD | 0~99999 | ||
| C | C DDDDD | 0~99999 | ||
| SM | SM DDDD | 8000~9999 | ||
| S | S DDDDD | 0~99999 | ||
| Lamp | Lamp D | 0~0 | Communication indicator | |
| Word | X | X OOOOOO | 0~303237 | |
| Y | Y OOOOOO | 0~303237 | ||
| M | M DDDDD | 0~99999 | ||
| T | T DDDDD | 0~99999 | ||
| C | C DDD | 0~199 | ||
| D | D DDDD | 0~7999 | ||
| S | S DDDDD | 0~99999 | ||
| SD | SD DDDD | 8000~9999 | ||
| CMOD | CMOD D | 0~1 | ||
| CMSI | CMSI D | 0~1 | ||
| Double Word | CH | CH DDD | 200~255 | C200~234: 32-bit Counter C235~255: High Speed Counter |
Cable Wiring
- RS485

- RS422

✎Note:
- HMI COM3 is available in PI8000 series and COM3 is in COM2(hardware PIN 7 and PIN 8) .
- If PLC <= 20 points,such as LX3V-1208/LX3V-0806 PLC,PLC RS485A and RS485B mean PLC COM2 RS485+ and RS485- .PLC COM2 can support modbus. Please refer to PLC COM2 setting manual.
https://drive.google.com/drive/folders/13rgso7oUlatZQN_SNEcJCcN4toEdDPoP?usp=sharing
HMI settings
Download PIStudio Software
Please visit the link below to get the latest version PIstudio for HMI programming:
Create a new HMI project connect with PLC
Check the link below for the video to show you how to get started with a new project
For more videos, please visit our Youtube channel: http://www.youtube.com/user/Wecon2004/videos
General
HMI could communicate with PLC and support many PLC protocols. It is easy to operate and set communication parameters. This demo shows how to make a communication with PLC device, use WECON LX3V Series PLC as an example.
Protocol settings
The communication between two devices requires a protocol. The following contents show the steps of protocol settings.
Please select the protocol, when creating a new project.
- Select the COM port for communication;
- PLC type: It means PLC brand, like WECON;
- PLC model: It shows the model of PLC, such as LX3V;

If you want to change the protocol for existing project, please click [Program] → [Communication] to open the [Communication] windows, shown as the following figure.

The steps to change the protocol for project are as follows.
- Click [Setting] to open the [Communication device] window;
- Select communication port, such as COM1;
- Select Serial port for communication, such as RS422;
- Select device type (device brand), such as WECON;
- Select the protocol for communication, such as WECON LX3V;

Parameter settings
The parameters settings are in [Communication] window, shown as following below.
- Click [Setting] to open the [COM port setting] window;
- Set the parameters such as [connection], [Baud rate] and so on;

- Click [Setting] to open [Timeout] setting window, you could set the parameters according your requirements, or just use the default value.

Set PLC address in HMI screen
- Place the objects to HMI screen;
- Double-click the object to open the setting window;
- Click “Edit” to open the address setting windows;
- Connection: select the serial port in HMI;
- Address type: All the PLC address types will be display in this list, such as M;
- Address No.: Please input the number of this address, such as 0;

HMI Compilation Download

Communication cable
In order to ensure the stability of communication, please use the twisted-pair communication cable with good grounding. The following figure shows the pin out definition.

HMI communication PLC use Modbus
- HMI setting: https://docs.we-con.com.cn/bin/view/PIStudio/12.PLC%20protocols/
- PLC setting: https://docs.we-con.com.cn/bin/view/PLC%20Editor/8.1.%09Communication/
PLC settings
Download PLC Software
Please visit below link to get the latest version PLC Editor for HMI programming
- LX3V:Download link
- LX5V:Download link
Start a new PLC project
Start a new PLC project by clicking “New” on the left top corner of screen, select the PLC mode from the drop-down list.

Add a new instruction
Double click on the ladder, select the ladder symbol (instruction) from the drop-down list, then enter the address for this symbol.

You could also select the ladder symbol from the menu bar directly.

Add comment to PLC program

Add the statement to PLC program
Add the statement by single click on “Statement”, when finished, single click on “Statement” again to go back to Ladder edit.

Compile
You need to compile the PLC program before downloading or running Off-line simulator. The background color will be changed from purple to white when there is no error.

Download setting
Click on “Transfer Setup” to select download mode.
 Download PLC program to PLC
Quick select the parameters and main program of PLC program, then download to PLC, “Yes”-”Yes”-”OK”

Upload PLC program from PLC
Read the PLC program from PLC to computer.

Device monitor
Monitor the value of certain address in PLC, double click “Current value” to change the value in this address.

Online monitor
Monitor the each address in PLC by online monitor. Changing the state or value in PLC is also allowd.

Monitor edit
In this mode, you could edit the PLC program during PLC is running.

LX5V Series
This example introduces the establishment of serial port communication between Wecon HMI and LX5V, including three parts: PLC software configuration, HMI software configuration, and hardware wiring.
Software configuration of PLC
PLC programming software

New PLC project
Click "New Project" and select the PLC model.

HMI software configuration
HMI programming software

New HMI project
Click New Project and select the HMI model.

Set communication port parameters
Click the communication configuration button on the left to find the communication protocol with LX5V. After selecting the protocol, configure the communication parameters of the COM port.
- Baud rate:115200
- Data bit:8
- Stop bit:1
- Parity:No verification

hardware connection
Hardware wiring diagram
This example introduces WeconHMI with LX5V PLC to establish communication through serial port. The connection diagram is as follows:


The above are all the steps for establishing serial port communication between Wecon HMI with LX5V PLC.
LX5V-N Ethernet
This example introduces the establishment of Ethernet communication between Wecon HMI and LX5V, including three parts: PLC software configuration, HMI software configuration, and hardware wiring.
Software configuration of PLC
PLC programming software

New PLC project
Click New Project and select the PLC model.

Set Ethernet port parameters
Follow the steps below to configure Ethernet parameters
- PLC IP address:192.168.39.200
- default gateway:192.168.39.1
- subnet mask:255.255.255.0

Registers list

HMI software configuration
HMI programming software

New HMI project
Click New Project and select the HMI model.

Set communication port parameters
Click the project setting button on the left to configure the IP address of the HMI machine to ensure that the HMI and PLC IP remain in a local area network.
- HMI IP address:192.168.39.201
- Default gateway:192.168.39.1
- Subnet mask:255.255.255.0

Next, click Communication Settings to configure the IP of the HMI communication object.

Hardware connection
This example introduces WeconHMI with LX5V-N PLC to establish communication through ethernet. The connection diagram is as follows:

The above are all the steps for establishing ethernet communication between Wecon HMI with LX5V PLC.
LX6V Ethernet
HMI Setting
| Items | Settings |
|---|---|
| Protocol | WECON LX6V EtherNet/IP |
| Connection | Ethernet |
| Port No. | 33818 |
| Device No. | 1 |
| HMI No. | 0 |
Support Variable Type
| Data Type | PIStudio Data Format |
|---|---|
| BOOL | Bit |
| BYTE | 16-bit Unsigned/Binary/BCD/Hex |
| WORD | 16-bit Unsigned/Binary/BCD/Hex |
| DWORD | 32-bit Unsigned/Binary/BCD/Hex |
| LWORD | 64-bit Signed/Binary/BCD/Hex |
| SINT | 16-bit Signed/Binary/BCD/Hex |
| USINT | 16-bit Unsigned/Binary/BCD/Hex |
| INT | 16-bit Signed/Binary/BCD/Hex |
| UINT | 16-bit Unsigned/Binary/BCD/Hex |
| DINT | 32-bit Signed/Binary/BCD/Hex |
| UDINT | 32-bit Unsigned/Binary/BCD/Hex |
| LINT | 64-bit Signed/Binary/BCD/Hex |
| REAL | 32-bit Float |
| LREAL | 64-bit Float |
PLC Setting
PLC programmer software

Create and Export the Freetags
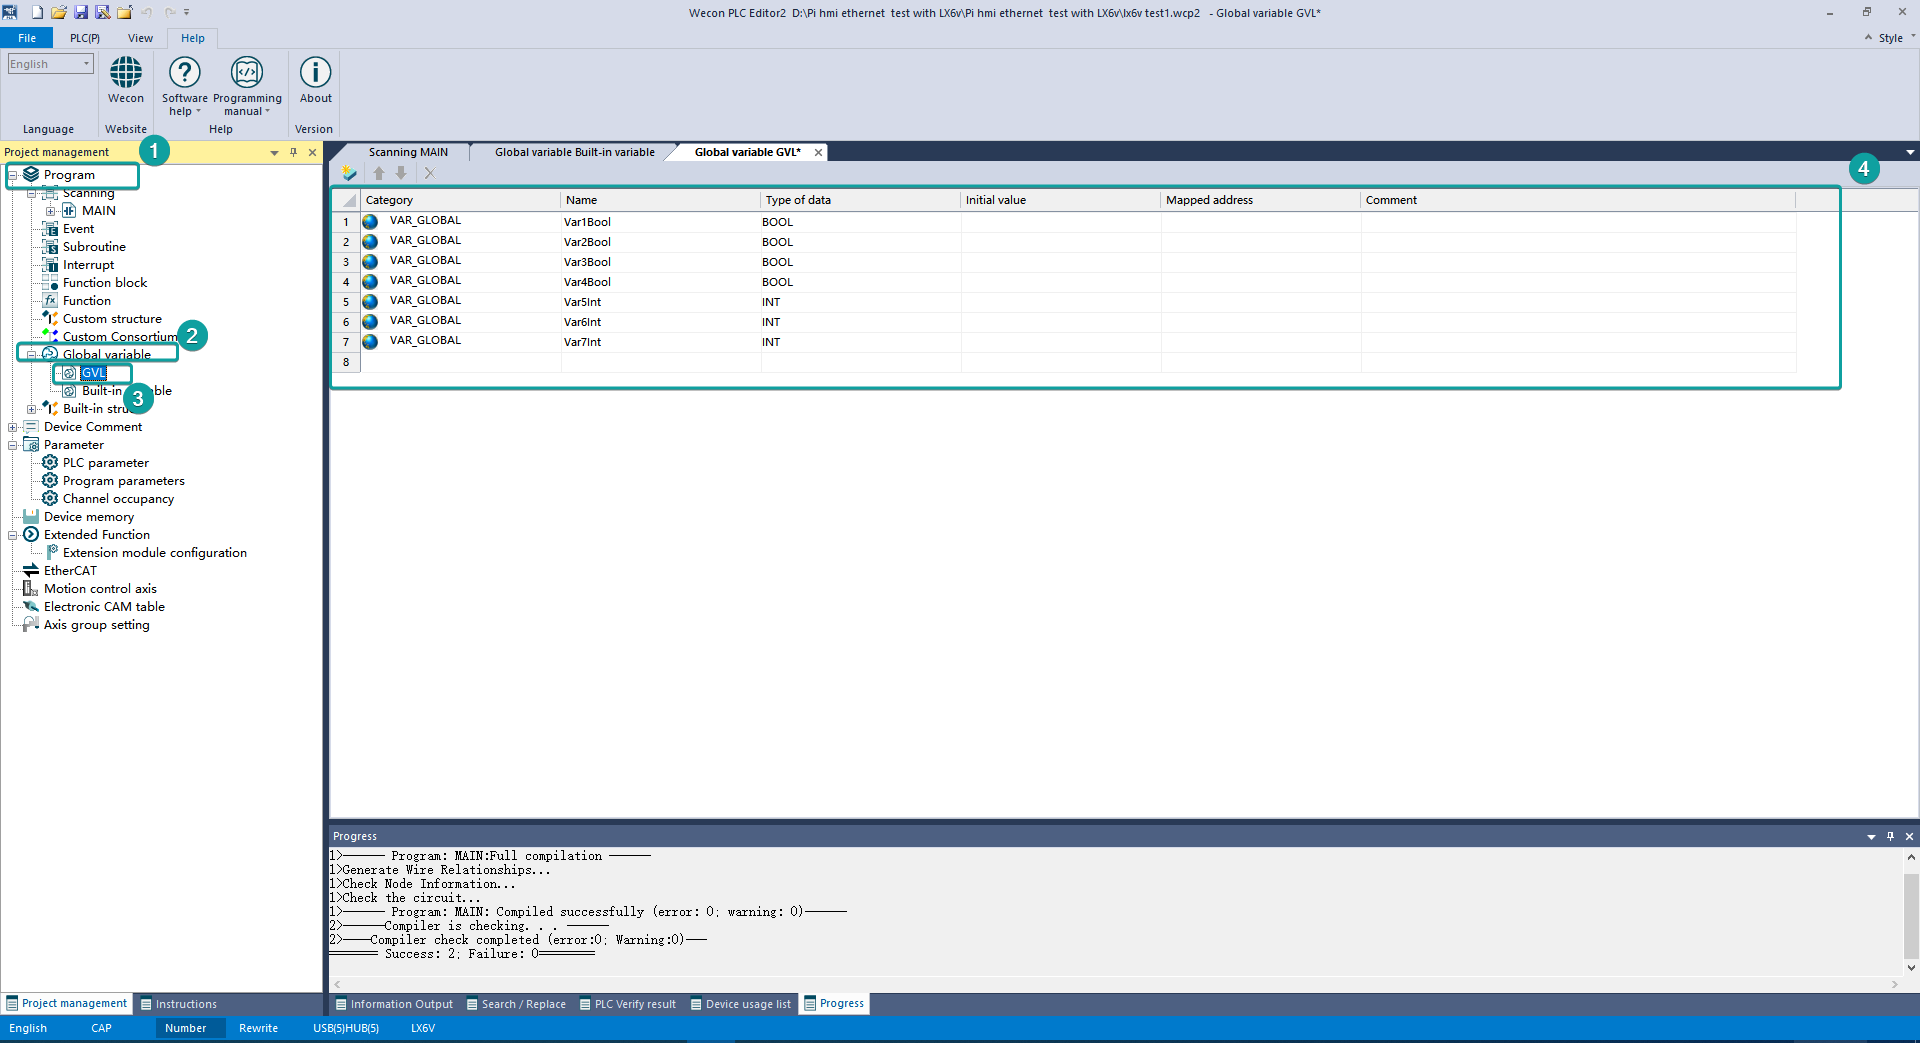
①[Program]→[Global variable]→[GVL]→Create the Freetags you need,notice the Category and Type of data

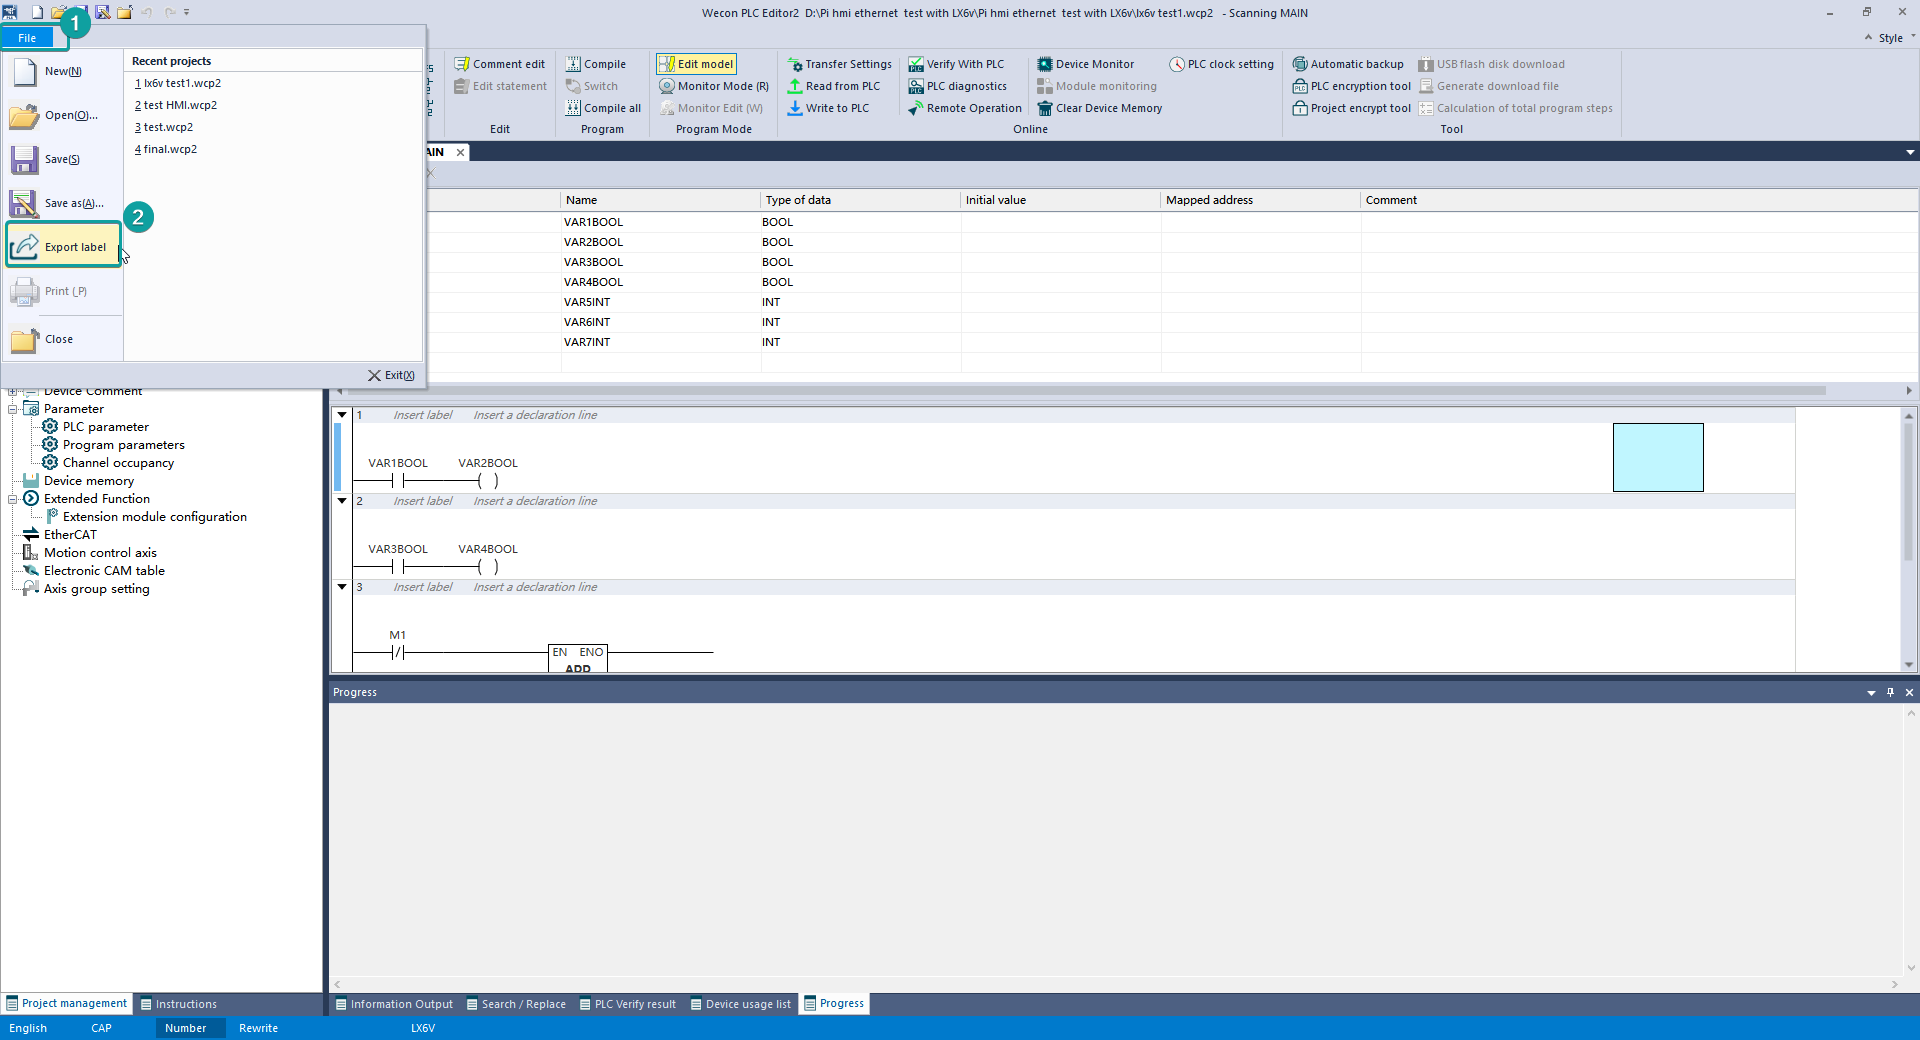
②[File]→[Export label]

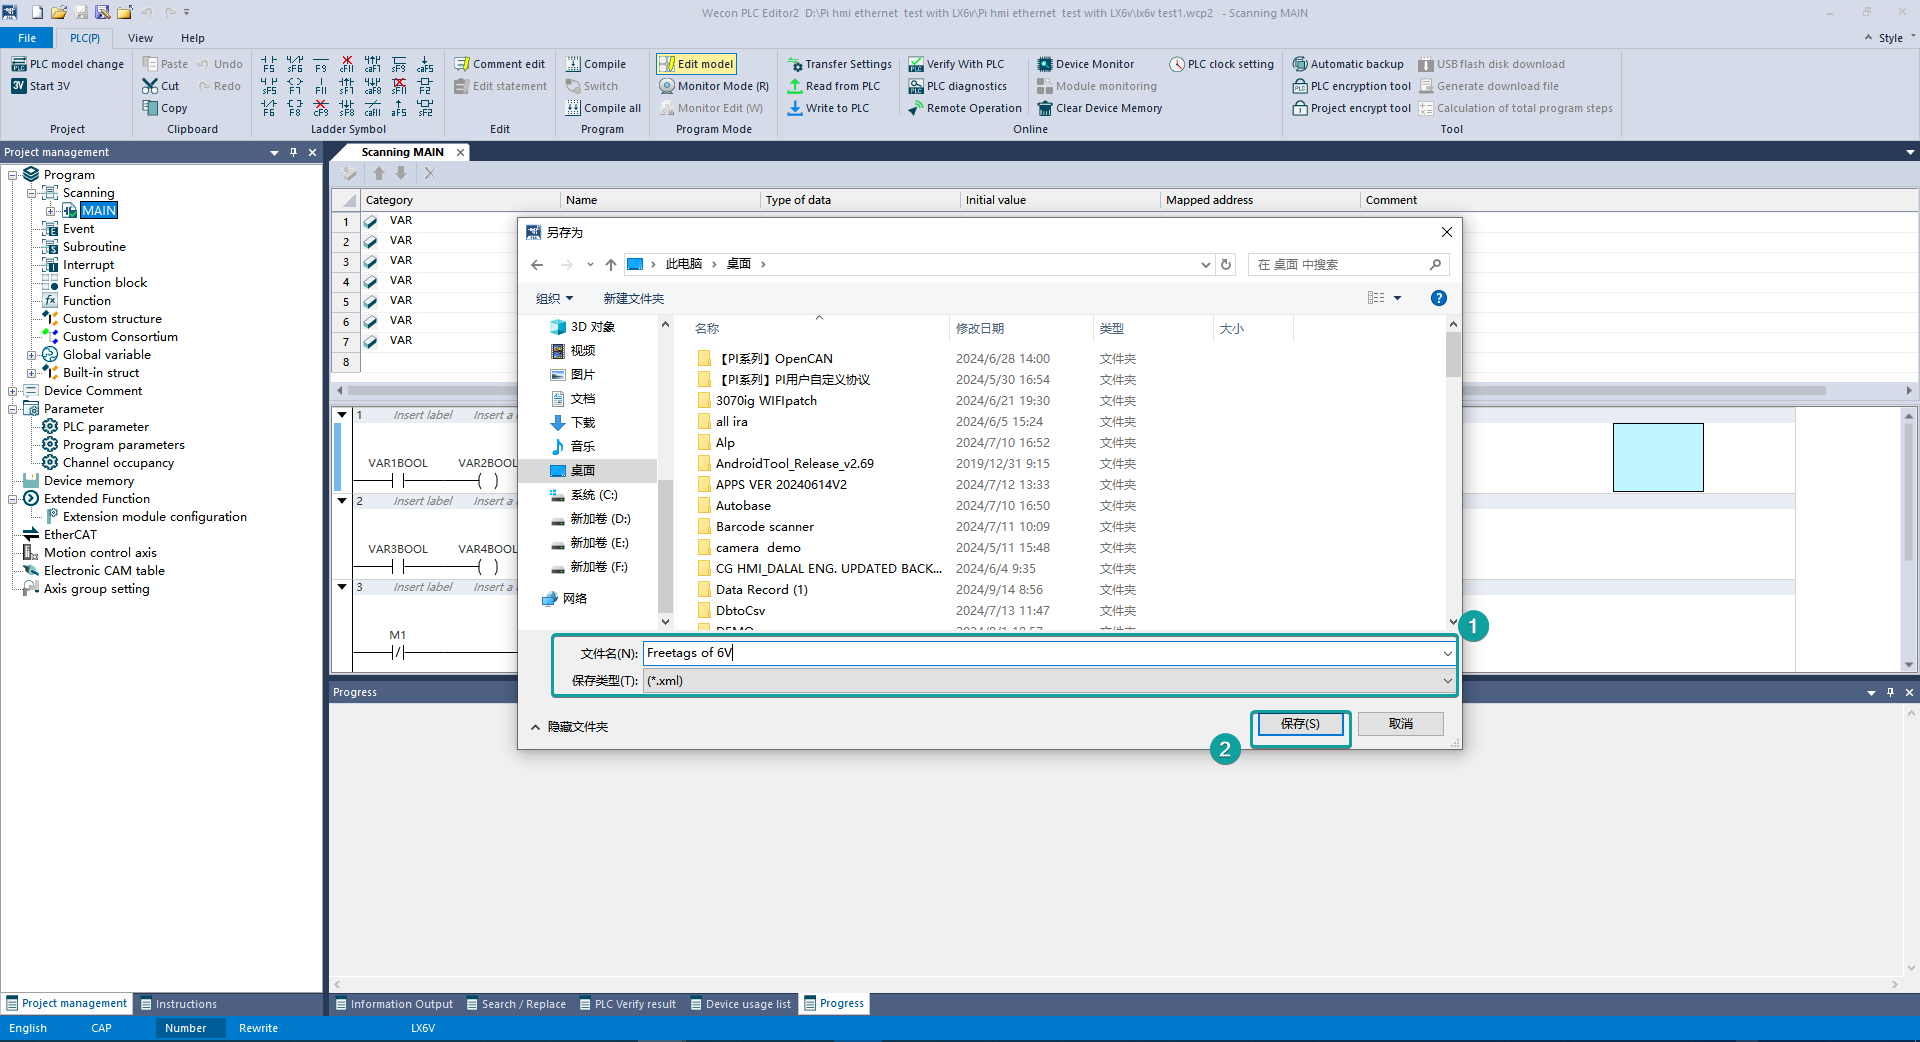
③Set the Name and Type→[Save]→[OK]

HMI Setting
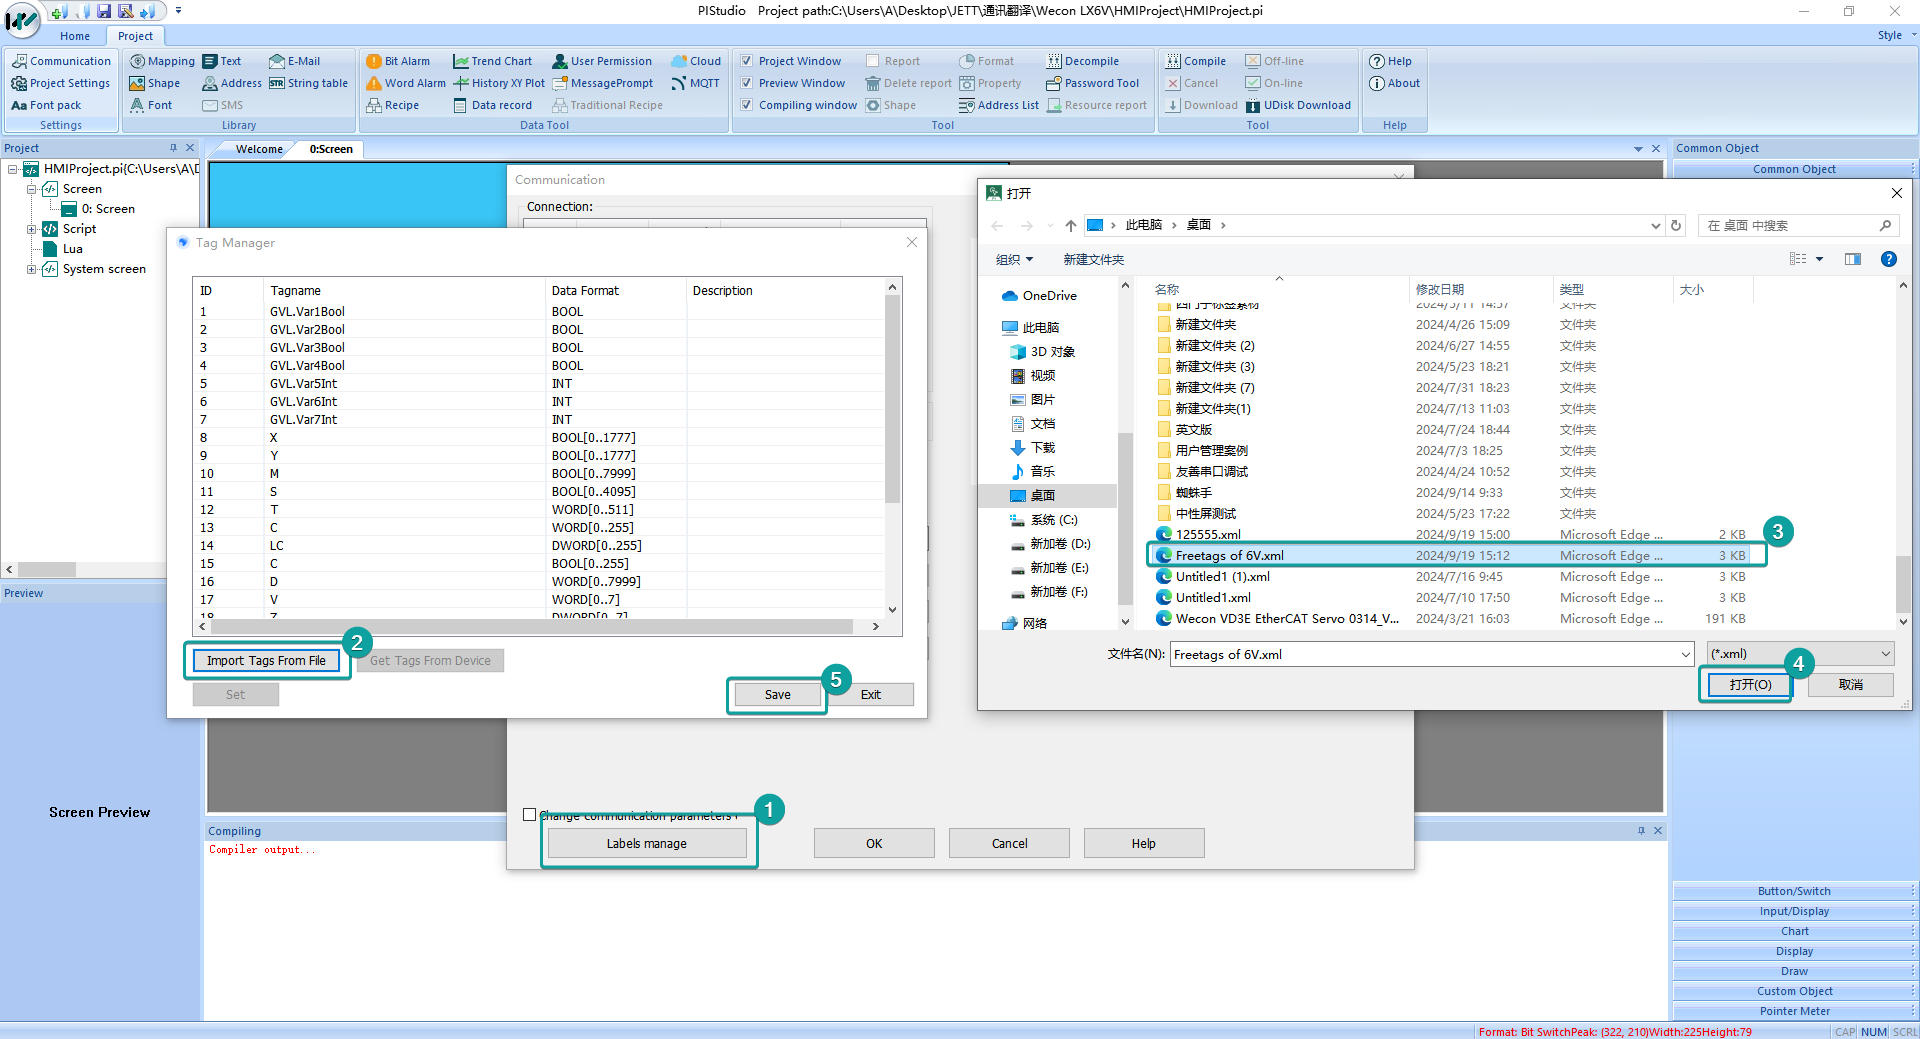
Tags import
[Labels manage]→[Import Tags From File]→Choose the .CSV file you need→[Open]→[Save]→[OK]

